It’s MARKER geek MONDAY!

Hiya sistahs!

Here’s today’s Marker Geek Monday!  Enjoy!


Since Spring is here I thought it would be a good time to share some Copic colour combos for the Woodsies range from Stamping Bella. I absolutely love these little characters, they are so soft and sweet yet full of that character and fun we all love Stamping Bella for.


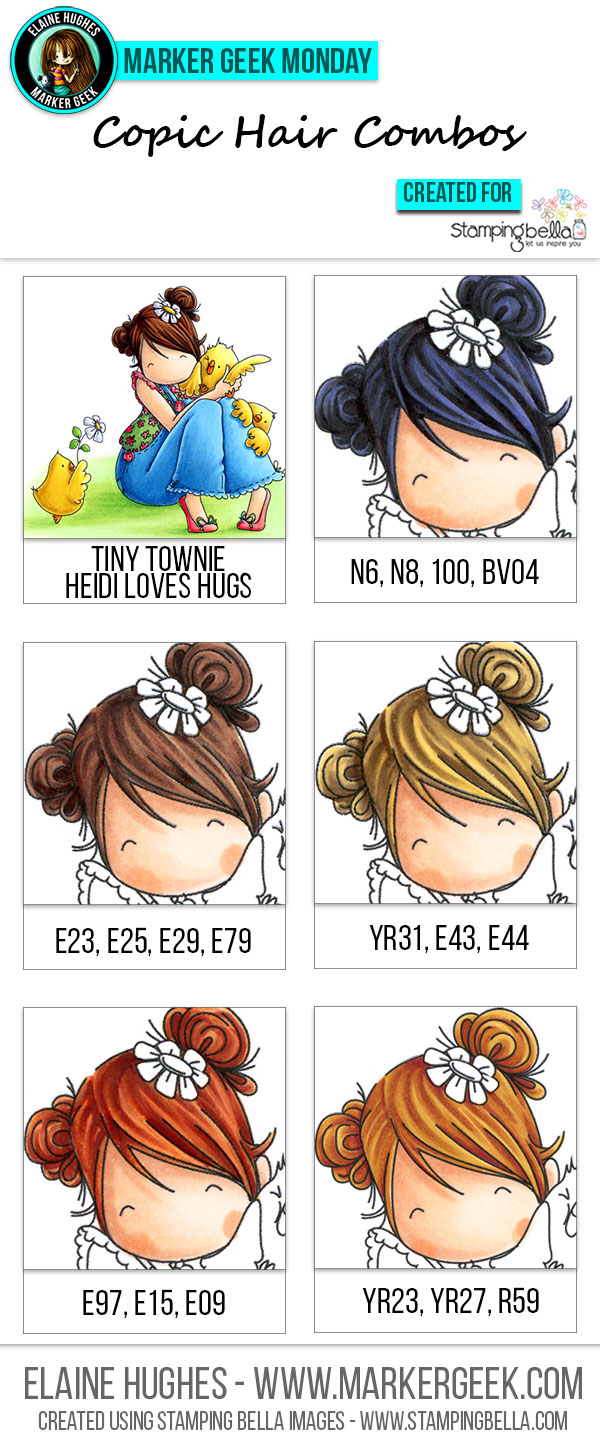
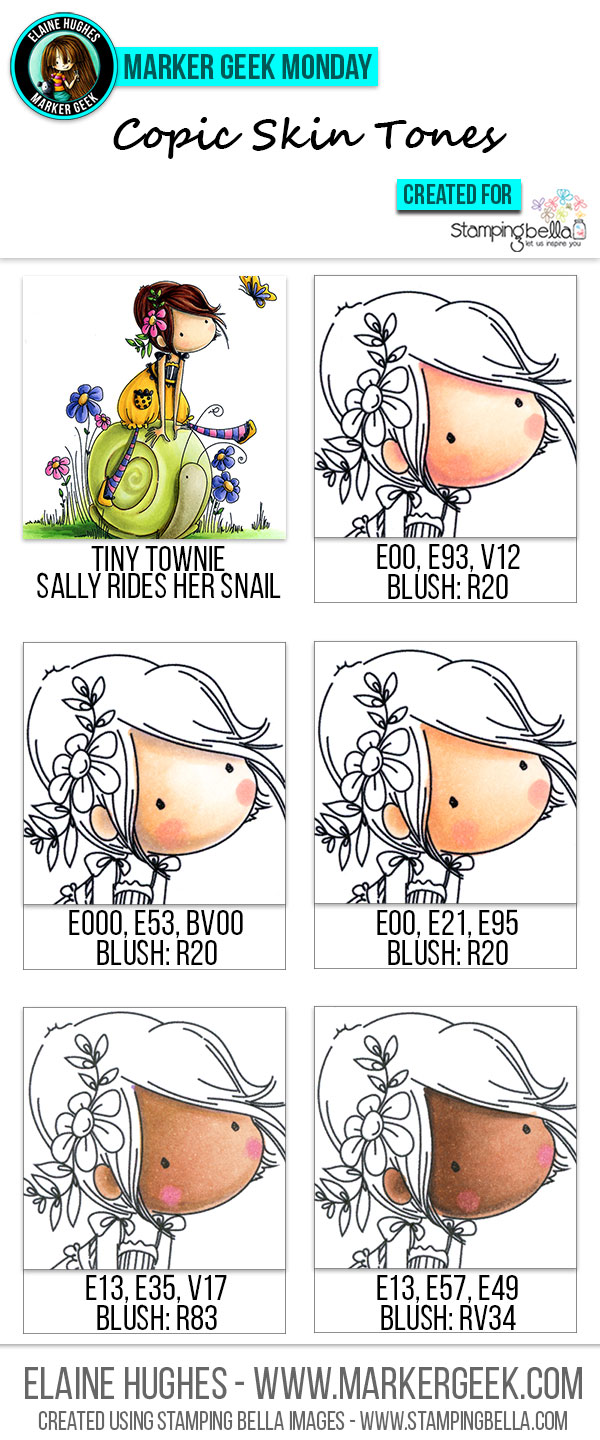
The graphic below shows five different combos for colouring the adorable Petunia seen in the Especially For You Petunia stamp. Of course, these work for any piggy image, including the other Woodsies images and the Stuffies range too.


march 28


You will notice that I don’t necessarily stick to colour families when colouring with alcohol based markers like Copics. By playing and mixing shades from different groups you can get a greater variety of results. Learning what works is a case of trial and error, and a good colour chart like Sandy Allnock’s Hex Chart really helps too (I’ll talk in depth about this in a future post, but go grab one – it is a great investment for Copic colouring).


I’d like to take this opportunity to remind you that your results will look different from mine. Not just because digital representations of colour will not be an exact match for “real life”, but because your results will be affected by a variety of factors: the paper you use, how heavily you lay down colour, the amount of layering you do, the order in which you use the colours etc. The aim of these posts is not to get you replicating my results, but to encourage you to try different combinations, play with your markers and gain more confidence in experimenting. The more colouring you do, the more colours you play with and combine in different ways, the better you will become at colouring in your own style!


Have a go and let us know how you got on by sharing your work here in the comments section, over in the Stamping Bella Sistahood chat group on Facebook, directly on the Stamping Bella Facebook page or on Instagram by using the tag #markergeekmonday . You are also welcome to share your own favourite combos. We love hearing from you and sharing the enthusiasm for Stamping Bella!


MWAH!


~Elaineabella

it’s Elaineabella’s MARKER GEEK monday!

I love Marker Geek mondays.. do you?  If you do, just take a mo’ (i love that..) to leave a comment down below.. I’m sure it would make Elaineabella feel so good 🙂

Here we go!

There’s more than one way to skin a cat ahem… colour a bear! I’m here to share three simple ways to colour one of Stamping Bella’s adorable Stuffie images. Today’s Marker Geek Monday graphic features Harry the Stuffie Gets Happy Mail . I have coloured him using Copic Markers, but the techniques discussed should work for any alcohol based markers that you have. I have supplied the Copic marker combination I used in the graphic below for those of you that do have Copics.


march21


The first example is, as noted, just coloured and shaded with markers as normal with no special techniques. There is absolutely nothing wrong with colouring your Stuffies or other similar images this way, they look just as adorable like this, but it’s fun to play right? 😉


The second example shows Harry the Stuffie coloured in the same way as the first example, then textured with colourless blender solution (I simply used a Copic Colourless Blender refill) on a piece of textured fabric. The technique is really simple, you apply the colourless blender to the fabric, test and dab off excess on a piece of scrap paper then gently apply to the coloured image.


  • Leave colouring of areas like Harry’s nose to the end, to avoid accidentally adding texture where it isn’t desired!
  • Go lightly and gently, it is better to build up the texture by going back in stages than it is to go heavy with the colourless blender solution and end up with a blotchy mess!
  • Experiment on a piece of scrap paper – see how long you need to hold the fabric to the paper to get the desired effect (not long – tap/dab and wait a few secs as the blender solution works its magic).
  • This colourless blender technique works by pushing the colour around to create light areas. Test out some different fabrics to get different results. I used 16ct aida cross stitch fabric, but a textured rag/flannel works well too. Play around with what you have on hand.


The third example is quite therapeutic and uses just your markers to create a textured look that works really nicely for Stuffies!


  • Rather than colouring with a flicking motion or in smooth circles, try using a loose squiggly motion.
  • Practice on a piece of scrap paper.
  • Create a base with your lightest shade, then using your darkest shade create some dabs and squiggles. Don’t think about it too much, be loose and fairly free with it (practice really helps with this). Work back down from your darkest shade to the lightest, and repeat where necessary. The idea is to create a smooshy, plushy look.
  • You can add extra definition and depth to shadow areas at the end.


That’s it! These are by no means the only ways to colour your Stuffies, but hopefully the examples shown will give you some inspiration to play! Have a go and let us know how you got on by sharing your work here in the comments section, over in the Stamping Bella Sistahood chat group on Facebook, directly on the Stamping Bella Facebook page or on Instagram by using the tag #markergeekmonday . We love hearing from you and sharing the enthusiasm for Stamping Bella!


MWAH!


~Elaineabella

it’s MARKERGEEK MONDAY!

Hiya sistahs!  What a great start to the week DONTCHA THINK??

Welcome to Elaineabella’s AKA Markergeek’s blogpost today.. isn’t she awesome?

Last Monday we covered some Copic skin tone combinations and basic colouring tips, so it seemed logical to move on to hair this week! But before we get started, I’d like to say a big thank you to everyone for their lovely comments and enthusiasm following the first post! I really hope that these posts prove useful and inspire you to give those markers a good work-out. For those of you who don’t use Copic markers, do stay tuned, there will be posts using other brands and mediums that I have available.

Remember, we want to see your results too! Share your Stamping Bella colouring and cards here in the comments section of the blog, over in the Stamping Bella Sistahood chat group on Facebook or directly on the Stamping Bella Facebook page.


In the graphic below I’ve got some of my favourite Copic hair combos for you. The lovely Tiny Townie Heidi Loves Hugs was perfect for showing hair colouring as she has some really nice open areas of hair, plus she’s one of my favourites from the latest release – so cute!


2016_stampingbella_markergeekmonday_skintones_001_web


Normally when I colour I tend to start with my lightest shade to lay a base down. With hair I quite often do the opposite, especially on images where the hair detail areas are quite small. With all of the combos shown above I worked DARK – MEDIUM – LIGHT, going back in with the medium and light shades as necessary. Keeping the layering and blending to a minimum in this way helps to prevent the issue of sticky ink which can result in patchiness when you try to correct it, or what is otherwise known as a hot mess (we’ll talk about ways to fix some of these issues another day).


With most of the Stamping Bella characters the hair areas aren’t very large, so sticking to two or three marker combos is generally the best approach. Keep it simple! As with colouring the skin tones, try and avoid doing too much layering and blending. With hair in particular you don’t need to blend out every line, the aim is to create some texture and to have enough variation in colour and depth to create interest.


The amount of layering you do, and the order in which you use the markers will affect the results you get. Play around, see what happens if you add an extra layer of your medium shade, or if you use a much lighter hand with the darkest shade. For example, the blonde combination shown above could be lighter if you use less E44, or if you start with E43 instead, and add in just a very small amount of fine detail with E44. It’s all in the experimentation!


Special Note: don’t be overwhelmed by images with curly hair as seen on the new EDNA stamps (and on Uptown Girls like Savannah has a Star), these can actually be the easiest and most fun to colour. Work with the lines provided by the illustrator to figure out where to put darker shading and be loose and a little messy, creating some variation and texture. Don’t try to create perfect uniform strokes, be a little squiggly and free, the overall effect will look great (remember, the recipient of your card isn’t likely to be analysing it up close with a magnifying glass ? ).


If you try out the marker combos in this post with your Stamping Bella stamps, be sure to share! We would love to see the results and hear how you feel about them. Show off your creations in the comments below and even better, share your own favourite hair colour combos with us. Let’s talk colour!

If you are posting your images using these combos, we would love to see them on Instagram and all the platforms mentioned above!  To make it easier for us to find you , just use #markergeekmonday as a hashtag!  If you have other favorite combos, we would love to learn from you!  Leave a comment below 🙂

MWAH!

MARKER GEEK MONDAY! New to our Blog!

Hiya sistahs,

We all know how instrumental my Design team is to me and to my company.. OUR company.  They educate da sistahood, inspire da sistahood, and have fun WITHIN da sistahood.  I am SO grateful for them all.

While Elaineabella (aka MARKERGEEK) may not contribute weekly to our Bellarific Friday line up, she is also an integral part to our group.  She colours all of our images that you see online.. she designs and provides our FREE COLORMAPS for da sistahood.. and now she is contributing to our blog every Monday with different colouring techniques that we always wondered about but never quite knew how to do.  She’s sharing her SECRET SAUCE… mmhmmm.  Are we lucky or what?

In this Tutorial, Elaineabella used TINY TOWNIE SALLY and her SNAIL

So without further ADOOOO

Let’s see what she has planned for us today!


“With so many fun character images in the Stamping Bella range, I thought a post about skin tones would be a good start to the Marker Geek Monday post series! You can apply the skin tone combinations below to any of your character stamps.


I tend to lay down colour as follows: Light – Dark/shadow colour – Medium – Light. This isn’t a hard and fast rule, and sometimes it isn’t the best approach for a particular combination (with some darker blends it can help to work from Dark to Light). The best way to find out what works for you and any particular combination of markers is simply to practice and experiment!


Skin Combos:


2016_stampingbella_markergeekmonday_skintones_001_web


Colouring Tips:?


  • Use a light hand and lay colour down gradually.  It is easier to add more colour than it is to take colour away, and you don’t want to over saturate the paper.
  • Colour in light feathered strokes/flicks rather than in a circular motion.  This will help you to avoid over saturating the paper and will make blending easier.  Practice your strokes on a piece of scrap paper and try to find a grip you are most comfortable with for holding the marker while doing this.
  • Choose a smooth uncoated paper.
  • Don’t give up too quickly! An image will go through stages of looking messy or a little weird.  Persevere and keep colouring, the image will start to take shape and come together.  Most mistakes can be fixed – this will be easiest if you use a light hand as mentioned above. In particular, don’t judge your skin tones until you have coloured the hair – your skin colouring may look too dark at first, but add dark hair colouring and it will look very different.
  • When assessing your colouring and evaluating areas that need more work, hold your colouring at arms length.  Don’t judge your image from very close up.
  • In small detail areas don’t be tempted to over-blend. Less layering will give a better result. e.g. when colouring the skinny arms and legs of Uptown Girls.
  • Varying the amount of layers or the order in which you use the colours will give different looks.


I hope this post inspires you to try out some new skin combos with your Stamping Bella images. We would love to hear from you, so join in and show off your own Stamping Bella colouring using these colours or your own favourite combos in the comments below. If you would like to share your own favourite skin combinations with Copics or other markers, go right ahead!


Join me next week for a look at some of my favourite Copic marker combinations for hair.”


MWAH!


Elaineabella