


Today Sandiebella teaches us how to make a beautiful TRIPLE TIER CARD with a Stand featuring our new TINY TOWNIES on Santa’s lap rubber stamp.


Supplies:
White card

Set the image aside.

Cut a piece of card measuring 11.5″ x 5.5″ and score on the long side at 5.5″ and 11″ (bottom tier)

Cut a piece of card measuring 10.5″ x 5″ and score on the long side at 5″ and 10″ (middle tier)

For the top tier of the card cut one piece of card measuring 4.5″ x 4.5″

Take the bottom tier card piece and, with the 0.5″ section on the right, measure down 0.5″ on the left side section. Draw a line across. Across the top, place a pencil mark at 1.5″ and 4″ and draw a line from top to bottom. Measure up 1.5″ and draw a line across.
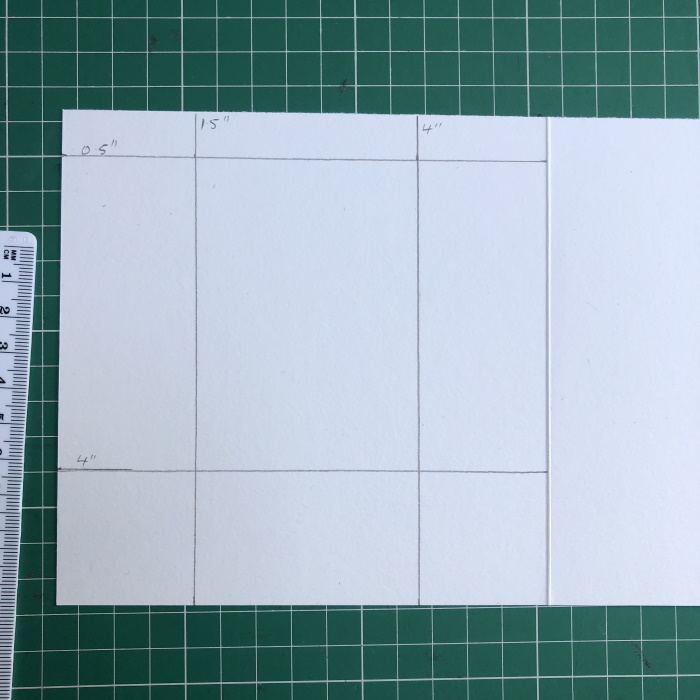
Take the middle tier card piece and, with the 0.5″ section on the right, measure down 0.5″ on the left side section. Draw a line across. Across the top, place a pencil mark at 1.25″ and 3.75″ and draw a line from top to bottom. Measure up 1.5″ and draw a line across.

If you would prefer the tiers to be tucked completely inside each other when the card is closed, move the bottom line down 0.5″ on each piece.

Using a craft knife, cut each side of the pencil line, from the 0.5″ horizontal line to the first or second horizontal line, depending on whether you want the tiers hidden. On this sample I went to the bottom line so that the tiers were completely inside one another.

Take the 0.25″ x 7″ piece of card and slip in under the centre section. Loosely fold it around and trim if necessary. Glue the ends together.

Repeat for both piece of card.

Take the 4-7/8″ x 4-7/8″ piece of card and apply DS tape around the edges. Fold the middle tier on the 5″ score line so that the outside is showing. Apply a strip of DS tape each side of the sliding mechanism. Remove all the tape backing and adhere the panel down. Repeat with the bottom tier, using the 5-3/8″ x 5-3/8″ piece of card.


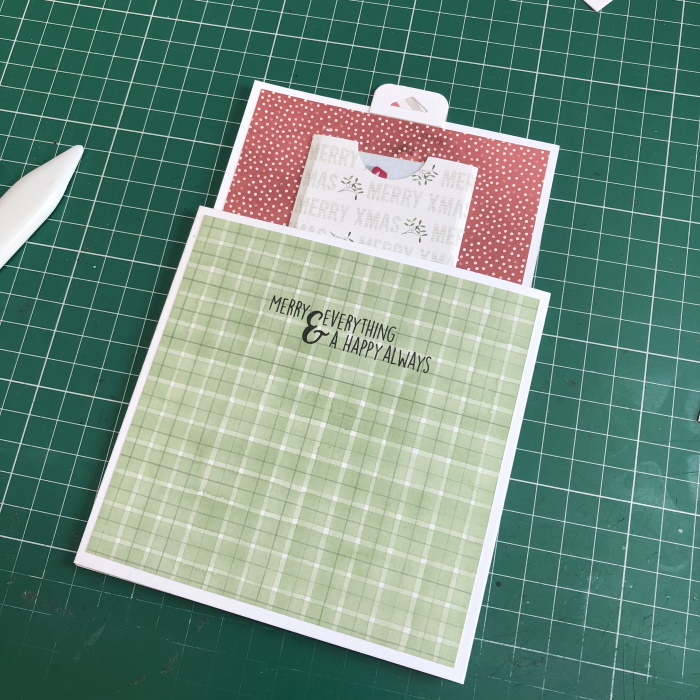
Adhere the paper with the sentiment onto the front of the middle tier and set aside.

For the top tier, cut a piece of designer paper measuring 4.25″ x 4.25″ and adhere to the 4.5″ square piece of card. If you want to add a gift card holder, measure the size of the gift card and then add 1-1/8″ extra to the width, and 0.5″ extra to the length. Score on each long side and the bottom at 0.5″


Using a small circle die, cut a semi-circle from the top of the gift card holder.

Apply adhesive to the 0.5″ sections and adhere the holder down onto the top tier, ensuring it’s towards the bottom.

Apply 1/4″ tape, or wet glue, to the sliding mechanism on the middle tier. Push the mechanism right down to the bottom of the runner.

Line the top of the top tier up with the top of the middle tier, centered horizontally across the card, and adhere it to the sliding mechanism.

Before closing up the middle tier, add a pull tab, or punch a hole and add some twine.

Apply DS tape to the outside of the 0.5″ section and lift the backing on one end. Fold the middle tier over and adhere the 0.5″ section to the opposite end, ensuring it’s behind the top tier.

Repeat the steps above to attach the middle tier to the bottom tier.


Cut layers and panels for the front of the card, and adhere them all together.

Adhere the circle panel down using foam tape and then adhere the image on top using more foam tape.

Decorate the front as desired.

This card is designed to lay flat but if you want to create a stand to display it upright, cut a piece of card measuring 4.5″ x 9.5″. Score on the long side at 3.5″, 7″, 8″ and 9″.

Mountain fold the 8″ score line and valley fold all of the others.

Apply adhesive to the outside of the 0.5″ section and adhere to the other end.

Line up the bottom of the stand with the bottom of the back of the card and adhere.

Decorate each of the tiers.
Share your personal favourite Stamping Bella creations with us. We LOVE to see what you’ve been creating with Stamping Bella stamps. Share a link to your latest Stamping Bella card in the comments below, or an old favourite you made a while ago. Tell us what your favourite stamps are. Are there any additions you would like to see to the range? Let us know!
Another way to connect is by joining us in the Stamping Bella Sistahood Facebook Group and share your pictures.
If you are posting your images online, we would love to see them on Instagram and all the platforms mentioned above. To make it easier for us to find you just use #stampingbella as a hashtag. Even better tag me @stampingbella . We love it when you connect, so don’t be shy!
Until next time, HAPPY STAMPING!
MWAH
Very fun…you are impressive, thanks for the tutorial!