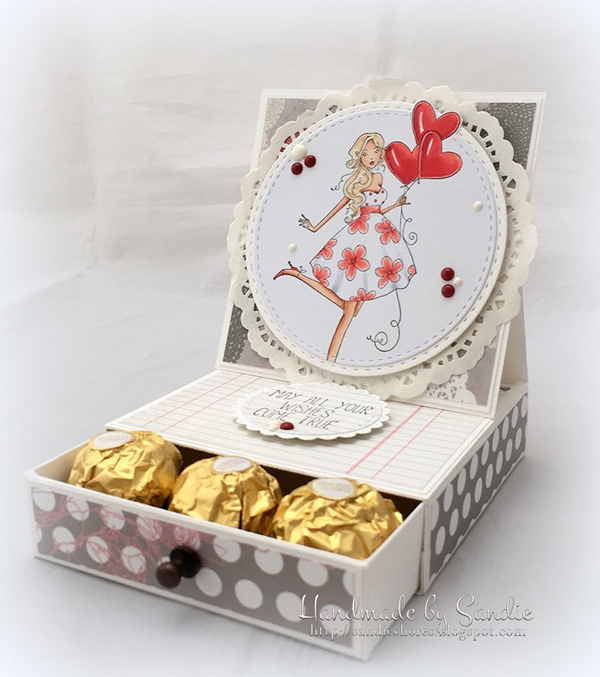
Time for DT Thursday with our scoring whizz Sandiebella!
This week Sandiebella has another fantastic “more than a card” project for you! Grab your scoring board and get ready…
Paper Doily
Cut a piece of card measuring 8″ x 8″ and score at 1″ and 2″ on all 4 sides.
Cut away the outer 1″ sections on each corner, and cut the last one to make a tab, as shown. Taper the edge for a neater fold.
Repeat on all 4 sides.
Add some adhesive to the outside of the 1″ tabs
Flip the card over and apply double sided tape to each of the outer long tabs.
Cut 2 pieces of white card measuring 7/8″ x 3 7/8″ and adhere together to make 2 panels.
Decide which side will be the front, then adhere one each of the panels on the inner 1″ sections, for the back and front of the drawer.
Fold up the outer 1″ section and punch an hole though both sections, for the drawer handle.
Remove the backing from the tape on the 1″ tabs and adhere them to the inside of the drawer.
Remove the tape backing from the 1″ sections and fold inwards, to the inside of the box.
Burnish well with a bone folder.
Add the handle and this part is complete.
Cut a piece of white card measuring 4 1/16″ x 10 1/2″
(Tip: If your scoring board doesn’t have 1/16th marks, move the card in 1/16″ from the edge of the scoring board and score on the 1/8″ mark)
Cut 2 pieces of white card measuring 1″ x 4″ and 2 pieces of patterned paper measuring 7/8″ x 3 7/8″ and adhere together to make 2 panels.
Adhere one each to the 1 1/16th” sections.
Apply adhesive to the 1/2″ section on the end
Adhere the 1/2″ section to the inside to make the wrap for the drawer.
For the Easel Card:
Adhere the 3 square pieces together to make your card front and set aside.
Score the 8 1/4″ piece of card, on the long side, at 4 1/8″ and 6 1/4″
Fold like this.
Cut one more piece of white card measuring 4″ square and a piece of patterned paper measuring 3 7/8″ square. Adhere together to make the inside of the card.
Apply glue to the bottom section of the easel, as shown.
Adhere the front panel.
Open up the card and adhere the inside panel.
Remove the wrap from the drawer and apply adhesive to the top.
Place you hand inside the wrap whilst adhering the easel card down.
Once the easel is stuck down, pop the drawer back in.
Stamp the sentiment onto matching paper, or white card.
Cut with a circle die, and also cut a matting layer.
Adhere the sentiment, popped up on 3D foam, towards the bottom of the inside panel.
How far down you adhere the sentiment will depend on the shape you use when cutting it out. For best results, fold down the easel and position it as you want it before adhering the stopper.
Stamp the image onto white card.
As I wanted the balloon outside of the circle, I cut around it, then placed the die behind it.
Run through the Cuttlebug, or similar die cutting machine.
Trim around the balloon with a scissors, to remove the excess
Colour using your preferred medium, and matt onto a larger circle.
Adhere a paper doily to the top of the box, then adhere the image, using 3D foam dots/tape.
Add some candy, or a gift into the drawer.

Hopefully I’ve inspired you to sit down and try your hands at this lovely project.
We also encourage you to share your personal favourite Stamping Bella creations with us. We LOVE to see what you’ve been creating with Stamping Bella stamps.
Another way to connect is by joining us in the Stamping Bella Sistahood Facebook Group and share your pictures.
If you are posting your images online, we would love to see them on Instagram and all the platforms mentioned above. To make it easier for us to find you just use #stampingbella as a hashtag. We love it when you connect, so don’t be shy!
Until next time, HAPPY STAMPING!
Comments are closed.
Love this!!! Can’t wait to give it a try! thanks for sharing 🙂
Sandie, your tutorials are the best! So much detail and wonderful photos of every step. I can’t thank you enough! ?
Oh this is stunning! I love this! Thanks so much for sharing the instructions for creating this! 🙂
This is a fabulous idea! Perfect for a small thank you! Love the tutorial and can’t wait to try this!
Love this card! Definitely need to make this one!
Love the new bellas. I’m always inspired by your stamps.
Just adorable. Absolutely love it!!
its gorgeous!
Someday I am going to attempt to do one of these. Your directions and I mean yours and all of the other people who show us how to do things are really very good. I am one of those people who needs to have everything shown step by step. I am one of those people who when she gets a new board game, my dad would have to explain the rules to me because I couldn’t understand them. I used to say ‘Well, if they had said it like that I could be playing it by now’. My dad passed away last week so I can’t ask him anymore and that makes me sad. Whose going to explain stuff to me? You are! Thanks for explaining everything step by step so even us geeks who don’t have dads to explain them anymore have someone who will. Thank you.