Hi all,
Today I’m sharing how to make a one-sheet gift box using Oddball Hermes. Hermes is the Olympian deity known as the herald of the gods, and he is also regarded as the protector of travelers so the theme for today’s project is a travel gift box that can be filled with snacks, care items such as travel sized sun protection and lip balm, and even a gift card.
A good heavyweight double sided paper is essential to ensure the box is sturdy enough to support any sort of weighty gifts; however, the base can also be made with card and then decorated with designer paper for a more durable result.
Products needed:
Oddball Hermes rubber stamp
Heavy designer paper
Scoring board and bone folder
Adhesive
Selection of shaped Dies
How to:
Stamp Oddball Hermes onto blending card, colour and fussy cut around the outline.


Cut a piece of double sided paper measuring 11.75″ x 7.5″. Score on the long side at 1.25″, 5.25″, 6.5″ and 10.25″, and on the short side at 1.25″ and 6.25″


Fold on all the score lines and crease well with a bone folder.

Snip a wedge from each side of the centre 1.25″ tabs and the inner side of the four corner tabs.

Fold the centre tabs inward and apply adhesive. Bring up one side of the box and adhere at a right angle. Repeat on both sides.


Adhere the four corner tabs to the insides of the each end to form the box shape.

Fold down the lid of the box to ensure it doesn’t catch. Trim where necessary

Cut some layers using dies.

Stamp the sentiment from Encouragement Sentiments set onto one of the paper layers. Adhere all the layers down and then adhere the Oddball Hermes using foam tape or dots.
Fill the box with snacks and gift cards.

Flitterfly Spring Seeds Gift Bag

Stamps:
How to:
Mask Whimsabella Flitterfly so that she appears to be sitting on the tree stump on the Spring Backdrop. Fussy cut around the whole piece.


Cut 2 pieces of double sided paper measuring 7″ x 5.75″. Score on the 7″ side at 1.5″ and 5.75″. Flip 90 degrees and score at 1.25″ and 4.75″. This makes a gift back that is 4.25H x 3.25W x 1.25D


Fold and burnish all the score lines. Fold back the 1.5″ section and crease well.

On one piece, cut on the 5.75″ score lines from the edges in to the intersecting score line. Taper in the edges of the tab.

On the second piece, remove the 1.25″ squares in the bottom corner and taper the edges of the centre section. This will be adhered to the inside of the first section to create one long piece (see below)


Fold back the tabs and apply adhesive. Fold up one side of the bag and adhere to the tabs.

Apply adhesive to the side sections of the other side of the bag and adhere inside.

Trim the outer sections of the 1.5″ piece as shown below.

Apply adhesive to the trimmed tabs and slide in under the opposite side. Repeat on both sides.

Pinch in both sides of the bag.

Cut some stitched circles to make a decorative panel for the box front. Stamp the Hello Spring! sentiment from the Hello Spring Sentiments set and cut out using a circle die. cut the top off the sentiment circle.

Arrange the circles on the front of the box then adhere the image down using foam tape or dots.


Grab some seed packs – these measure 3″ x 4.75″. I made the box a little shorter so that the seeds are peeking out the top. Pop them into some tissue paper and place in the bag.


Colour the strawberry from the Spec-tacular Strawberries and Cream set. Fussy cut around the outline.


Cut a piece of card measuring 5.75″ x 8.5″. Score on the 8.5″ side at 2″, 4″, 6″ and 8″.
Flip 90 degrees and score at 0.5″, 1.75″ and 4.5″.
Fold and crease all the score lines.
On the 8.5″ side, cut away the first, third and fifth 0.5″ sections.
On the bottom, cut each of the 1.25″ sections up to the first score line. These are the tabs for the bottom of the carton.
On the 0.5″ side section, cut away the bottom 1.25″ section and make tabs from the 2 remaining sections.

On the top, where you cut away the three 0.5″ sections, measure and mark the first section in the centre, at 1″. Score diagonally, on each side, into the corners of the next score line down.

Pinch the score lines to fold inwards.

Repeat for the other side of the carton. Use paper panels to decorate the 4 sides of the box, and the 2 upper sections not scored.

Apply tape or wet glue to the two side tabs and fold so that the tabs are adhered to the inside of the opposite end of the base.

To create the closure, fold out the 4 bottom flaps of the box. Using a ruler and craft knife, cut a 0.5″ slit by placing a ruler across and cutting from 0.75″ to 1.25″. Bring the ruler down slightly and repeat, then remove the excess. Repeat on the opposite flap.


Cut a small strip of card and slip it through one of the openings. Adhere to the inside.

Close up the box and insert the other end into the opening. Push closed.

Apply glue to the inside of the top of the box and secure.

Cut a piece of paper 7/8″ x 1-7/8″ and fold in half. Apply glue to the inside and slide on over the box top.


Cut decorative shapes to create a matt for the image

Adhere to the front of the box

Adhere the image to the box using foam tape/dots.

Stamp the sentiment from the Work Life Sentiments set and cut out using a pennant die. Adhere to the top of the box and add a little heart for decoration.


Stamp Bundle Girl Bunny onto blending card and fussy cut around the outline. Set aside to work on the box.


For the card base, cut one piece of card measuring 4″ x 9-5/8″. Score at 4″ and 5-5/8″ on the long side.
To make the boxes, cut four pieces of card measuring 6.5″ x 5″. Repeat the following for each box:


Take the 4″ x 9-5/8″ piece, scored at 4″ and 5-5/8″, and adhere a length of ribbon to the inside of each end, centered horizontally.

Cover the ribbon with mat layers of card and then designer paper. Cover the centre 1.5″ section with mat layers also.

Apply adhesive to the outside of the 0.5″ tab on the side. Fold over and adhere to the inside of the opposite end.


Fold into a box shape

On the bottom, fold in 3 of the tabs, apply adhesive to the inside of the last tab and adhere.


Apply adhesive to the bottom of each box, line it up on the inside of the card base, leaving approx 1/4″ from the sides.


Fold the top of the card base over the boxes and decorate with designer paper.

Tie the ribbon to secure it.

Stamp the sentiment from the Easter Sentiments set then cut out using a pennant or label die.

Create a mat for the image using a shaped die and paper layers.

Adhere the mat to the top of the card and then, using 3D foam tape, adhere the image to the centre. Position the sentiment beneath the image.

Add some enamel dots to finish

Stamp Bundle Girl with a Carrot onto blending card and colour with Copic markers before fussy cutting around the outline.


For the box, cut one piece of card measuring 7″ x 9.75″. Score on the long side at 1″, 4.5″, 8″ and 9″ and on the short side at 1″ and 6″
With the 0.75″ section at the bottom, cut on each of the score lines from the edge to the intersecting score line. Cut a wedge from all of the bottom tabs to create the same as below.

Using a shape die, cut a window from the centre.

Cut a piece of paper measuring 3.5″ x 5″ and cut the same shape from the centre. Trim down as necessary to fit over the window on the box base.


Cut a piece of acetate meausring just under 3.5″ x 5″ and adhere inside box base to cover the window.

Decorate the outside of the box using designer paper.

Decorate the inside base with a piece of patterned paper before applying glue to the outside of the 1″ tabs and adhering them to the inside of the box base.

Cover the tabs with paper.

Fold up the box and if the front flap stops the lid from closing properly, trim it down to around 0.5″

Create a mat layer using scalloped oval and oval dies, then adhere it to the bottom left of the box lid.


Add a sentiment to the front and then fill the box with candy, a small gift, or tea light candles.
Hi all,
I recently came across garlic bread pizzas in Lidl and instantly thought what a cool gift the box would make. When I opened it up, the bread inside was wrapped in plastic so the box was clean and perfect for altering!


The stamp I used is Oddball Girl Power, which I stamped on copic blending card and coloured with Copic markers before fussy cutting around the outline.


The box measures approx. 7″ x 7″ and I shaped the papers by using the box as a template – drawing around it with a pencil.


When I had the sides and top covered I layered papers onto the front using various dies for the stars, circles and letters.

I used 3D foam strips to adhere Oddball Girl Power to the front.

Finally, I cut out the sentiment using a stitched rectangle die and positioned it behind the image.

The box can be used for a small gift, candy or anything else you like. I baked a 6″ chocolate chip cookie which fit perfectly inside.
Hi all,
Today I’m sharing a couple of cards featuring the new Spec-tacular stamps by Amy Glatiotis, which have just been released. These Spec-tacular pairs are super cute and such fun to work with, and can be used for all occasions.
The first card features Spec-tacular Avocado and Toast and the new Spec-tacular sentiment set. I am not a fan of avocado toast but I love this cute pair and the sentiment is just perfect with it.

My second card features Spec-tacular Cheese and Crackers and the new Spec-tacular sentiment set. Another cute and versatile stamp that could even be a Valentine’s Card or a Birthday card for your significant other?!

Both of these stamps, plus so much more are now available over on the store. Check out the WHAT’S NEW section to see all of the February release stamps.
Hi all, today is my birthday so I made a birthday card for myself using my favourite colours, techniques, craft supplies and, of course, one of my favourite stamps – Curvy Girl Eats Cake

My favourite colours for cardmaking are pink and teal.
Dress and shoes – BG11, BG13, BG45, BG53, BG57
Flowers – R30, R32, R35

Plate: BV11, BV13
Cake: E51, E53, E55, R30, R32, R35
Leaves: G20, G21, G24
Shadow: W00, W1, W3

A favourite technique of mine is to use a scoring board and stylus to create a frame around the image. I do this by turning the image face down and scoring on the 1/8″ line on all four sides.

The teal, mint and pink papers are a mix from various different brands.

My next favourite thing is to decorate the inside of the card. This does add a lot of weight to the card and is more expensive to mail but I just love the finished look.

I also added a place to hold a gift card – who doesn’t love gift cards??

On the card front I stuck down the card and paper layer.

Then I used strips of contrasting paper and adhered them to the back of the image, before gluing that down onto the paper base layer.


Finally, my favourite embellishment – enamel dots. I have these in just about every colour there is; you could almost say I have an obsession with them!

And here is the finished product! All of my favourites on one card. Happy Birthday to me!
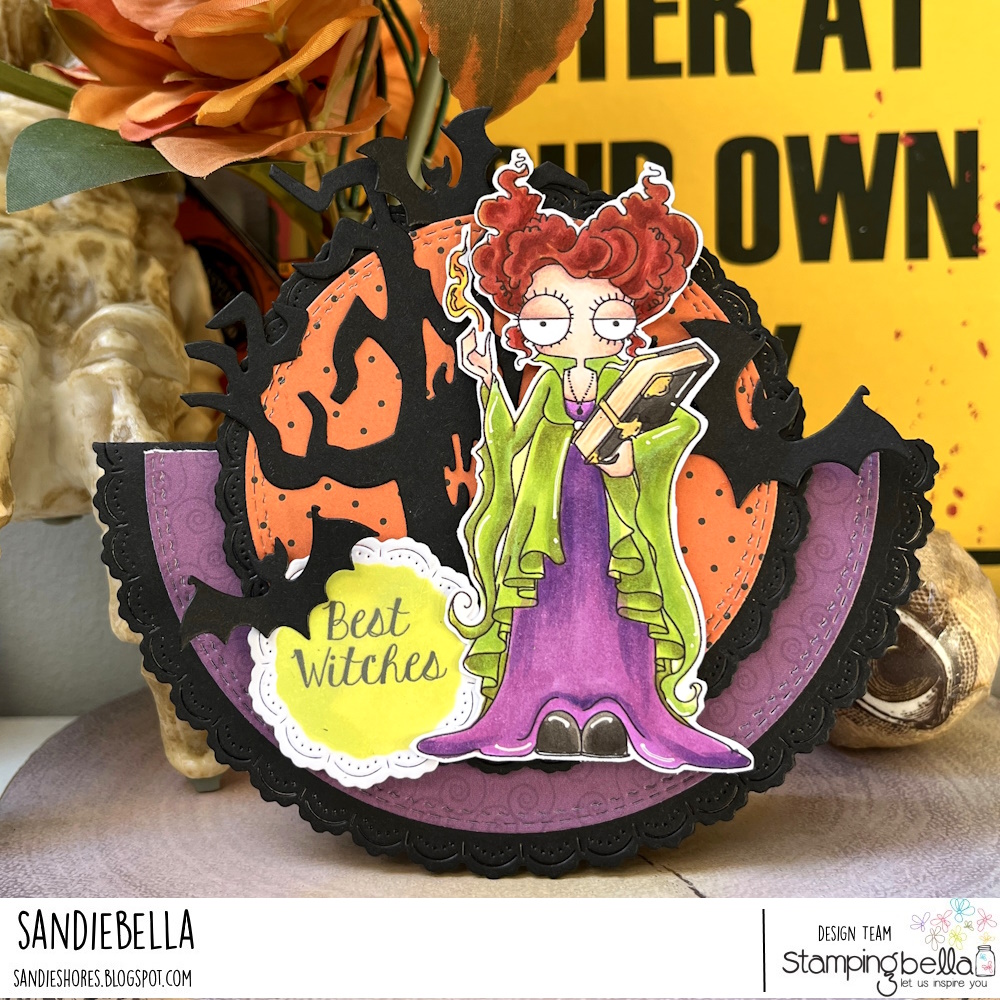
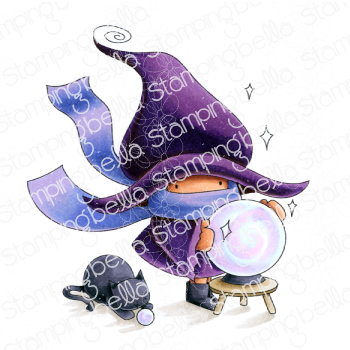
Sandiebella is back! After a very busy time with work, Sandie is back creating her magic with tutorials for us. Starting with this awesome Halloween Rocker Card featuring our Oddball Witchy Sistah 1 rubber stamp!


Phew, a third post in one day – unheard of!
If you saw the previous posts today, you will be aware, but in case you missed them: the Holiday 2024 Release is now available to order! Head to the WHAT’S NEW section of the store to see it all! Scroll down here on the blog to see the sneak peek posts if you missed those, for all of the DT inspiration.
Each week you have a chance to win a $25 gift card for our website, just by commenting on the Bellarific Friday post for that week.
On last week’s post we had 14 comments, and I’ve used a random number generator to select a winner (counting comments from oldest to newest).
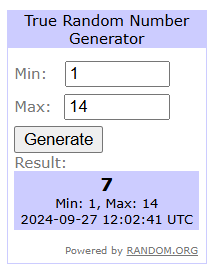
Our winner for last week is Patricia Beck!

Congratulations Patricia! Please email me at customerservice@stampingbella.com and I will get your gift card sent over.
On to Bellarific Friday for your regularly scheduled inspiration fix! This week the Babes were challenged to choose and follow one of Sandiebella’s Thursday tutorials or another tutorial from the blog.
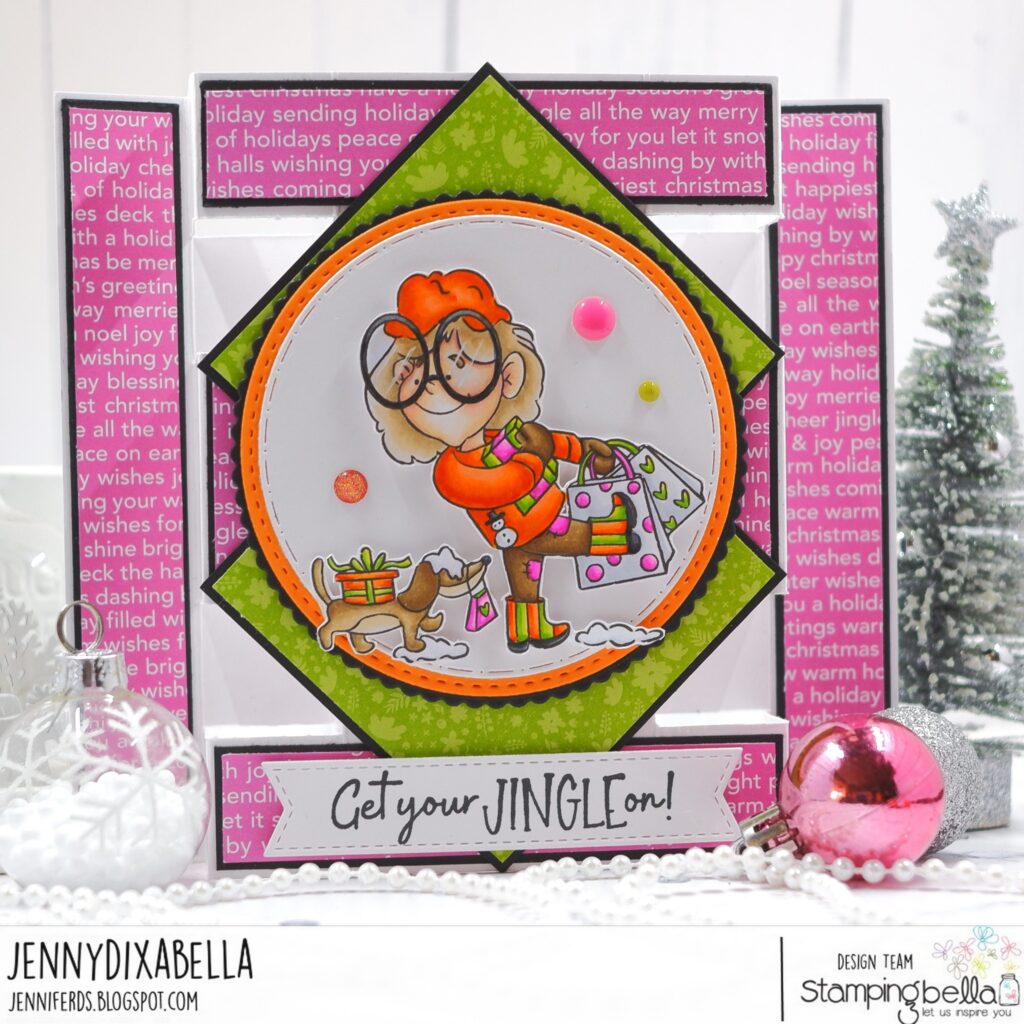
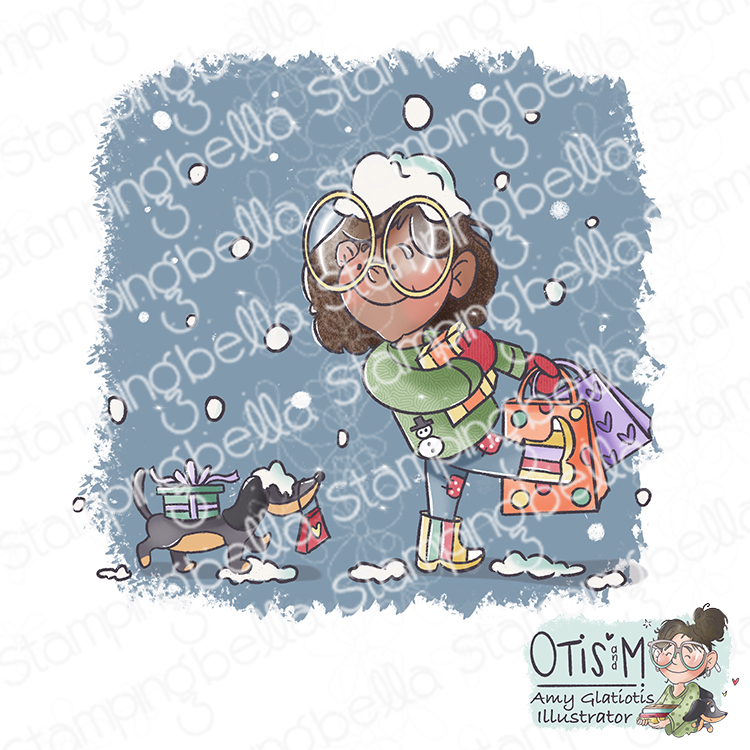
Jenny followed Sandie’s TOWER CARD TUTORIAL to make this gorgeous Christmas card featuring one of our new release stamps! Love that this fancy fold makes such a WOW card!
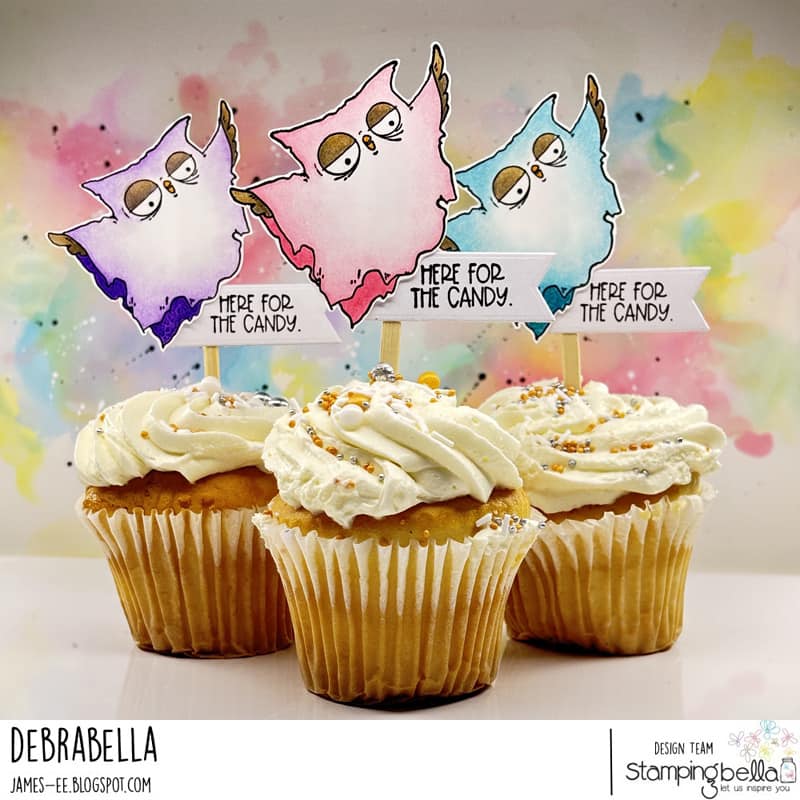
Debra created these wonderful cupcake toppers using Sandie’s CUPCAKE TOPPERS TUTORIAL.
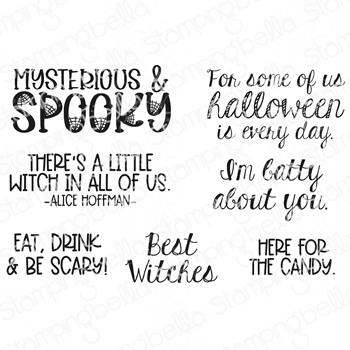
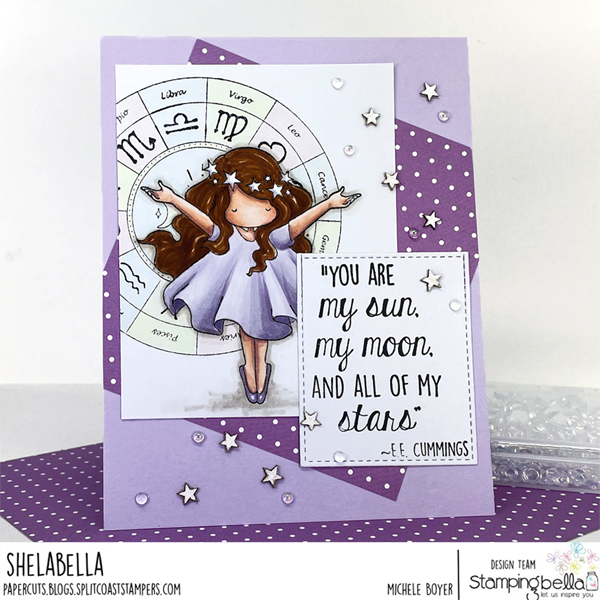
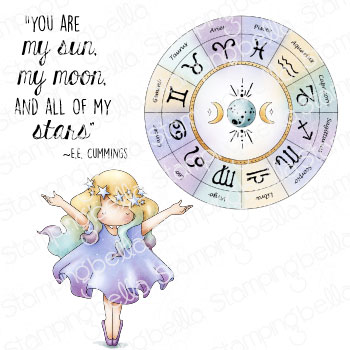
Michele created this gorgeous card following one of my tutorials on masking, which you can find HERE.
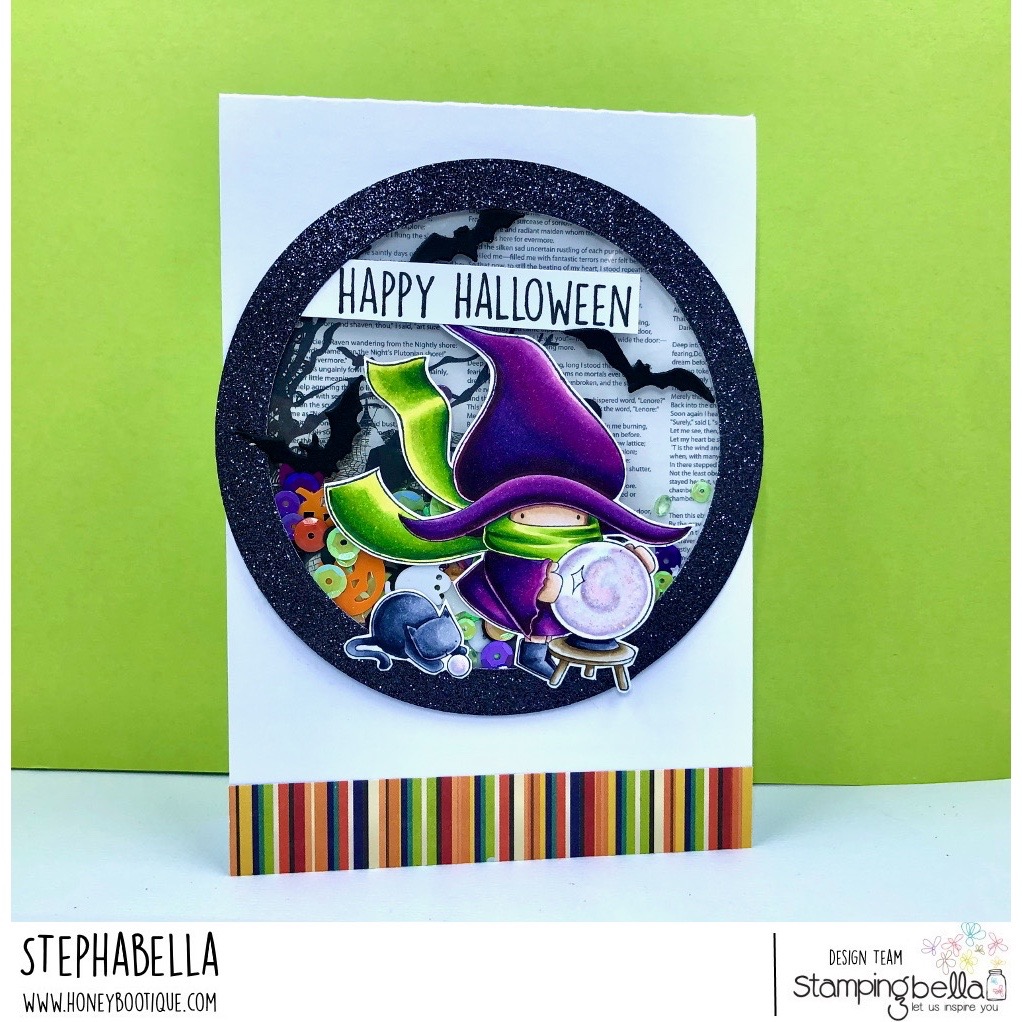
Steph created this spooktacular halloween card following Sandie’s SHAKER CARD TUTORIAL.
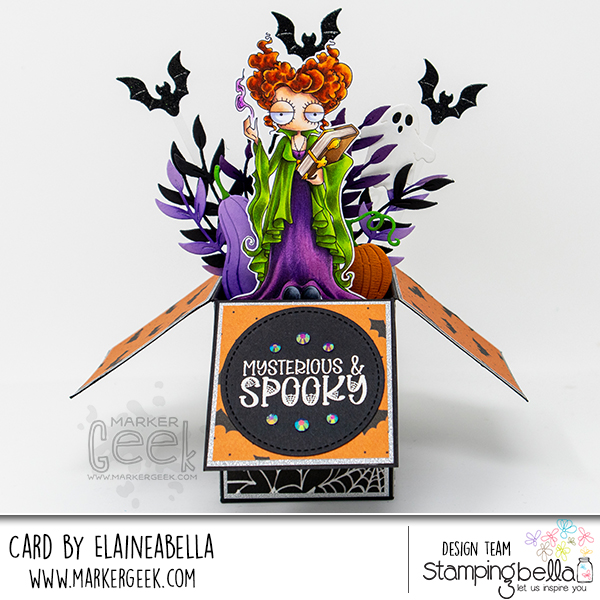
It has been a while since I made one, and I always enjoy them, so I decided to follow Sandie’s BOX CARD TUTORIAL to create a card using one of the new release stamps!
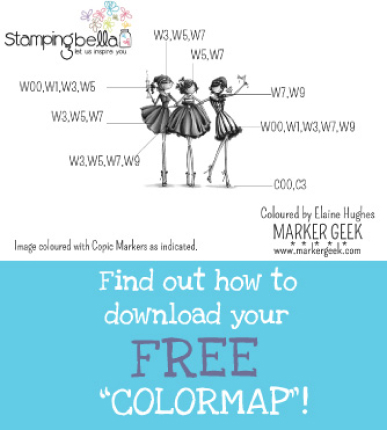
Stamps Elaine Used
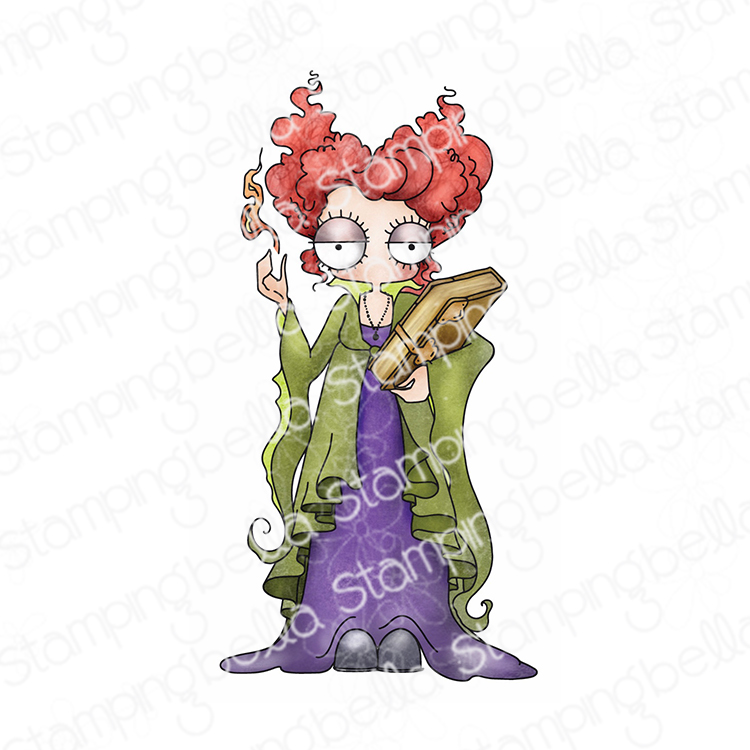
You get an extra video from me today too!
You can watch me colour the above image in the video below. If you enjoy watching please do like the video and subscribe over on my YouTube channel.
That’s it! Happy stamping and crafting. Make sure you leave a comment on this post to be in with a chance of winning the $25 gift card for the store.
MWAH!
Elaineabella