


Sandiebella is bringing a little much needed sunshine into our lives today with another fab step by step tutorial, and gorgeous card! Keep hanging in there everyone, and thank you for all your support for Stamping Bella at this time. We may not be able to ship stamps, but we’re still serving up inspiration!
Little Bits Tall Beach Card

Supplies:
How to:
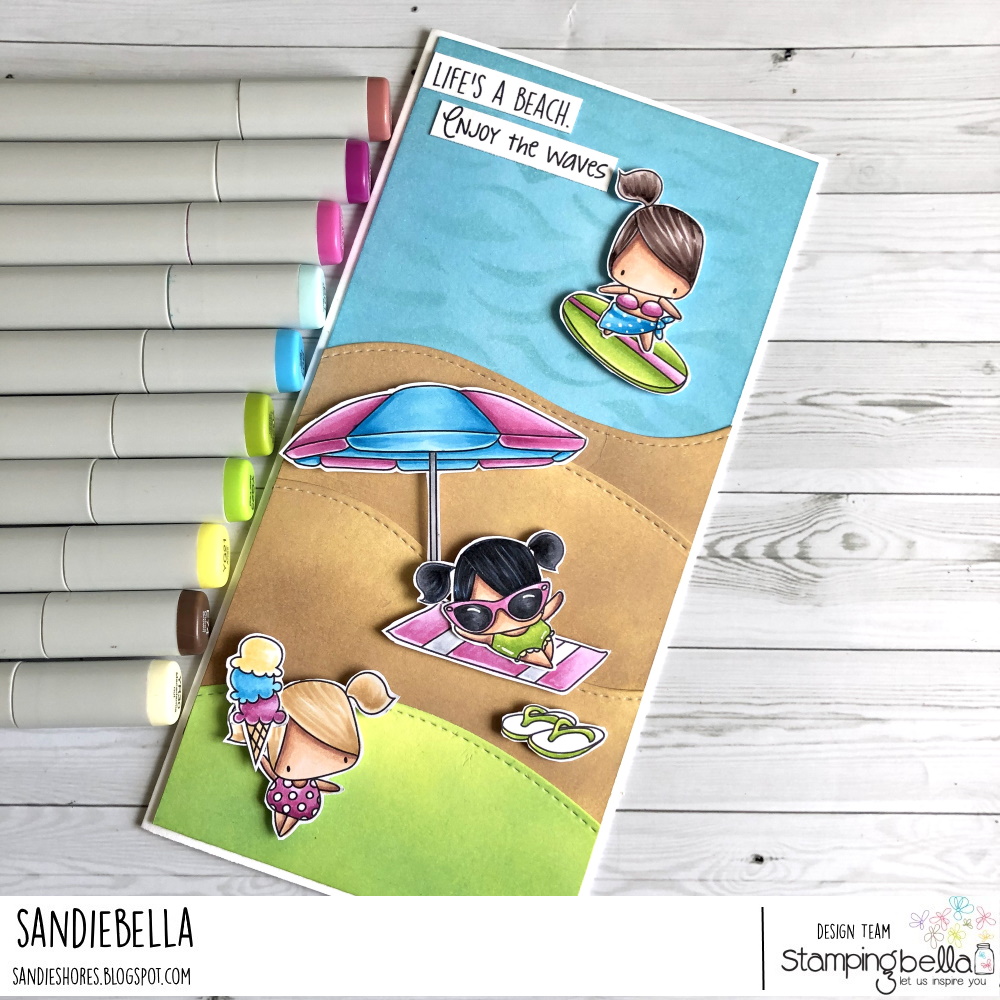
 Fold the 8.25″ x 8.25″ (210mm x 210mm) piece in half to make a tall card base. Crease well with a bone folder.

Taking one for the 4″ x 8 1/8″ (100mm x 205mm) pieces and some border dies, cut out panels to use as grass and sand. You need one for the grass and two to three pieces for the beach/sand.


Using distress oxides, blend mowed lawn and twisted citrus for the grass.

Antique linen and gathered twigs for the sand/beach.

Layer the inked pieces onto the other 4″ x 8 1/8″ (100mm x 205mm) piece to get an idea of how much inking to do for the sea. There is no need to ink the whole piece. Do not stick them down.

Apply Tumbled glass ink to the 4″ x 8 1/8″ (100mm x 205mm) piece, only as far down as necessary.

Position the stencil over it and apply Broken China. Remove the stencil and reapply Tumbled glass over it to blend in the ‘waves’ more.

Adhere all the pieces down. The easiest way to do this is to layer all the pieces without gluing them down. Using one hand to keep the layers in place, slide out each one starting at the top, apply wet glue, and slide it back into it’s place before removing the piece beneath it.

 Stamp all the images onto white card and colour using your desired medium

Cut the image out using the coordinating CUT-IT-OUT dies or fussy cut them with a precision scissors.

Stamp the “Life’s a Beach” sentiment from the Summer Sentiment Set onto white card and cut in half


Over To You!
Share your personal favourite Stamping Bella creations with us. We LOVE to see what you’ve been creating with Stamping Bella stamps. Share a link to your latest Stamping Bella card in the comments below, or an old favourite you made a while ago. Tell us what your favourite stamps are. Are there any additions you would like to see to the range? Let us know!
Another way to connect is by joining us in the Stamping Bella Sistahood Facebook Group and share your pictures.
If you are posting your images online, we would love to see them on Instagram and all the platforms mentioned above. To make it easier for us to find you just use #stampingbella as a hashtag. Even better tag me @markergeek and Emily @stampingbella . We love it when you connect, so don’t be shy!
Until next time, HAPPY STAMPING!
MWAH
Elaineabella