


Sandie has a fantastic step by step today. Definitely one you could change up for another festive occasion that is looming on the horizon! How cute are these treat bags?
One Sheet Halloween Treat Bags
Supplies:
How to:


Fussy cut each of the images and set aside for now.

Cut one piece of paper measuring 6″ x 12″ for each bag. Score on the 6″ side at 1.5″ and 4.5″

On the 12″ side, score at 3″, 5″, 9″ and 11 5/8″

Fold and crease all the scorelines with a bone folder.

with the 11 5/8″ scoreline at the top, fold in one side.

Bend the 3″ scoreline outwards until it lines up with the edge. Crease the fold with a bone folder.

Repeat on the other side.

turn the paper so that the 11 7/8″ scoreline is at the bottom and repeat the steps above to create the other side of the bag base.


Fold down the corners on each side, on the end of the 3″ section. Crease well.

Open the corners up and fold them inwards. Crease again.

Open up the paper and apply glue across the top as shown below.

Fold the sides in and stick down.

Fold down the 5/8″ section.

Cut a piece of card approximately 1/2″ x 2.75″

Lift the 5/8″ section each side of the opening and apply some wet glue.

Slip the piece of card under the lip. Working quickly before the glue dries, fold the box up and slide the other end into the opening ensuring the ‘shoulders’ fit.


Open the box up again. There will be a little gap between the sides.


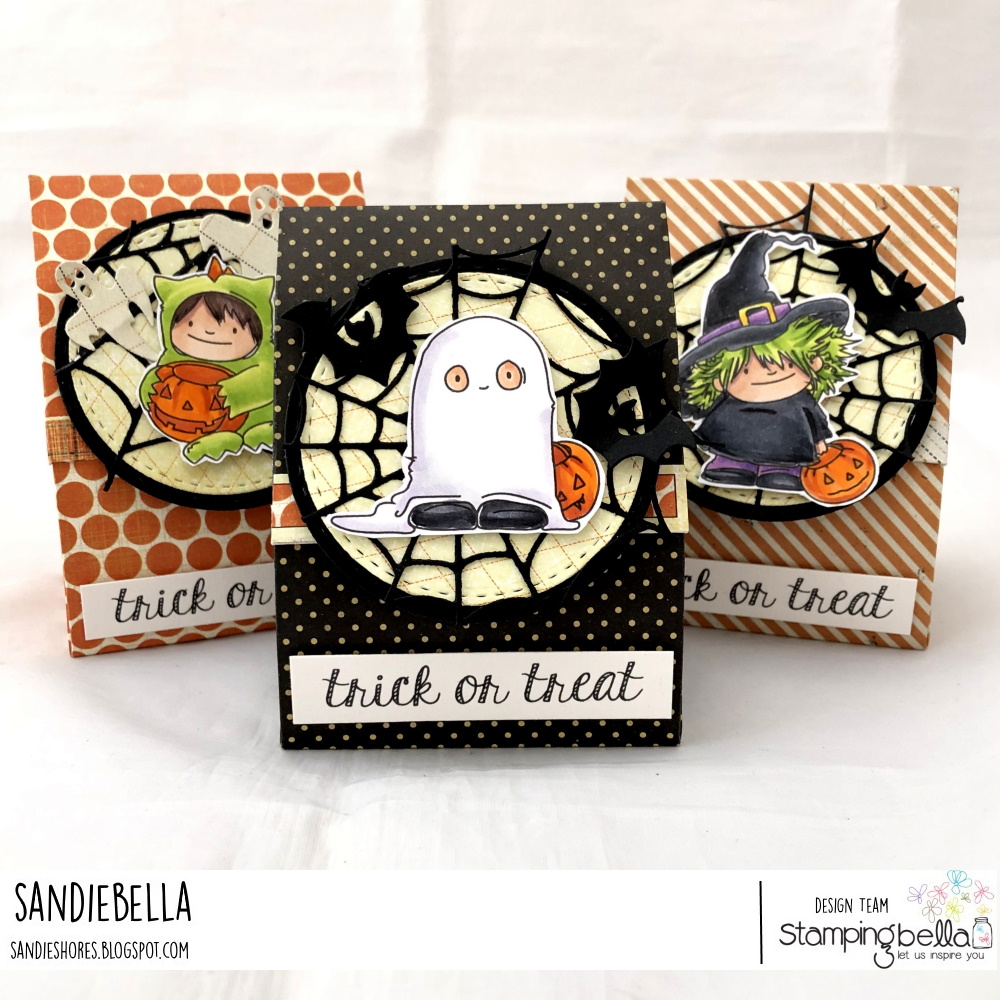
Cut a circle from black card and a smaller circle from paper, adhere them together.


Decorate the front of the circle, then adhere the image down using foam tape.

Apply adhesive/foam tape to the back of the circles to about 2/3rd of the way down and stick them to the front flap of the bag. Stamp the sentiment onto a strip of white card and adhere to the front using foam tape

Over To You!
Share your personal favourite Stamping Bella creations with us. We LOVE to see what you’ve been creating with Stamping Bella stamps. Share a link to your latest Stamping Bella card in the comments below, or an old favourite you made a while ago. Tell us what your favourite stamps are. Are there any additions you would like to see to the range? Let us know!
Another way to connect is by joining us in the Stamping Bella Sistahood Facebook Group and share your pictures.
If you are posting your images online, we would love to see them on Instagram and all the platforms mentioned above. To make it easier for us to find you just use #stampingbella as a hashtag. Even better tag me @markergeek and Emily @stampingbella . We love it when you connect, so don’t be shy!
Until next time, HAPPY STAMPING!
MWAH
Elaineabella
Wow! Love these super cute. Thanks for the step-by-step instructions. Have got to try this.
very cute! Thanks for all your inspiration!
Adorable treat bags. These stamps are too cute….love your coloring as well!
These are such cute treat containers, and they could make wonderful cards, place cards, really anything you could think of. Such a great idea. Thank you so much for sharing and please stay safe.