


Sandiebella has another awesome make to share this week! This time she’s used an SVG cut file with her Silhouette electronic cutting machine and is showing us how to put it all together and add some additional details.
Uptown Boom Box
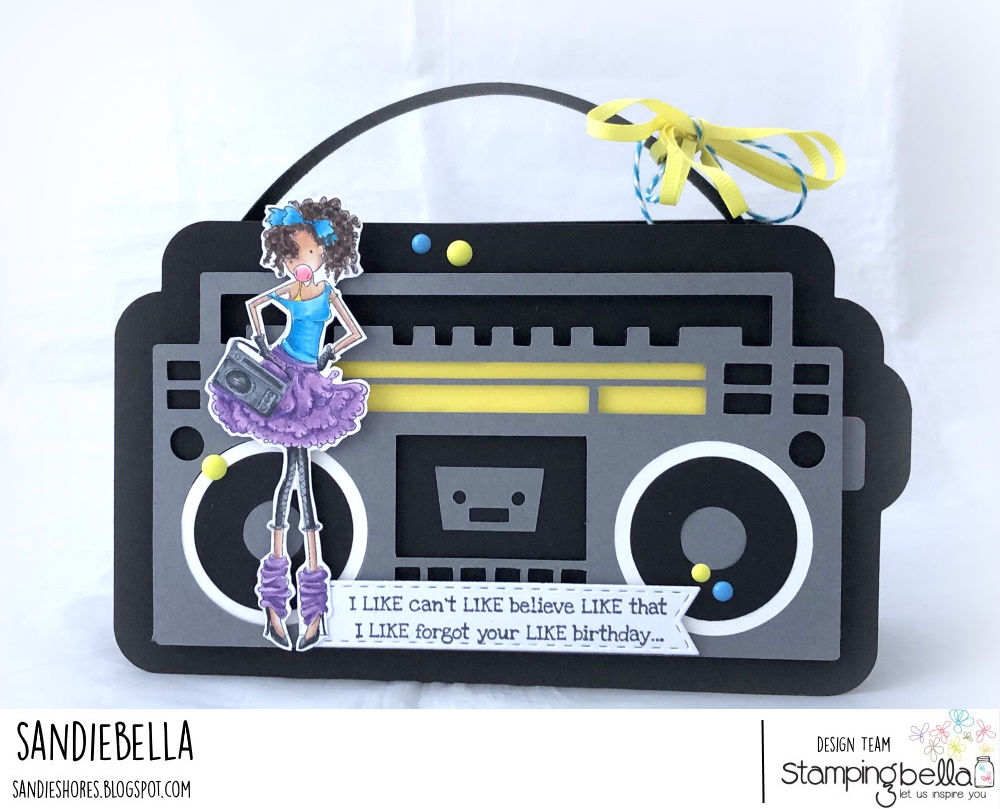
Using cut files to make projects can be so much fun, but it can also be frustrating when instructions aren’t provided and how to assemble all the pieces isn’t very obvious. Even when instructions are provided you may want to switch things up, or add extra bits and pieces. Playing around with cut files and creating your unique take on it can be just as enjoyable as following along with provided instructions. With this project, I wanted to add loads of dimension using 3D foam between the layers, and I wanted a handle.
Supplies:
Uptown Girl Farrah Loves Flashdance rubber stamp
3D foam tape

Take the light grey front piece and flip it over to the back. Grab the pieces that make up the speakers too.

First add the larger circles and place them into the centre of the speaker holes.

Next, add the smaller black circles, and finally the small grey circles.

Holding them in place, apply a strip of 3D foam across them.

To add loads of dimension, and to make sure the front holds it’s shape, apply lots of 3D foam tape, cutting the tape to make narrow strips when necessary.

Take the black centre section and turn it face up.

Remove all the backing from the 3D foam on the front panel, and carefully adhere it onto the black piece, lining up all the edges.

Place the yellow strip of card into the slot at the top, and apply more 3D foam tape

Adhere down onto the largest black panel, with the tab on the right hand side.

Adhere the little cassette ‘face’ into the centre of the boom box.

Adhere the ‘dial’ on the side.

Take the strip of black card that makes the box and fold up all the outer sections.

Apply wet glue along the edges on one side and adhere down onto the back piece of the boom box.


Apply wet glue to the other side of the centre piece and adhere the boom box front to it.
Set aside to work on the image.
Stamp Farrah onto white copic card using memento black ink.


Fussy cut with a precision scissors.

To add a handle:
Cut a strip of card measuring 12″ x 1″. Score on the 12″ side at 1″ and 11″
Curve the handle by rolling it through your fingers, then fold down the 1″ sections

Apply a strong double sided tape to the 1″ sections on both ends.

Adhere the 1″ sections to the inside wall of the box ends, as shown.

Cut the sentiment out using a pennant die, or cut it in a strip and fish tail the end with a scissors if you don’t have a pennant die.

Adhere Farrah to the front of the boom box, over the end of the sentiment pennant, using 3D foam tape for even more dimension.

Add some yellow ribbon, blue and white bakers twine, and enamel dots to embellish.

Over To You!
Share your personal favourite Stamping Bella creations with us. We LOVE to see what you’ve been creating with Stamping Bella stamps. Share a link to your latest Stamping Bella card in the comments below, or an old favourite you made a while ago. Tell us what your favourite stamps are. Are there any additions you would like to see to the range? Let us know!
Another way to connect is by joining us in the Stamping Bella Sistahood Facebook Group and share your pictures.
If you are posting your images online, we would love to see them on Instagram and all the platforms mentioned above. To make it easier for us to find you just use #stampingbella as a hashtag. Even better tag me @markergeek and Emily @stampingbella . We love it when you connect, so don’t be shy!
Until next time, HAPPY STAMPING!
MWAH
Elaineabella
Super cute!! Love it!!
so creative! love it!
Sandie, your artistic talent knows no bounds. Simply amazing.
I look forward to your posts. Thanks for sharing.