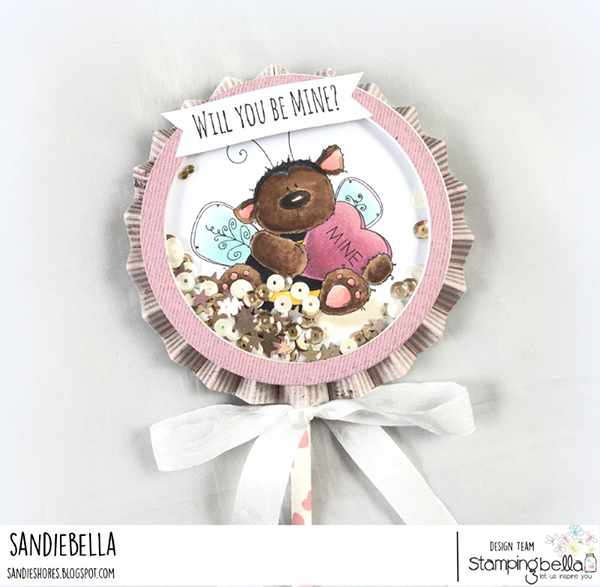
It’s that time of the week – time for another fun step by step with our awesome Sandiebella.

Cut 2 strips of patterned paper measuring 12″ x 1.5″
Score both strips at every half inch.
Flip over and score on the other side at every inch.
Valley/mountain fold both strips.
Apply adheside to the end of one strip and adhere the other strip to it to make one long piece.
Apply adhesive to one end of the paper and adhere to the other end.
Cut a 3″ circle from white card and apply adhesive to it.
Fold the patterened paper into a rosette shape, with the back facing upward and adhere the circle to it. Hold in place until it’s secure and the rosette doesn’t lose it’s shape.
Flip the rosette over so that the front is facing up, and apply a generous blob of adhesive in the hole at the centre of rosette
Slide the straw up behind the patterened paper and on top of the white circle, until it’s sitting on the glue. Set to one side to allow the glue to dry.
Stamp Bee Mine on to white card and colour with your desired medium
Cut out with a 3.5″ circle.
Cut one 3.5″ circle from white card, and another one from acetate, and set aside.
Sandwich the acetate in between the 2 white card frames.
Adhere the patterned paper frame on top of front frame.
Cut a narrow strip of foam tape and make partial cuts in it on the outer edge. This allows you to curl it around the circle frame. Apply a double layer of the foam tape all around the inside of the acetate window, removing the tape backing from the first layer before adding the second layer.
Remove the backing from the tape and pour in some shaker mixer.
(It’s easier to remove the backing before adding the shaker mix)
Retrieve the image and white circle and adhere them together.
With the image facing down, carefully line up the cirlces and press down on to the foam tape.
Turn it over to see your shaker.
Apply a generous amount of wet glue to the underside of the shaker.
Retrieve the lollipop and centre the shaker into the middle of the rosette. Press down firmly to get a good bond.
Stamp the sentiment from the Bee Mine set onto a strip of white card and fishtail the ends.
Adhere to the top of the shaker, as shown.
Tie a ribbon around the straw, just under the rosette to finish it off.
Share your personal favourite Stamping Bella creations with us. We LOVE to see what you’ve been creating with Stamping Bella stamps. Share a link to your latest Stamping Bella card in the comments below, or an old favourite you made a while ago. Tell us what your favourite stamps are. Are there any additions you would like to see to the range? Let us know!
Another way to connect is by joining us in the Stamping Bella Sistahood Facebook Group and share your pictures.
If you are posting your images online, we would love to see them on Instagram and all the platforms mentioned above. To make it easier for us to find you just use #stampingbella as a hashtag. Even better tag me @markergeek and Emily @stampingbella . We love it when you connect, so don’t be shy!
Until next time, HAPPY STAMPING!
MWAH
Elaineabella
Oh My! This is just faboulos I love it.
Such adorably shaker cards!!
Sandie this is such a beautifully put together and gorgeous project. Love this!…xxx
I love this lollipop shaker. You instruct so well, I am tempted to try it myself.
Such a cute idea… I have this stamp and I LOVE this little bear… he touches my heart. Guess I’m going to have to go make a lollipop now! LOL
Too cute. I love this stamp, and I think my grandkids are gonna love the shaker for Valentine’s Day. Thanks so much. Your instructions and photos make your projects so easy to follow. Perfect!
Great Idea! Love it!
This is the CUTEST!!!! I feel the need to make one. 🙂
Adorable! And something I am definitely going to try. Thanks, you are a great teacher!
Meraviglioso….???