


*happy sigh* Our Sandiebella has another gorgeous step by step for us today!
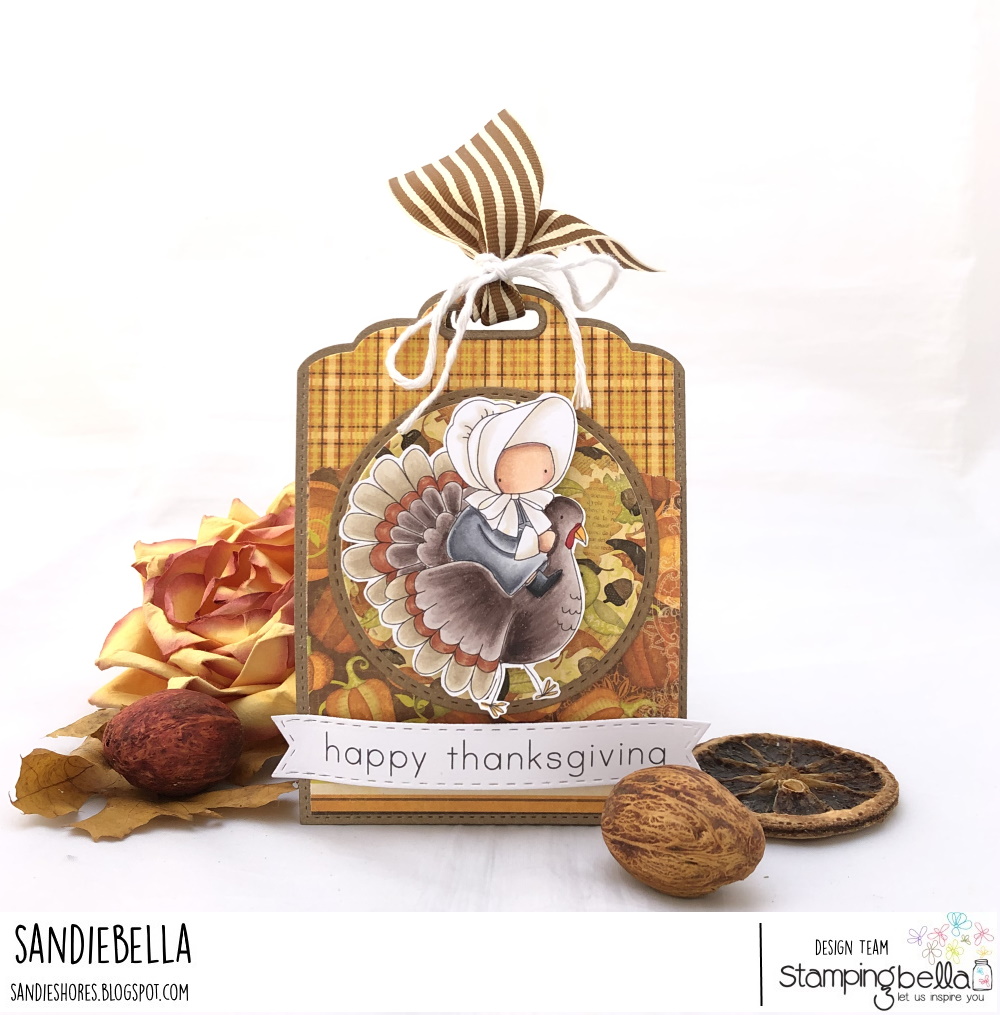
Thanksgiving Tag Box
Supplies:

Cut one piece of card measuring 5.5″ x 7.5″. Score on the long side at 2″ and 5.5″

Flip to the short side and score at 2″ and 3.5″

On the long side, cut each of the score lines in to the intersection, as shown.

On the outer 4 corners, cut approx 1″ off the tabs.

Use a scissors to taper the edges.

Apply double sided tape to each of the outer 4 corner sections

Remove the tape liner and adhere the tabs to the inside of the adjacent sections, as shown.


Cut 2 tags from card and 2 tags from patterned paper. Trim each side and the bottom of the paper tags so that it leaves a border all around.

Trim away the excess around the hole at the top of the tag.


Layer on any other decorative paper as desired. If your tag die comes with reinforcers, cut these in the same colour as the base tags

Apply adhesive to one side of the box.

Adhere the box down onto the inside of one of the tags, centering it horizontally and lining it up with the bottom edge of the tag.

Apply adhesive to the other side of the box. I use wet glue so that I have time move it around before it sets.


Stamp Bundle Girl onto white card and colour using your desired medium. Cut out using a precision scissors.

Cut some stitched circles from card and paper and layer them together.

Apply foam tape/dots to the back of Bundle Girl and adhere to the centre of the circles.

Adhere the circles down onto the front of the tag box.

Stamp the Happy Thanksgiving sentiment from the Fall Sentiment Set onto white card and cut out using a pennant die. Alternatively, cut the sentiment in a strip and fishtail the ends with a scissors.

Thread some ribbon through the holes at the top fo the tags and tie together using white twine.

Fill the box with a bag of fall scented pot pourri or some candy.

Over To You!
Share your personal favourite Stamping Bella creations with us. We LOVE to see what you’ve been creating with Stamping Bella stamps. Share a link to your latest Stamping Bella card in the comments below, or an old favourite you made a while ago. Tell us what your favourite stamps are. Are there any additions you would like to see to the range? Let us know!
Another way to connect is by joining us in the Stamping Bella Sistahood Facebook Group and share your pictures.
If you are posting your images online, we would love to see them on Instagram and all the platforms mentioned above. To make it easier for us to find you just use #stampingbella as a hashtag. Even better tag me @markergeek and Emily @stampingbella . We love it when you connect, so don’t be shy!
Until next time, HAPPY STAMPING!
MWAH
Elaineabella
your project is so cute and so well explained. Thanks for sharing. Annie (from France)
What a beautiful table decor, room decor, anywhere decor! You are just plain amazing with the wonderful projects. I love your posts. I also try almost every one of your projects. Your instructions are so precise that the final results are always just as you’ve shown. It’s fun to impress my family with these gorgeous projects you’ve sent us. Thanks soooo much. Keep up the great work.
Sandibella does it again!!! SO CUTE! And such a wonderful idea. I agree with Susan G. totally!!! Thanks for another GREAT project, that I will “case” – hahaha. Love your work!