


She’s done it again! Another fantastic step by step from our wonderful Sandiebella. Love it.
Flip Card with Surprise Pocket

Supplies:
LITTLE BITS haunted house OUTDOOR DECORATIONS rubber stamps
LITTLE BITS MUMMY, FRANKIE and GHOSTY rubber stamps
LITTLE BITS LITTLE WITCHIES rubber stamps
FALL SENTIMENTS stamp set
Black card
Halloween themed papers
Scoring board and bone folder
Pencil and ruler
Adhesive and foam tape/dots
Dies (optional) – Haunted Hill Border, Grass Border.
Scissors
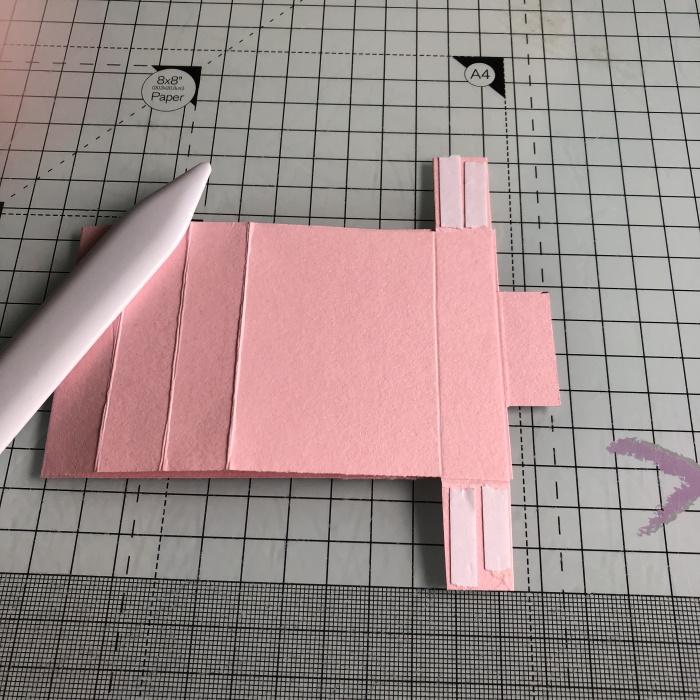
To show you how to make the flip mechanism for the card I have used a light pink card as black is hard to see in photos. I made a second base in black for this card and will note any size differences below when I switch to the black card.
How to:
Cut a piece of card measuring 4.75″ x 9.5″. Score on the 4.75″ side at 1″ and 3.75″

On the 9.5″ side score at 4.5″ and 9″

Score at 2 5/8″, 3.25″ and 3 78″

Score at 0.75″

Cut away the outer sections from the top down to the 0.75″ (the last score line you made)

At the top, measure in 0.75″ from both sides and mark with a pencil.

Cut on the 0.75″ mark down to the intersecting line and cut across to remove both sections. This makes the ‘pull’ tab that makes it all work.

Fold and crease the 4 middle scorelines, both ways to loosen the card. This makes it easier for the flip mechanism to work smoothly.
Apply adhesive to the outside of the end tabs. These will be the only thing holding the mechanism to the front of the card so I would recommend using a good, strong tape.

Fold the card piece in half with the scored lines and tabs facing up.
Cut a piece of card measuring 5″ x 3.25″ to adhere the mechanism to. Remove the lining paper from the tape, fold the tabs around the back piece and adhere to the card panel.

When you pull the top tab the mechanism should curl around and flip under.

Cut three pieces of card measuring 2.5″ x 2.75″ and one piece measuring 2 5/8″ x 2.75″.

Take the larger 2 5/8″ x 2.75″ piece, apply adhesive to it and adhere it completely to the square panel marked.

For the three remaining 2.5″ x 2.75″ pieces, apply double sided tape just beside each of the other three scorelines and adhere the pieces to them.


When you pull the tab each of the pieces will flip up and when you push the tab back the pieces will go back into position. This completes the process of making the flip mechanism.

When I made the black base I increased the width of the tabs that held the mechanism to the card base from 0.75″ to 1″ and I scored only on the outer sections. This made no difference to the size of the card piece needed.
I also increased the size of the ‘pull’ tab at the top from 0.5″ to 0.75″. This did increase the size of the card piece from 4.75″ x 9.5″ to 4.75″ x 9.75″. All the scoring in previous steps remains the same.

Stamp all of the images on to white card and colour using your desired medium. Use the coordinating dies to cut them out, or use a precision scissors to fussy cut if you don’t have the dies.

Decorate each of the panels as desired. All of the elements on the 3 inner panels are adhered flat, the images are popped up on foam tape only on the front panel.

Adhere the largest panel as shown previously. Then adhere the three smaller panels.
Cut some paper approximately 5.25″ x 3.5″ to adhere the mechanism to.

To make the card base cut a piece of black card measuring 10″ x 6″ and fold in half to make a 5″ x 6″ base. The patterned paper measures 4.75″ x 5.75″.
Stamp the sentiment onto some white card and cut out using a pennant die Alternatively, cut the sentiment in a strip and fishtail each end using a scissors.

Adhere the mechanism flat to the card front, and the sentiment popped up with foam dots below it.

To create the surprise pocket cut a piece of coordinating paper measuring 3.5″ x 2.5″. On the 3.5″ side score at 0.5 and 3″. On the 2.5″ side, score at 0.5″. Cut away the corners, at an angle, where the score lines intersect.

Cut the top of the pocket, at an angle, from the inside of one scoreline, across to the opposite edge. outer

Apply tape to the three outer sections. Remove the liner paper from the two side edges and fold up the bottom.

Pull the tab to fully open the mechanism. Cut a piece of paper measuring 4 3/8″ x 2 5/8″ and adhere it as shown below. Remove the liner paper from the bottom of the pocket. Slide the pocket slightly under the bottom image (there is a gap),so that it doesn’t catch when opening and closing the flip mechanism, and adhere the pocket to the back panel.

Insert a gift card and/or cash into the pocket and slide the pocket back in to hide it.

Decorate the pull tab as desired.

Over To You!
Share your personal favourite Stamping Bella creations with us. We LOVE to see what you’ve been creating with Stamping Bella stamps. Share a link to your latest Stamping Bella card in the comments below, or an old favourite you made a while ago. Tell us what your favourite stamps are. Are there any additions you would like to see to the range? Let us know!
Another way to connect is by joining us in the Stamping Bella Sistahood Facebook Group and share your pictures.
If you are posting your images online, we would love to see them on Instagram and all the platforms mentioned above. To make it easier for us to find you just use #stampingbella as a hashtag. Even better tag me @markergeek and Emily @stampingbella . We love it when you connect, so don’t be shy!
Until next time, HAPPY STAMPING!
MWAH
Elaineabella
Thank you very much for this tutorial. I have been wanting to make one of these cards for my grandchildren and haven’t gotten around to figuring out the dimensions to make it, without having to purchase yet another die. Your card looks amazing.
Susan
FAbulous! My grandkids are going to love this one. I always give them some money instead of candy. So cute!
Thank you for the tutorial. Cool idea, for sure! Love this Halloween theme!
How cute is this concept!?! I like to give my adult son & his wife cash for special days but not just hand it to them…The pocket is perfect for that purpose! (Note alliteration!)
I have the full Alice stamp set (Life IS a Wonderland!) and will see if they fit on these measurements, otherwise I will adjust accordingly.
Sandiebella…I LOVE Thursdays with you! Thanks for sharing your ideas and techniques.
Fabulous instructions! Struggled in the past but this year the granddaughter will get a great Halloween card WITH a gift card!
Thank you!