Time for some Thursday folding fun with Sandie. This week she has even included a video showing how to fold the design – fantastic!

I find this stamp really fun to colour – I think I enjoy adding the patches for some reason!
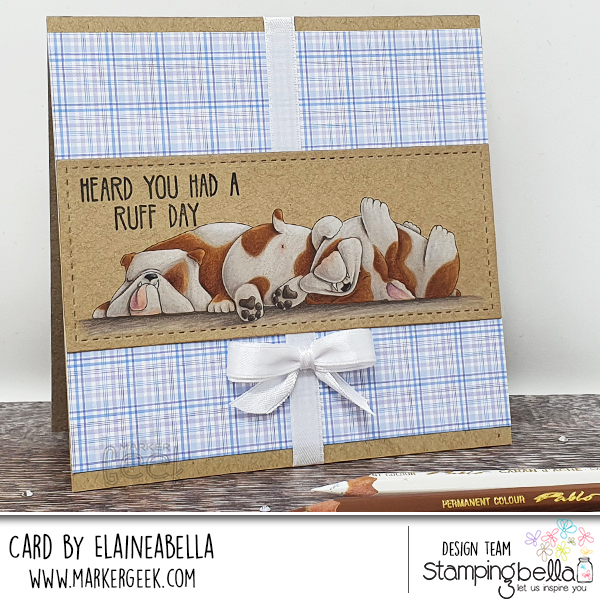
Stamps Used: Bully Trio, Dog Sentiment Set
Watch me colour this stamp in the video below. If you enjoy watching please do like the video and subscribe over on my YouTube channel.
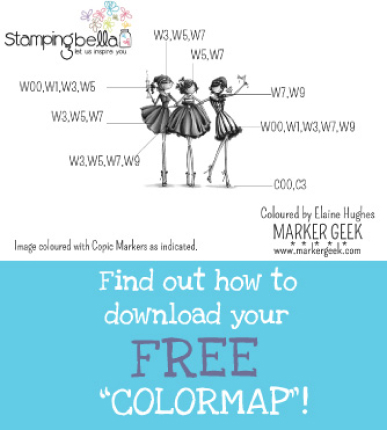
Fur: White, Light Beige, Brownish Beige / Apricot, Cinnamon, Burnt Siena
Tongue/Inner Ear: Aubergine, Salmon Pink, Granite Rose
Toes/Ground: Light Beige, Brownish Beige, Sepia
Have a colourful day!
MWAH!
Elaineabella
Time to shine the spotlight on another of the fantastic stamp sets in the Stamping Bella collection.
As the weather warms up are you planning some adventures? This pair have already started out, by the look of it!

Watch me colour the stamp set in the video below. If you enjoy watching please do like the video and subscribe over on my YouTube channel.
Let’s take a look at some of the amazing creations from the Babes!
There are so many ways you could colour this stamp. It can be pretty quick to colour, depending on how you tackle it. I went with the fairly simple smooshy texture approach, which doesn’t take that long at all.

Stamp Used: Stuffie Gang, sentiment from Sanford the Birthday Boy Stuffie set
Watch me colour this stamp in the video below. If you enjoy watching please do like the video and subscribe over on my YouTube channel.
Have a great week!
MWAH!
Elaineabella
Hiya sistahs! How are you coping with this consistent daily hammering of news :(.. staying at home.. and then with the scary news that things may start opening again. I don’t know if I am ready for that. On the other hand I am seeing so many small businesses closing permanently .. it’s breaking my heart (We are not closing! I just saw a few on facebook closing their doors and it made me so sad 🙁 ). I pray that you are all safe every day!
For a little uplifting news I know we had a sale as this virus started and then we had to close.. and then our 30 image release has had to be delayed.. so for a little bit of fun, we did a huge inventory and everything we have “in stock” and READY TO SHIP is now 40% off.. we need retail therapy.. I know I do at least.. and since times are tough right now , I thought this could add a little happiness to your lives :). It gives me happiness to have this sale. Here’s the thing.. I will be updating this section all weekend, but the quantities are limited.. so once they are sold out at this price, they go back to regular price.
Also due to volumes and our limited staff, we cannot add, remove etc from orders.. so once you place them, we cannot alter them :(.
You can find all the ON SALE ITEMS HERE and like I said, I will be adding to it.
So I hope this adds a little bit of cheer in a very grim time. I LOVE MY SISTAHS!
Ok so let’s talk BELLARIFIC FRIDAY shall we?
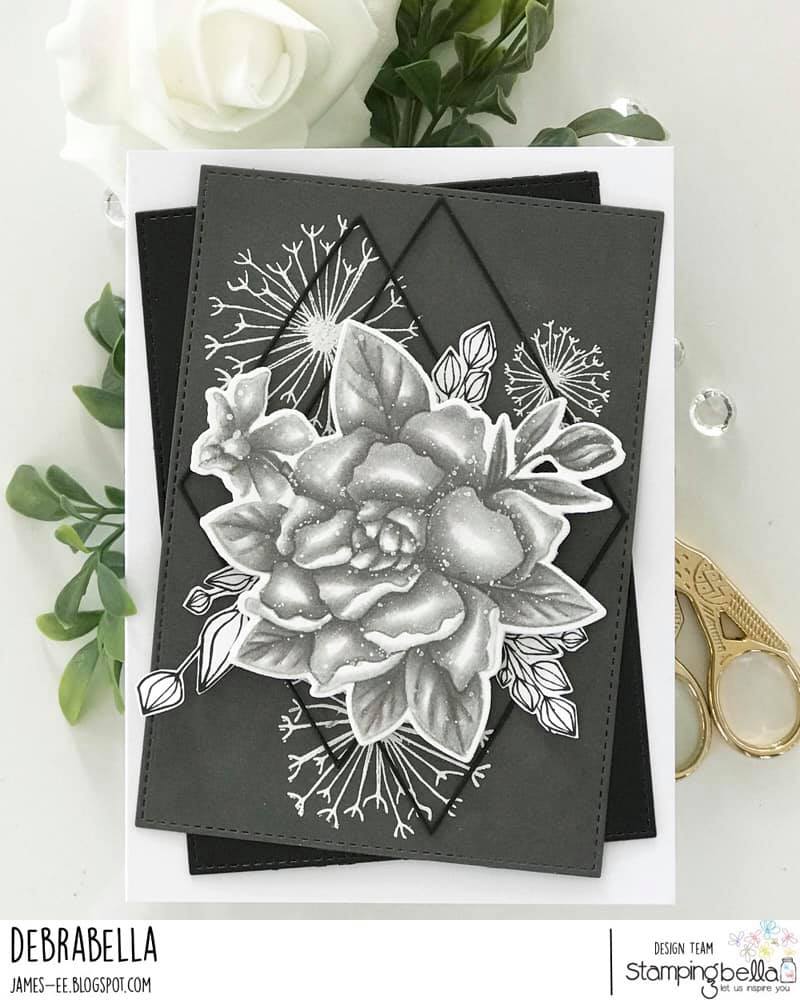
Debrabella used the GARDENIA from BUNDLE GIRL with a GARDENIA and our TUMBLEBLOSSOM # 10
It has been a few, but our Sandiebella is back with another fab Thursday tutorial for you!
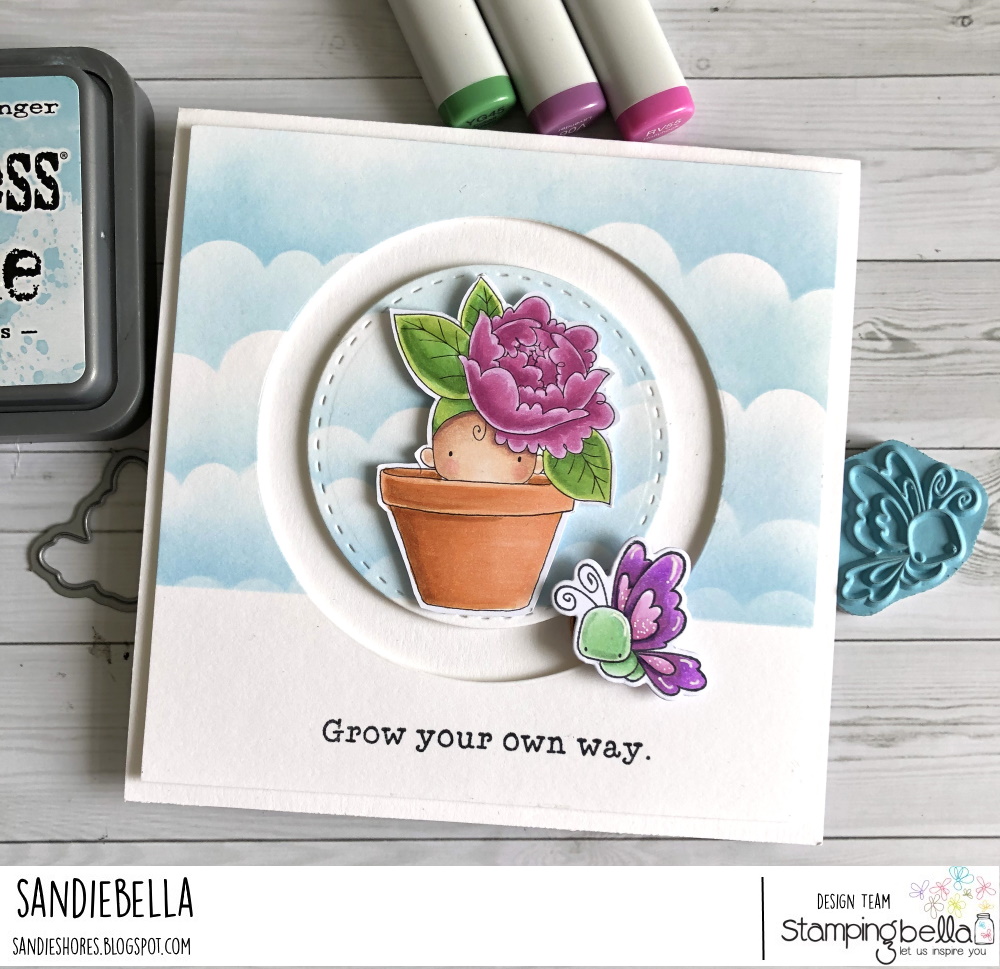
Peony Baby in a Pot rubber stamp
Peony Baby in a Pot CUT-IT-OUT die
Little Bits Little Critters rubber stamps
Little Bits Little Critters CUT-IT-OUT dies
Spring Sentiments rubber stamps
3.5″ circle die
2.75″ circle die
Double sided tape and foam tape/dots
White card
Clouds stencil
Tumbled Glass distress oxide ink
2 coins (approx 0.8″)
Cut a piece of white card measuring 5″ x 5″. Using a clouds stencil and tumbled glass distress oxide ink, create a background, leaving approx 1.5″ – 1.75″ at the bottom white.

Place the 3.5″ circle die on the card front and place the 2.75″ circle die in the centre of it. Secure them with a piece of low tack tape.

Cut out using a cuttlebug or similar.

Stamp the butterfly from the Little Critters onto white card and colour using your desired medium.


Cut the butterfly out using the coordinating CUT-IT-OUT die or fussy cut with a precision scissors.

Stamp a sentiment on the bottom section of the card front.

Cut a piece of card measuring 5.25″ x 10.5″ and fold in half to make a 5.25″ square card base. Adhere the card front using foam tape/dots. Leave enough room around the circle for a coin to move freely around it.

Place a coin slightly under the outer circle.

Again, apply foam tape/dots to the back of the smaller circle, making sure not to go to close to the edges and adhere over the coin in the centre.

Stamp Peony Baby in a Pot on to white card and colour using your desired medium. Cut out using the coordinating CUT-IT-OUT die or fussy cut with a precision scissors.

Adhere the image to the centre circle.

Cut a small square of foam tape and apply it to the centre of the coin.

Adhere another coin on top.

Apply double sided tape to the top of the coin and adhere the butterfly to it.

As you move the card around the butterfly circles the image.


Share your personal favourite Stamping Bella creations with us. We LOVE to see what you’ve been creating with Stamping Bella stamps. Share a link to your latest Stamping Bella card in the comments below, or an old favourite you made a while ago. Tell us what your favourite stamps are. Are there any additions you would like to see to the range? Let us know!
Another way to connect is by joining us in the Stamping Bella Sistahood Facebook Group and share your pictures.
If you are posting your images online, we would love to see them on Instagram and all the platforms mentioned above. To make it easier for us to find you just use #stampingbella as a hashtag. Even better tag me @markergeek and Emily @stampingbella . We love it when you connect, so don’t be shy!
Until next time, HAPPY STAMPING!
MWAH
Elaineabella