Hiya sistahs, happy Thursday with Sandiebella !
Today Sandiebella teaches us how to make a DOUBLE DISPLAY CARD!
Double Display Card


Stamp Edna Loves the Ocean onto white card. Colour using your preferred medium, and fussy cut around the outline. Set aside to work on the card.


Again on the long side, score down from the top to the 1″ mark at 1″, 5″, 7″, and 11″. Also score up 1″ from the bottom at 1″, 5″, 7″, and 11″.

Turn the card to the back and draw a line from the end (at the 1″ mark) of the 1″ score line to the 5″ score line, and from the 7″ to the 11″ score line. Repeat on the opposite side.

Using craft knife, cut across the pencil lines.
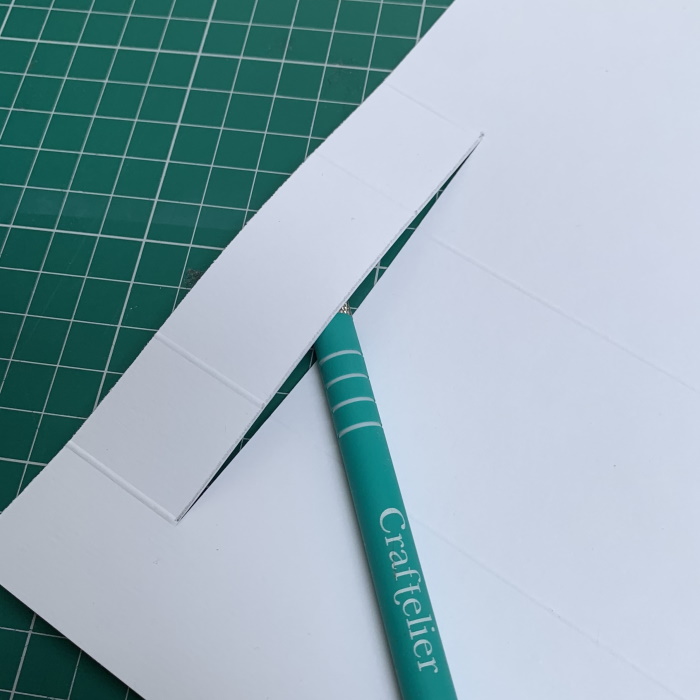
Gently folding the score lines – mountain, valley, mountain, valley fold 1″ sections. Mountain, valley fold the larger sections. Repeat on the opposite side.


Cut two pieces of card measuring 3″ x 6″.

Apply adhesive to the end section as shown, and adhere the 3″ x 6″ piece of card to it. Repeat on the opposite end.


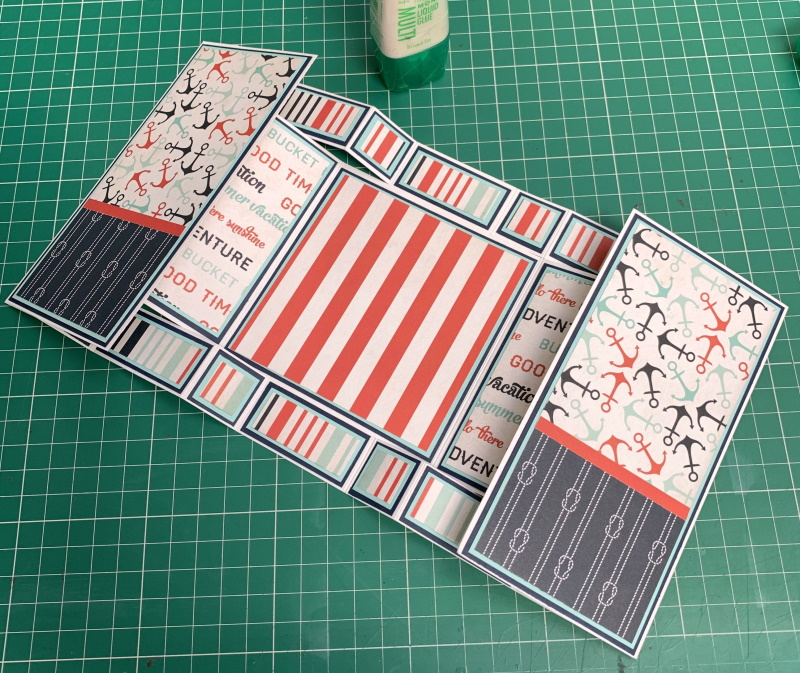
Once all the layers are adhered, cut a selection of nautical themed die cuts for embellishment. Stamp the sentiment onto white card and cut out using a stitched rectangle die.

Cut one 3.5″ stitched circle from navy card and one 3.5″ stitched circle from paper. Adhere them together, then decorate before adhering Edna using foam tape/dots. Adhere the circle panel to the centre section of the card.

Another way to connect is by joining us in the Stamping Bella Sistahood Facebook Group and share your pictures.
If you are posting your images online, we would love to see them on Instagram and all the platforms mentioned above. To make it easier for us to find you just use #stampingbella as a hashtag. Even better tag me @stampingbella . We love it when you connect, so don’t be shy!
Until next time, HAPPY STAMPING!
MWAH
Fun fact: I love dinosaurs. So, with the latest Jurassic World movie out, I couldn’t resist playing with the adorable dinosaurs and scene builder stamps to create a scene. Watch my Dinosaur Scene Copic Video below to see how this fun scene came to life.
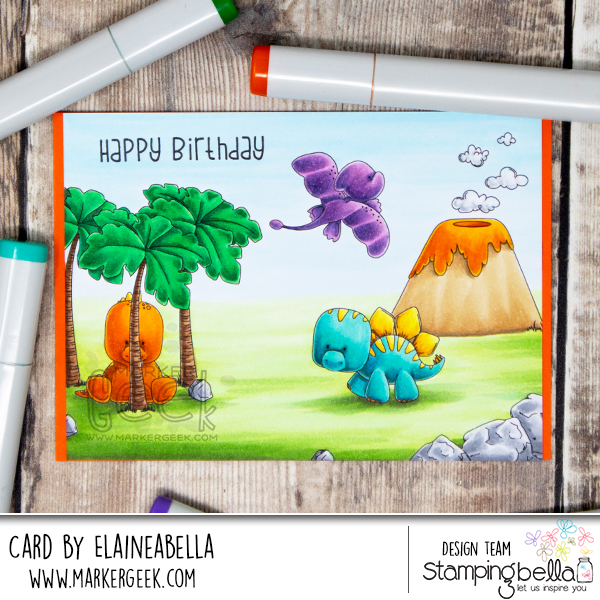
Stamps Used: Set of Dinosaurs, Cave Kids Add Ons, Happy Birthday To You Sentiment Set,
Watch me colour this stamped scene in the video below. If you enjoy watching please do like the video and subscribe over on my YouTube channel.
MWAH!
Elaineabella
It’s that time of the week again. I’ve got my spotlight out and I’m shining it on another amazing stamp – I’m here to show you why you need it. If you already have it, I’m here to remind you why you needed it, and inspire you to get it inky!

Make sure you check out all of the other amazing UPTOWN GIRL STAMPS too for more fun, and our awesome SENTIMENT STAMP SETS for the perfect sentiments to go with all of your stamps.
Watch me colour this stamp set in the video below or in HD over on YouTube. If you enjoy watching please do like the video and subscribe over on my YouTube channel.
I thought it was high time I gave some of the Squidgies stamps some love again! Fishing Squidgy seemed like the perfect one to start with for summer. Watch my Fishing Squidgy River Scene Copic Video below to see how this sweet riverside summer scene came to life.
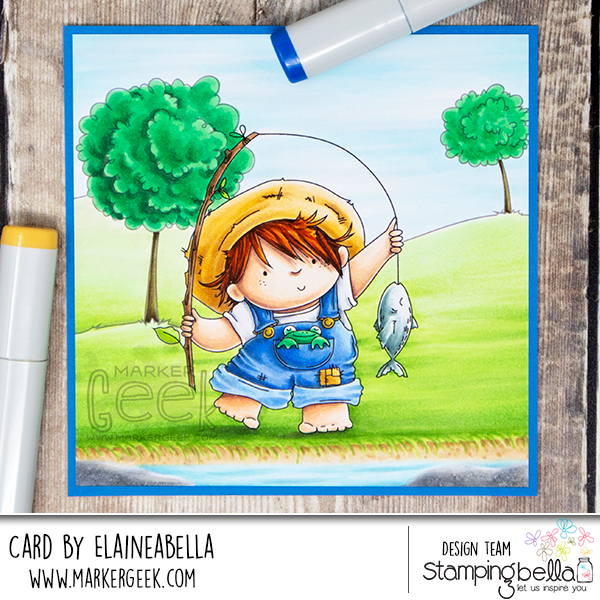
Stamps Used: Fishing Squidgy, Summer Backdrop,
Watch me colour this stamp in the video below. If you enjoy watching please do like the video and subscribe over on my YouTube channel.
MWAH!
Elaineabella
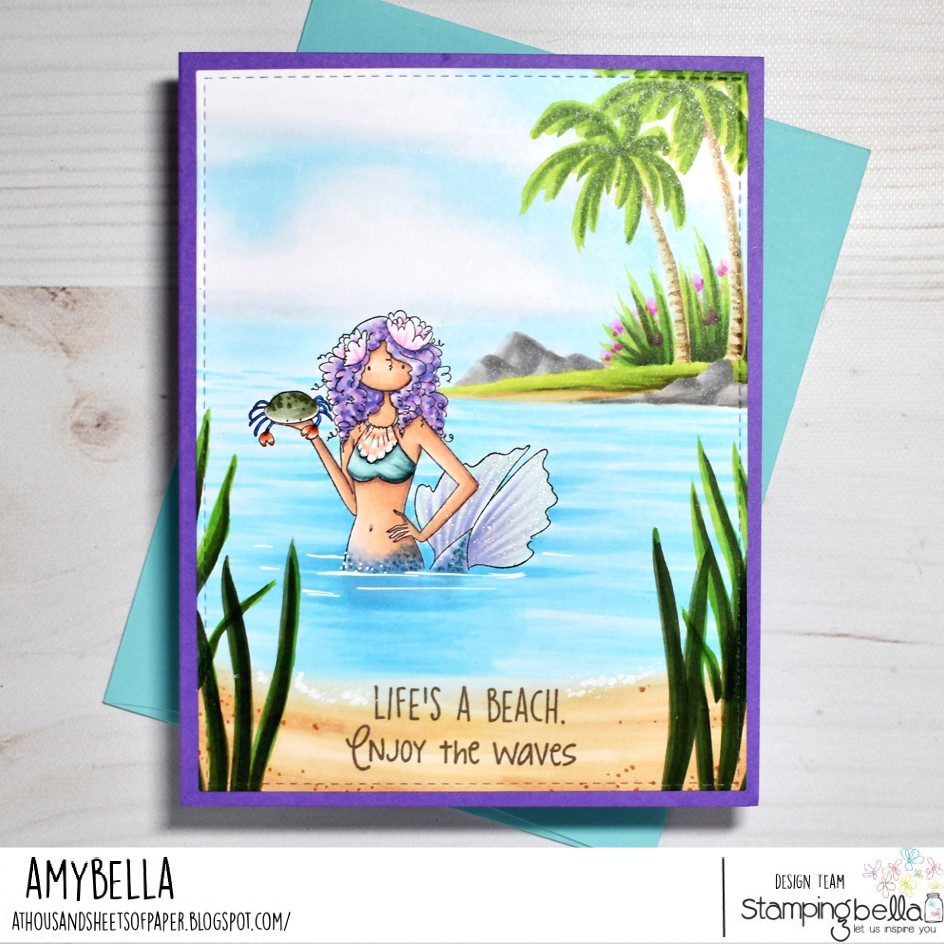
Alright, alright… even though MerMay is over, I still had one more mermaid card up my sleeve for this week’s Scenic Saturday. I’ve always thought that with some minor tweaking Uptown Zodiac Girl Cancer would make for a beautiful mermaid. The real clincher to making it happen came when I was inking up Edna with a Manatee for my previous Scenic Saturday and realized that with some very simple masking I could combine the end of Edna’s tail with Zodiac Girl Cancer to finally make my vision happen. I began by deciding where on the card this mermaid would reside then I placed a post-it-note where I wanted the water to cut her off at the waist. I inked the top half of Zodiac Girl Cancer and stamped her just above the post-it. I then masked off her bent arm, flipped Edna and the manatee upside down and inked up only the fin and stamped her just above the post-it as well. Once I removed the mask on her arm and the post-it below, I quickly colored some blue around her until it looked likeCancer was half in/half out of the shallow water. To alter her top half, I simply grabbed a 0.1 black multi-liner pen and sketched in some connecting lines under her bust line to turn her slinky dress into a bikini top. I then dressed it up a bit by adding the decorative scallop shell and completed the look with a belly button on her newly exposed torso.
For the background I colored in a spit of land behind her, complete with palm trees and flowering bushes, to help give the sense that we have found our mermaid in a sheltered lagoon. I then added more sand down in front of her with large fronds of beach grass framing the sentiment, from the Summer Sentiment set, that I stamped at the bottom of the scene. Adding that tall grass also creates a really strong foreground which adds extra interest to this scene as we hit the trifecta with the mermaid in the midground and jetty in the background. When you can get all three in a scene, that’s when things really come to life!
Well, I hope this easy transformation reminds you to keep looking at the stamps in your stash with fresh eyes and how combining them with newer additions can breathe new life into those older images.
Stay cool and stay crafty!