


Score the mechanism on the 1.5″ side at 0.75″.

At the back section, valley fold the centre score line and mountain fold the diagonal score lines.

On the opposite end, fold upward on the diagonal lines

Repeat for all 4 pieces


Adhere the paper to the white card and then adhere the inside panels on both the card base an the inner cards.

Apply adhesive to the end section of the mechanism

Place the creased edge of the inner card into the end of the mechanism and press firmly to secure. There are 2 mechanisms for each inner card (positioned as shown below)

Ensure the folds on the end of the mechanism are pointing up for the bottom lower card, and pointing down for the upper one and they need to pop out in opposite directions.

Place the inner card on the side back of the card base, with the mechanisms just touching the centre crease. Apply adhesive to the ends as shown. Fold the top of the card over and press firmly.

Open up the card and apply adhesive to the other side of the mechanisms. Close the card up and press firmly on both sides until the glue has dried.


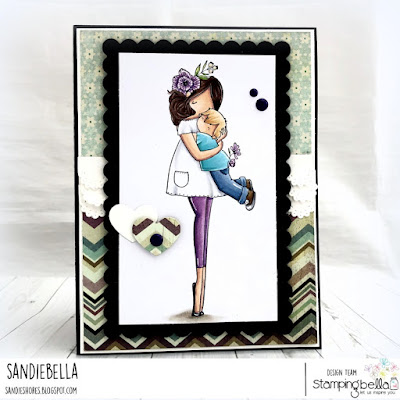
Decorate the front of the card base.


Cut a scalloped rectangle approx 5.25″ x 3.25″ and trim the image to fit.

Apply foam tape to the back of the image and adhere the card front.


Decorate the inside cards using both sentiments from Curvy Girl Boy Mom and diecuts.


Add some die cut hearts and enamel dots to decorate the front.
Share your personal favourite Stamping Bella creations with us. We LOVE to see what you’ve been creating with Stamping Bella stamps. Share a link to your latest Stamping Bella card in the comments below, or an old favourite you made a while ago. Tell us what your favourite stamps are. Are there any additions you would like to see to the range? Let us know!
Another way to connect is by joining us in the Stamping Bella Sistahood Facebook Group and share your pictures.
If you are posting your images online, we would love to see them on Instagram and all the platforms mentioned above. To make it easier for us to find you just use #stampingbella as a hashtag. Even better tag me @markergeek and Emily @stampingbella . We love it when you connect, so don’t be shy!
Until next time, HAPPY STAMPING!
MWAH
Thank you very much for sharing! love your cards and creations!
Fantastic design & colours Sandiebella. I’m loving both these baby love stamps & the baby girl versions. I’m about to be a Grandma soon to a beautiful rainbow baby girl, this design would be awesome to do. Thank you for the inspiration, I’m off to order my stamps x Stay safe, healthy & happy creating x