


Hiya sistahs, happy Thursday with Sandiebella !
Today Sandiebella teaches us how to make a GRADUATE PHOTO GIFT BOX!


Supplies:


Cut a 3.75″ stitched circle from card, and a 3.5″ stitched circle from the designer paper. Adhere together and embellish with school themed cut outs.

Adhere Oddball Boy Graduate to the circles using foam strips, then trim away the excess at the bottom, using the curve of the paper circle as a guide. Set aside for now.


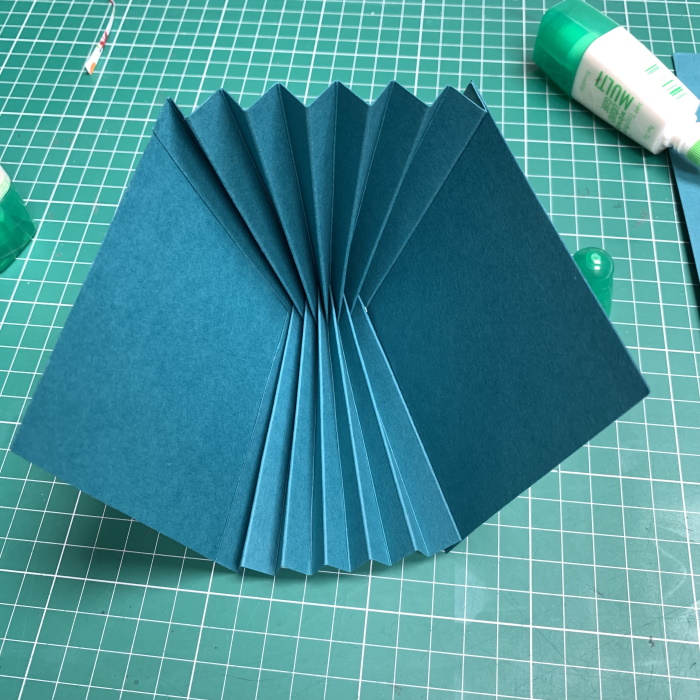
For the expanding part of the box, cut two pieces of card measuring 4″ x 7″. Score at every 0.5″ then mountain/valley fold on each score line.


Interlock the ends and use a small dab of glue under the outer sections to hold it in place.

Cut two pieces of coloured card measuring 4″ square, two pieces of white card measuring 3-7/8″ square, and two pieces of paper measuring 3.75″ square. Adhere the layers together to make 2 panels for the front and back of the box bottom.


Apply adhesive along one side of the interlocked card. Adhere one of the 4″ panels to it, being mindful of directional paper.


Repeat on the other side.
Cut two paper panels measuring 3-7/8″ square and adhere to the inside of the 4″ panels.

Cut six photo mats and inset one into each valley. These are also ideal for notelets, gift cards, etc.

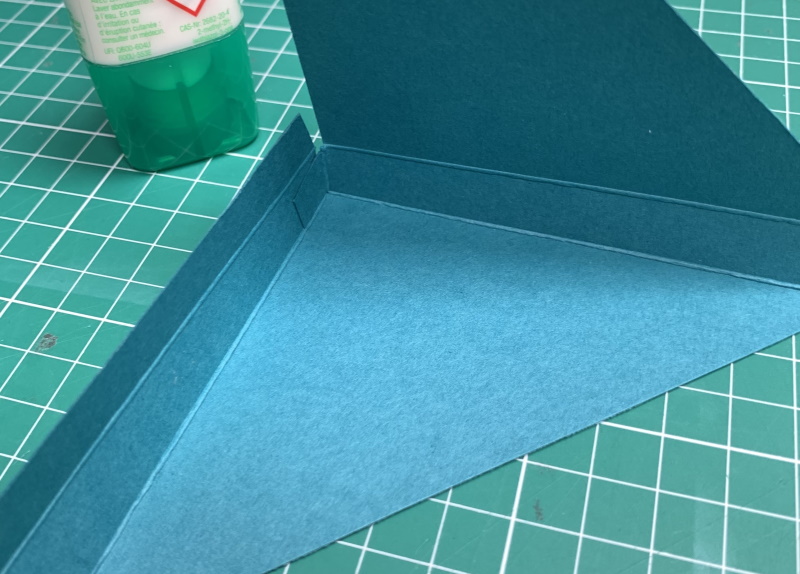
Cut a piece of card measuring 5″ x 8.5″. Score on the long side at 4″ and 4.5″

Score on the short side at 0.5″ and 1″

With the 0.5″ and 1″ sections at the bottom, remove the whole right section up to the 1″ score line. Remove the centre tab up to the 0.5″ score line, then taper the edges of the remaining centre section. Taper the edges of the bottom 0.5″ section on the left side.

Using a paper trimmer, cut on each side of the centre score lines, diagonally to the 1″ score line, as shown below.

Cut a 3.75″ square from white card and a 3.5″ square from designer paper. Cut both diagonally and adhere to the box top. Cut 2 thin strips of paper for the 0.5″ sections.

Apply adhesive to the outside of the 0.5″ tab and adhere to inside of the adjacent side.
Apply adhesive along the long 0.5″ section and fold down the other triangle.

There will be a little corner of card poking out, remove this with a scissors.


Slide the box top over the bottom to ensure it fits correctly.

Apply foam strips across the top section of the box, keeping about 0.5″ away from each edge.

Adhere the circle with the image to the foam strips.

Stamp the sentiment onto a strip of white card, cut out using a stitched rectangle die and adhere to the front. Embellish as desired.
Another way to connect is by joining us in the Stamping Bella Sistahood Facebook Group and share your pictures.
If you are posting your images online, we would love to see them on Instagram and all the platforms mentioned above. To make it easier for us to find you just use #stampingbella as a hashtag. Even better tag me @stampingbella . We love it when you connect, so don’t be shy!
Until next time, HAPPY STAMPING!
MWAH