Scenic Saturday with Amybella: Uptown Girl Sylvia & The Seashell Scene

Hello bellas!

Amy here, and now that we’ve officially welcomed in the summer season, I wanted to head back to the beach with today’s Scenic Saturday card. This time around, rather than bright and playful, I opted for a more serene vibe with Uptown Girl Sylvia and the Seashell (sentiment included in set).

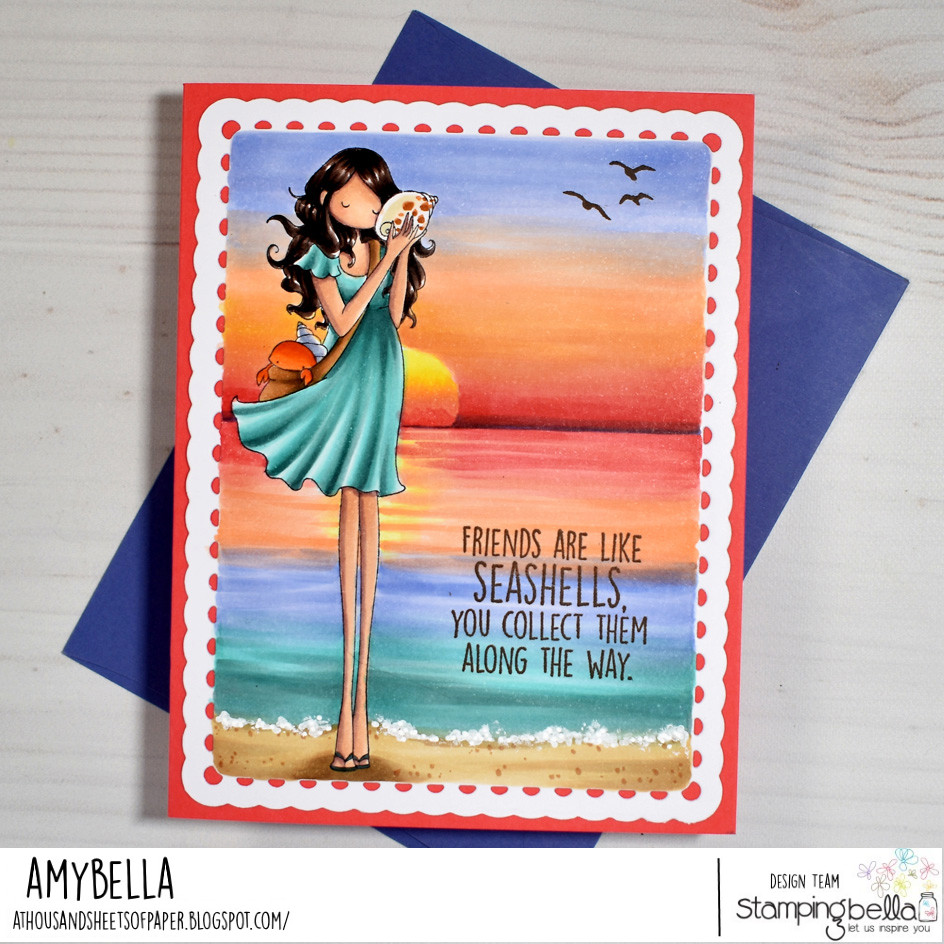
I imagined this beautiful girl strolling through the sand at the end of a long summer day as the setting sun created a kaleidoscope of color painted across her world. To help me achieve that look I went straight to Google and searched beach sunset photos until I found the perfect picture to inspire my color palette. The mix of coral reds and peachy orange with the pale lavender and teal was really different than my usual go-to colors and I welcomed the fun challenge of trying to re-create the look with my Copic markers.

I placed the horizon line slightly above the middle of the card because I knew I would need a bit more room for the sea than I would for the sky. Next, I began blending up from the horizon line starting with the reds and left a space the for the sun itself to be seen setting just behind Sylvia. That choice of placement helps pull focus right to her, just like a spotlight. Then it was time to blend down with the same colors and create the sea. To make sure it didn’t end up looking like another sky I purposefully avoided super smooth blends and opted for some texture lines instead, mimicking rippling waves. Once the sunset background was completed, I added one of the two sentiments that come with Sylvia to the bottom right corner of the card using a dark brown ink. I also added some sea bird silhouettes in the same dark brown to the upper right corner of the card. Both of these together create a “visual triangle” with Sylvia’s dark brown hair, which is a design trick to help add a pleasing balance to the overall design. Now, I don’t know about you, but I can almost hear the same gentle lapping of waves on the sand that Sylvia is hearing in her seashell.ย  ๐Ÿ™‚

Stay crafty my friends!

Scenic Saturday with Amybella: Mini Oddballs Playing in the Sand

Hello bellas!

Amy here, and we are headed to the beach for this week’s summer inspired Scenic Saturday card. The Mini Oddballs Playing in the Sand stamp set had caught my eye and there is something about this mischievous pair that had me excited about telling their story on a card.

I began by stamping this fun-loving pair into the lower left hand side of this A2 sized card front. I knew that between the ocean, sand and sky that I would need to figure out where the horizon line would land. One of the easiest cheats I share for that is to use the eye line of your main character as a reference point. Grab a ruler and whether a little above of a bit below their eye line, quickly sketch in your horizon and this will convincingly lead the viewer’s eye back into the far distance of your scene. Because of their smaller size and the low placement of my stamping, the horizon line at the Oddball girl’s eye line ended up splitting the scene nearly perfectly in half. The top of the card became all blue skies and wispy clouds while the bottom half contains all of the action. I wish I could say that I planned for that all along but in truth, this was a happy accident that added a great sense of balance to the overall scene. All that was left for me to do was color up these Mini Oddballs in some bright, happy colors and hint at some rippling waves disappearing off into the distance. As a final finishing touch, I was compelled to add some beach umbrellas way back at the horizon line, opposite the playful kiddos because I felt that the design needed an extra splash of color and balance. To be honest, they probably look more like beach balls but that accomplishes the same goal so you won’t find me complaining, LOL! ย ๐Ÿ˜‰

Stay crafty my friends!

Scenic Saturday with Amybella: Curvy Girl Loves to Hike

Hello bellas!

Amy here, with a new summertime inspired Scenic Saturday card. Living in the foothills of the Cascade Mountains, hiking is certainly a popular past time around here. And since I recently added the fabulous Curvy Girl Loves to Hike to my Stamping Bella collection, I went right to her as the star of this show. Because my goal was to really immerse Curvy right in amongst the tall trees of the forest, I used a couple scraps of masking paper to block out part of her hand, walking stick and feet when I stamped her. Once the masks were removed, I was left with blank space that I could then color in as a large tree trunk and grass that both now appear to be in front of her. This simple trick adds interest by helping to create a foreground and midground within your scene.

I took my time coloring Curvy and the landscape in front of her, including the addition of some large boulders on either side of the path and the wood sign containing the sentiment, because I find it is easier not to accidentally meld the background and foreground together when one is already completely fleshed out and the detail work taken care of. So, once I had that foreground space looking just how I wanted, I moved on to sketching in the forest behind our pretty hiker. Adding a babbling brook cutting through roughly the middle of the scene was a fun way to add some additional distance between Curvy and the rest of the trees. Just remember that the further in the distance you want something to appear, the lighter the colors you want to use to create them. Take those trees way off in the very back, I used a single earth tone Copic, E55, to sketch them in over the golden glow of the sky that I laid down first. Now when they are viewed in comparison to the more detailed trees, your mind reads them as further away rather than side by side. I hope this makes sense and that it inspires you to play with color as a way to create depth in your own coloring. ย ๐Ÿ™‚


Stay crafty my friends!

Scenic Saturday with Amybella: Tiny Townie Mermaid Scene

Hello bellas!

Amy here, and I’m back with one more MerMay card for Scenic Saturday. This time around I inked up the ever lovely, Tiny Townie Mermaid set. It’s hard to believe this curly haired cutie was released six years ago and I still go back to her time and again. It’s not just because she herself is so adorable, I also really like that she comes with unique background builder elements as well. Between you and me, after all this time, I’m still not-so-secretly hoping for a few new Tiny Townie mermaid sets to be introduced, as I would love to mix and match them all together into one big under the sea party… fingers crossed! ย ๐Ÿ˜‰

But I digress, as for my card today the scene I imagined for this little mermaid was an under-the-sea cave where she keeps her most precious treasures. I began making that a reality by stamping and masking TT Mermaid, then stamping the treasure chest right next to her tail before masking it off as well. I then used the small kelp stamp to add greenery behind her, both growing up from the ground and down from the cave ceiling that I knew I would color in. The last thing I stamped was the small sentiment from the Under the Sea sentiment set. I purposefully stamped it at a wonky angle so that I could make it look like a piece of driftwood signage stuck in the sand. Once everything was stamped into place I knew where the cave opening would be so I began coloring in the algae covered rock walls and the sandy floor below. I made sure to add that algae green to the chest and sign as well, to make everything look like it had been beneath the waves for a long while. Because the majority of the background was covered in cool blues and greens I decided to take advantage of the way contrasting colors naturally ‘pop’ against each other and make her a sunny little goldfish mermaid. This simple trick is a great way to pull the viewers eye right to the star of the show. Finally, I felt like I had a lot of empty space in that cave and I kicked myself for not stamping in any sea friends before coloring in the scene. I ended up adding drops of Copic colorless blender and letting it bloom on that blue background. This effect reminded me of soft jellyfish bodies so I grabbed a white gel pen to add the tentacles and sparkle on each before finishing them off with some Ranger glossy accents. Now TT Mermaid is joined by a school of jellies in that cave of hers and I’m much happier with the finished card.

Stay crafty my friends!

Scenic Saturday with AmyBella: Curvy Girl Mermaid Card

Hello bellas!

Amy here, and it’s time for a new Scenic Saturday card. In honor of MerMay I chose to ink up the beautiful Curvy Girl Mermaid stamp. She quickly became a favorite after her release and now I jump at any excuse to ink her up and get crafty. The Under the Sea Backdrop is another favorite of mine because it is so easy to alter to fit various card front sizes.

Here I’ve narrowed it to fit the A2 card size by stamping Curvy Girl Mermaid first, using a Misti, and masking off her tail then lining the backdrop up to left and inking it only as far as her tail before stamping. I then cleaned the ink off and slid the card to the right before inking up the right side of the stamp just to her tail. By doing this simple shift and selective inking, the mismatched lines are hidden behind her tail and the transformation looks seamless. While her tail was still masked I even added an extra strand of kelp behind it, to change up the scene even more. The shells strewn about the sandy sea bed and the little turtle swimming up behind the mermaid are all from the retired Little Bits stamp sets but there is a great turtle in the Under the Sea Creatures set that would be just as cute. When it came time to color I decided to stick with a rather limited color palette of olive greens and pretty plum shades. Even her blonde hair matches back to the sandy bottom. All of this is proof that it doesn’t take much to make a fin-tastic scene when you are working with such gorgeous stamps in the first place. ย ๐Ÿ™‚

Happy MerMay my friends!

Scenic Saturday with Amybella: Curvy Girl Plays Tennis Card

Hello bellas!

Amy here with a new Scenic Saturday card to share. The latest release saw the addition of so many great new stamps to the store, including this CURVY GIRL PLAYS TENNIS image. She looks quite confident as she poses with her ball and racket, so much so that I thought she could use a tennis court background to call home. Since I myself do not play tennis, my first step was to Google photos of tennis courts to give me an idea of where to start. In fact, Google images is one of my best resources whenever I want to create any kind of background that I haven’t done before.

For this card in particular, I was inspired to recreate a clay court with a tall green screen fencing it in. Looking at the photo I was able to simplify the design into three distinct horizontal sections; the court, the fence and the sky/tree section at the top. By breaking the scene down into pieces like that, tackling a new background feels much more manageable. The net was created by leaving a narrow strip of white card stock showing as I colored in the green fencing, then using a black multi liner pen I drew in the netting below. For the finishing touch, I heat embossed the sentiment from the ENCOURAGEMENT SENTIMENT SET so that it would tie in with all of the other white accents throughout the scene. I hope this card inspires you to make the most of internet image searches the next time you want to create your own card backgrounds. ๐Ÿ™‚

Stay crafty my friends!

Scenic Saturday with Amybella: Oddball Siblings Easter Scene

Amy has a gorgeous card for Scenic Saturday today, but first a little news…

Yep! It’s time to get excited. Sneak peeks for the new release start on Monday, so make sure you pop back here then!

I will leave you with Amy now!

~Elaineabella

Hello bellas!

Welcome back to another Scenic Saturday with Amy. With it being Easter tomorrow I wanted to get one final Easter card made this year. I have quite a few cute Easter stamps in my Stamping Bella collection but I thought it would be a fun challenge to take a non-holiday set and turn it into a sweet Easter scene. The adorable ODDBALL SIBLINGS caught my eye and I knew I had the perfect kiddos to celebrate an egg hunt. I could have simply colored them in Easter inspired pastel colors and called it good but when I spotted the CHOCOLATE BUNNIES set they were too cute not to pair up with the siblings.

The chocolate bunny stamps come in three different sizes and at first I was going to pair one with each kid but then I thought it would be funnier if the two older siblings had small chocolate bunnies while the baby had a chocolate bunny as big as him. So I began by stamping the large bunny and masking it off before stamping the baby. Next I stamped the smaller bunnies and masked them off before stamping brother and sis over top. Once I removed the masks from the bunnies I did have to grab a black multi-liner pen and draw in arms to hold the chocolate confections. For the background I stamped in the SUMMER BACKDROP after masking off brother and sister’s heads. Once I began coloring I made the trees more spring-like by adding pink blossoms between the green leaves. In the grass I colored in a few hidden eggs surrounding the siblings until this scene started to look like the kids being told to pose for a photo by mom and dad before any egg hunting can occur. And from the looks on those faces, you can see how thrilled they all are, LOL!

Happy Easter to all those celebrating the day and may the biggest chocolate bunny be yours.ย  ๐Ÿ˜‰

Scenic Saturday with Amybella: Tiny Townie Butterfly Girl Babette Scene

Hello bellas!

It’s Scenic Saturday with Amy and I just had to celebrate the official arrival of spring with a colorful fairy card this week. Tiny Townie Butterfly Girl Babette with her back turned and beautiful, sparkling wings on full display, got the wheels turning in my head for what kind of scene I wanted to create. Whenever I have a character stamp that is facing away from us I feel that the background they are looking at becomes even more important to the story you are telling. That is when I remembered the Tiny Townie Fairy Garden Fairy House set and I knew it would be the perfect destination for Babette to be walking towards.

To add extra interest I borrowed the mushrooms that come in the Tiny Townie Fairy Garden Fairy set and stamped them first so that when I masked them off and stamped Babette they would help push her into the mid-ground of the scene. I then masked Babette and stamped the Fairy House higher up and on the opposite side of the card so it would be pushed further into the background. Creating that sense of space between all of the elements is key to achieving a perspective where the various sized stamped elements all work cohesively together. Also notice that you don’t have to see every part of every stamp when creating a scene. By cutting off the very top of the house and losing some of Babette’s wing you still know exactly what it is you are looking at and it makes for a more dynamic over-all design by pulling you in and making it feel like you are walking down that fairy path right behind her in your very own fairy tale. ๐Ÿ™‚ The sentiment is from the Spring Sentiment set.

Stay crafty my friends.

Scenic Saturday with Amybella: Curvy Girl Strutting

Hello bellas!

Amy here with a Scenic Saturday card celebrating that special mother/daughter relationship with the fun CURVY GIRL STRUTTINGย stamp. I mean, how cute is it to see them both dancing their way down the street, not caring what anyone else may think? It’s that kind of joy and confidence that one would hope to instill in their little ones and what better way to do that than leading by example.

To make my vision of this wholesome scene happen, I first stamped Curvy Girl and her mini me into the lower left corner of the card front. To change things up from my usual rectangle die cut I instead grabbed a wavy border die and used it to add a decorative edge to the right hand side of the scene. I did this before I began coloring so that the scalloped edge could be left white, giving me a nice transition between the colorful scene and the rosy hued card base. Initially I began sketching in the sidewalk with the help of a ruler and a very light grey Copic marker. After that was beneath their dancing feet I loosened up and sketched in the flowering bushes, tree and houses by hand, not as concerned with perfect angles and such. My philosophy on sketching in background elements is that you don’t have to take a lot of time trying to make them look perfect because they are not the star of the show, your stamped image is. As long as your characters look great, things in the background can be a bit wonky just so long as they create the impression of whatever environment you were going for. Plus, if you get super detailed with your background it can actually start to compete with the main image and you don’t want that. It’s all about finding that happy middle ground of setting a scene that helps tell your story while allowing the characters to shine. The sentiment I ended up pairing with this sweet mother/daughter duo is from the GOOD VIBES SENTIMENT SETย and I love it because it succinctly captures everything I wanted to convey with these two free spirits.ย ย 

Stay crafty my friends. ๐Ÿ™‚

Scenic Saturday with Amybella: Bundle Girl with Balloons

Hello bellas!

Amy here with a Scenic Saturday card full of spring colors. In fact, before I even began stamping, I went to Pinterest and searched ‘spring color palette’ to find my inspiration. I love having resources like that for the times when I need a little extra push to get a card started. This particular palette came from a photo of a lovely flower bouquet in a blue tinted Mason jar and the combo of coral, blush pink, spring greens and tumbled glass had me searching through my collection of Bundle Girls. I quickly landed on the adorable Bundle Girl with Balloons to build my card around.

Since this Bundle Girl has released her balloons up into the sky and the sentiment that comes with her is all about letting things go, I wanted to play up height in this scene and choosing a slimline or mini slimline card base is a great way to do that.ย I also purposefully stamped the balloons so the highest one is partially cut off at the top of the card, this adds a sense that the sky extends even further up than we can see. Another trick I played with to add the illusion of height was coloring in the tall bank of fluffy clouds off in the distance. I shaded them pretty heavily on the underside to make the bright white edges hint at some strong sunlight shining down on Bundle Girl and her balloons. Her upturned face also leads the eye to the top so all of those various details come together to reinforce the overall theme.ย 

Thanks so much for stopping by today.ย  ๐Ÿ™‚