Scenic Saturday with Amybella: Bundle Girl among Foxgloves

Hello, hello!

Amy here with a new Scenic Saturday post. With so many fantastic stamps included in the last release there are still plenty that I haven’t inked up yet, making today the perfect time to get another Spring cutie on a card. This darling image is Bundle Girl Among the Foxgloves and how tiny she is perched atop that clay flower pot.

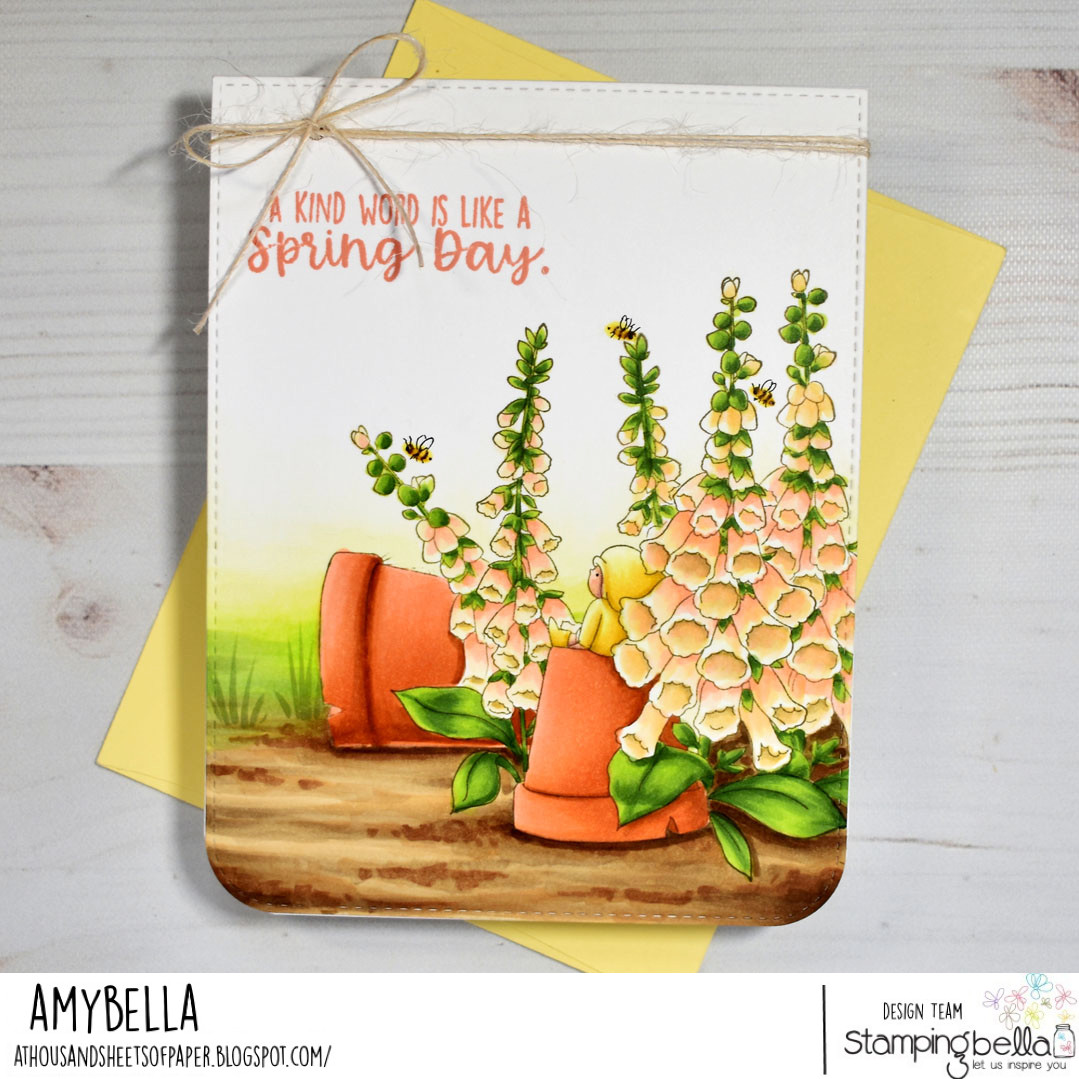
You may notice that the Bundle Girl on my card looks a bit different than the original image in the store. That’s because I had some fun with masking and selective inking to add more flowers and an extra pot to my scene. Using Memento Rich Cocoa ink I first stamped Bundle Girl Among the Foxgloves as is, low and on the right hand side of the card front. I then masked off the entire image before repositioning the stamp and adding ink to only the larger stem of flowers and stamping them behind the first flowers. I repeated this process of repositioning and inking only a single stem two more times, until I had filled up the space with foxgloves. Wanting to extend the scene a little further across the card, I masked off the flower stems out front before inking up just the flower pot and laying it on its side. There wasn’t much of a stamped line left along the bottom of the image but once I colored in the dirt beneath the pot you don’t even notice the missing line work. Once all of the masks were removed I was left with an abundant garden full of flowers for the wee Bundle Girl to enjoy. I was also left with a small smudge of ink just above the center stem of flowers, which wouldn’t do because the clean and simple card design that I had planned meant having the ground I colored in fade to white at the top of the card, and even a tiny bit of errant ink would stand out like a sore thumb. So I took a page out of the great Bob Ross’ playbook and told myself, there are no mistakes… just embellishment opportunities. Using a few yellow and brown markers, plus a black multi liner pen for the legs and wings, I colored a very simple little bee shape right over the smudge, then gave him a couple of friends for good measure. They certainly weren’t part of my original design plan but I think they ultimately added some extra charm to the over-all design. The sentiment is from the Hello Spring Sentiment set and I stamped it in the opposite corner from the image, in an ink color that coordinates with the flowers, which adds a sense of balance and cohesion to the completed card.
Hopefully this reminds you that rather than get upset the next time a crafting mishap occurs, instead look at it as a challenge to get really creative and turn it to your advantage.  😉

Stay crafty my friends!

Scenic Saturday with Amybella: Tiny Townie April & Her Bunny Love Easter

Hello again!

Amy here with one last Easter card for this week’s Scenic Saturday post. I couldn’t resist going back to the recent Spring release and inking up the lovely Tiny Townie April and her Bunny Love Easter. I love how these two are framed in a wreath of pretty Spring flowers and I really wanted to play that up on my card.

The first step was to ink up the wreath image near the top of the card front using Memento Rich Cocoa ink. I then cut a mask for it and covered the whole thing before using the Copic airbrush system to add the purple base. Before removing the mask I also used a textured background pattern stamp from my crafty stash to add another layer with some tone on tone purple ink. With that done I could remove the mask and begin coloring. I started with the wreath, sticking to pretty Spring inspired pastels and then jumped to the mini background scene that I added behind April. I kept it simple with a grassy field ending in a hedge row of distant trees, but even that quick addition suddenly makes this look like a mini portrait. Once I had April and her beloved bunny colored as well, I could then complete the card by stamping another of the sentiments from the Easter Sentiment set at the bottom using white embossing powder. I just love how this card shows that sometimes having just a hint of a scene can be just as effective as coloring an entire card front.  🙂

Stay crafty my friends!

Scenic Saturday with Amybella: Curvy Girl with a Sign Easter Card

Hello bellas!

It’s time for a brand new Scenic Saturday card. I will admit that I was a bit sad that there were no new Curvy Girls in the Spring release because they are some of my favorite images. But rather than let this little hiccup get me down, I instead felt inspired to get creative with the Curvy Girls in my collection and see who I could turn into a pretty Easter card. When I found Curvy Girl with a Sign I knew I had a winner.
Even though Curvy Girl with a Sign comes with several sentiments, the sign she is holding is large enough to house many of the different sentiments that Stamping Bella has to offer. Because I wanted to create an Easter card, I found the perfect sentiment to add to her sign in the Easter Sentiment set. I stamped it in a pretty pink ink and then added the smallest chocolate bunny from the Chocolate Bunnies set as additional decoration. Just like that I had the pretty Easter Curvy Girl that I was looking for. For good measure I also added some eggs on the ground thanks to the Bundle Girl Bunny stamp. All that was left to do after that was to color her into a colorful spring background. Atmospheric perspective relies on the use of color to create the illusion of distance so I began coloring in the loose, puffy ‘trees’ using very light blue/green markers. I then continued to layer over top them, first with slightly more saturated blue/greens then soft greens to build up the forest behind her. Then on the bottom half of the card I used the same scribbly application of color to create the bushes before sketching in the simple flower shapes. It’s only after the flowers were colored on that I then added the green of the grass and leaves around them. I gotta say, I had a lot of fun with this Easter transformation challenge that I set for myself and hopefully it inspires you to give some of the stamps in your stash a Spring twist.  🙂

Stay crafty my friends!

Scenic Saturday with Amybella: Oddball Oz Dorothy & Emerald City Backdrop

Hello bellas!

Amy here with another Scenic Saturday card to share. Apparently I’m on a bit of an Oddball kick as this fantastic ODDBALL OZ DOROTHY & TOTO stamp was just begging to make it onto a card. To help create the perfect scene for these two I also grabbed the EMERALD CITY BACKDROP, because what good are a pair of ruby slippers without a yellow brick road to walk down?
I began by stamping the basket first and masking it off before stamping Dorothy slightly higher right over top. By raising her a bit this creates the appearance of the basket sitting on the ground out in front, ready to be picked back up when she continues on her journey. Next, I masked off Dorothy so I could stamp the Emerald City Backdrop and have it fall behind her once the masks were removed. Now, because I stamped the backdrop rather high up on the card front this left a lot of open space down at the bottom. Not wanting the brick road to be cut off mid scene I grabbed a 0.1 black multi-liner pen and proceeded to sketch in loose rectangles inspired by the artist drawn bricks already in the stamp. I made sure to gradually increase the size of the rectangles as I moved down the card to continue the illusion of the road getting closer to us, the viewer. This simple sketching of basic shapes is something anyone can do and it’s an easy way to get more mileage out of your backdrop stamps. The fun sentiment is from the OZ SENTIMENT SET and I stamped it onto a speech bubble die cut that I adhered to the card using foam adhesive to give it some lift. I gotta say, this Oddball Dorothy certainly doesn’t look like she is going to let anything get in her way, LOL!   🙂

Stay crafty my friends!

Scenic Saturday with Amybella: Fairytale Princess Scene

Hello bellas!

It’s Scenic Saturday once again and today I’ve got an enchanting birthday card to share with you. This pretty Oddball Fairytale Princess is all dressed up for her special day as she strolls through the fields layed out before the Fairytale Backdrop.
The Backdrop stamps are always a great time saver when it comes to creating scenes for your characters. This time around I’ve manipulated the Fairytale Backdrop a bit because I didn’t want the castle to land in the middle of the card, directly behind the princess. So after stamping and masking her off, I first stamped the backdrop on the right hand side of the card, using the princess to hide where the scenery ended. I then shifted the stamp on my Misti stamp platform and stamped a small portion of the backdrop to her left as well. This way I still had the mountains and trees extending all the way across the card and with her mask removed, you would never know that it didn’t originally come that way. I also wiped the ink off the original path leading from the castle gates before stamping because I wanted to color in my own heading off in a different direction. I then proceeded to color in the scene using a mix of bright greens and pretty pastels, perfect for a princess themed birthday celebration. The sentiment I added to pull everything together is from the Princess Sentiment set and that was all I needed to complete this charming card.  🙂

Stay crafty my friends!

Scenic Saturday with Amybella: Bundle Girl on a Plane Falling Hearts Scene

Hello bellas!

Amy here with another Valentine’s Day card for this week’s Scenic Saturday. This time around the cute little BUNDLE GIRL ON A PLANE seemed like a fun and playful choice, especially when I paired her with just the hearts from the BUNDLE GIRL WITH FALLING HEARTS stamp.
There were a few choices I made when laying out this design to help play up the feel of movement within the scene. The first was deciding on a long mini slimline card size to provide plenty of space for this Bundle Girl to sail across. When I stamped her on the card front I also made sure to position the stamp so that both the tip of the plane and part of the winding trail ran off the edges. By having part of the image disappear out of frame it opens up the space that the scene is occupying and allows the viewers eye to imagine the scene extending out beyond the card. Finally, the trailing hearts that I added by inking up just the hearts from the Bundle Girl with Falling Hearts stamp, start above her raised hand and flutter back the entire length of the card, making it look like she has released them into the wind. All of these things combined, work together to achieve that sense of motion that I was after with this cutie. The sentiment is another one from the LOVE SENTIMENT SET and the way it is nestled in at the end of the motion trail brings all of the various elements full circle in a visually pleasing manner. So even though the completed scene is pretty clean and simple, I hope you’ve enjoyed this glimpse into my thought process when creating.  🙂

Stay crafty my friends!

Scenic Saturday with Amybella: The Softer Side of Tiny Townie Queen of Hearts!

Hello bellas!

Amy here with a new Scenic Saturday card to start off the new year. Valentine’s Day card making is in full swing right now and as I was looking at the stamps from the latest release, I thought that the TINY TOWNIE WONDERLAND QUEEN OF HEARTS could take a break from shouting, “Off with her head” and soften her image to send some love instead.

I really wanted to take advantage of her pointing hand and have it directing the viewer’s eye right to the message that I chose from the LOVE SENTIMENT SET. The bold serif font carries the weight of her decree quite nicely, I think. To make room for this effect I flipped the card stock panel to a landscape orientation and stamped the Queen far to the right, even letting some of her gown get cut off at the edges. Not only does this choice allow room for the sentiment but it also creates a more dynamic design than if I had simply stamped her in the center of the card front. With the Queen and sentiment both in place I could start coloring both her and the world she would inhabit. Because I wanted the Queen to have a sweeter look, I opted to deck her out in pretty bubble gum pinks and pale creams… even her wig got the cotton candy treatment. And since she is a royal, the idea of a castle type setting seemed appropriate but I didn’t want the entire background to be stone grey. That’s when the idea to place her on a balcony came to me and from there I started sketching in the floor and railing using a ruler and a very light grey marker. Once the shading and brick/stone detailing were complete it was as simple as adding a wash of blue sky and green fields to fill in the rest of the scene and this card was done. I gotta say… I’m kinda loving this softer side of the Queen of Hearts.  😉

Stay crafty my friends!

Scenic Saturday with AmyBella: Uptown Girl Vera glammed up for New Year!

Hello bellas!

Amy here with my final Scenic Saturday card of 2023. UPTOWN GIRL VERA & HER VANITY has always brought to mind stories of her getting herself ready for some glamorous party. With her stylish up-do and voluminous gown, you know this is a girl who isn’t afraid of the spotlight. So, as we come up on the new year with all of the celebrations that will be held to bid adieu to 2023 and welcome in 2024, I quickly realized that it would be perfect to have Vera getting ready for the glitziest New Years bash of them all. 

I started by stamping Vera and her Vanity in the center of the card front using Memento Tuxedo Black ink then proceeded to color her dress using a stippling technique. This creates the look of a sparkling sequined gown due to the high contrast between the dark and light grey markers that I used. The bright gold of the bow, her shoes and the vanity mirror create a ‘visual triangle’ that leads the eye throughout the scene. To create the spotlight effect that pulls focus right to Vera herself, I first colored in the wood floor letting the colors fade to white as I neared the edges of the card. Once that was done I masked off Vera and her Vanity before using the Copic airbrush system to frame the scene. The same effect can be done with an ink blending technique as well. For some added embellishment I used both the colorless blender and a white Sharpie to add the floating sparkles. Because I didn’t have a New Years sentiment in my stash that suited this card I ended up creating my own using my computer and printing it out on a strip of card stock that I then added to the top of my card and decorated with some glittery gold enamel dots. Now I am sure that Vera is more than ready to ring in 2024 in style.

Thank you all for joining me on these Saturdays and may the new year be your craftiest one yet!

Amybella

Scenic Saturday with Amybella: Tiny Townie Ellie the Elf

Hello bellas!

Amy here with one last Scenic Saturday card before Christmas. I realized recently that even though I’ve had this sweet TINY TOWNIE ELLIE THE ELF stamp in my stash for quite some time, she had yet to make it on a card. So it was high time that I got her inked up and ready to celebrate the season.

With the way Ellie is sitting I was inspired to shake up my usual card design and opt for a half circle die to house this scene rather than a rectangle. This limited the space left behind her but that didn’t stop me from masking Ellie and stamping the UPTOWN CHRISTMAS TREE directly behind her. Even though you only see the bottom portion of the branches, you can still tell that she is sitting beneath the tree. This helps shift the perspective of the scene down low and makes it feel like we are sitting right there on the floor with Ellie. So don’t feel like you have to see every part of a stamp when inking up your design, sometimes just getting a partial glimpse of something can be even more interesting for the story you are telling. As you can see, I also had fun playing with a non-traditional Christmas color combo for this card. A simple shift from red to fuchsia and green to mint gave this sweet elf an added playfulness and the sparkle and shine of the gold and silver accents keep it looking quite festive. The sentiment I found to complete the card is from one of my favorite Christmas movies and can be found in the CHRISTMAS SENTIMENTS SET. All in all, this one was a fun change up from my usual Christmas cards and I think it really suits Tiny Townie Ellie the Elf.  🙂

Stay crafty my friends and a very merry Christmas to all those celebrating!

Scenic Saturday with Amybella: Uptown Girl Snow White Scene

Hello bellas!

Amy here with my Scenic Saturday card and with the new release hitting the store yesterday I just had to color up another one of the gorgeous Uptown Girl princesses. The classic fairy tale theme of these beauties lends them so well to fantastical scene building opportunities. Uptown Girl Snow White challenged me to create a background that would transport us right into her story book world.

First things first, I went straight to Pinterest and searched for a reference to Snow White’s wishing well that I could use as a visual aid when sketching in the scene. I found a still from the old animated feature that was the perfect jumping off point, so I grabbed a very light Copic marker, E40 in this case, and roughly sketched in the well behind her. I prefer this method over using a pencil because the graphite in pencil lines can gunk up your marker nibs, which is never a good thing. The E40 is so light that once I start adding in my darker colors, the lines virtually disappear which allows me shift and modify lines if the perspective looks off on anything. As detailed as this finished scene appears on my card, it is actually quite stripped down and simplified from the original inspiration photo because while I want Snow White to look right at home within it, at the end of the day she is still the star of the show. The sentiment is from the new Princess Sentiment set and I added it at the bottom of the card. This is definitely a more advanced background which takes time and practice to be comfortable attempting but I hope it inspires you to see that coloring scenes on your own cards can start simply and eventually lead you to all sorts of imaginative places if you just stick with it.  🙂

Stay crafty my friends!