Time for more Stamp It Saturday fun! I hope your weekend is going well so far.

I love to indulge in a little stamped image butchery. Sounds a bit savage, but really its just a great way to get as much use as possible out of your stamps. You don’t always need to use the complete image to create a fun card or project and make an impact.
Uptown Girls are one of my favourite stamp ranges to get choppy with! Because they are so leggy, the Uptown Girls tend to be larger stamps, often over 4″ tall. Cropping or partially stamping the images is a great way to use them on smaller cards and projects, especially if you like to create more embellished cards.
Here are some examples of cards I’ve created with bits and pieces of Uptown Girls.
My favourite Uptown Girl is probably still gorgeous Uptown Girl Quinn and her Boots. As you can see, I love cropping her, and have even used just her legs!
Stamps Used: Uptown Girl Lolly, Uptown Girl Quinn, Uptown Girl Pippa
Uptown Girl Madison remains the focal point, but cropping her allowed me to have a little more fun with the card design.
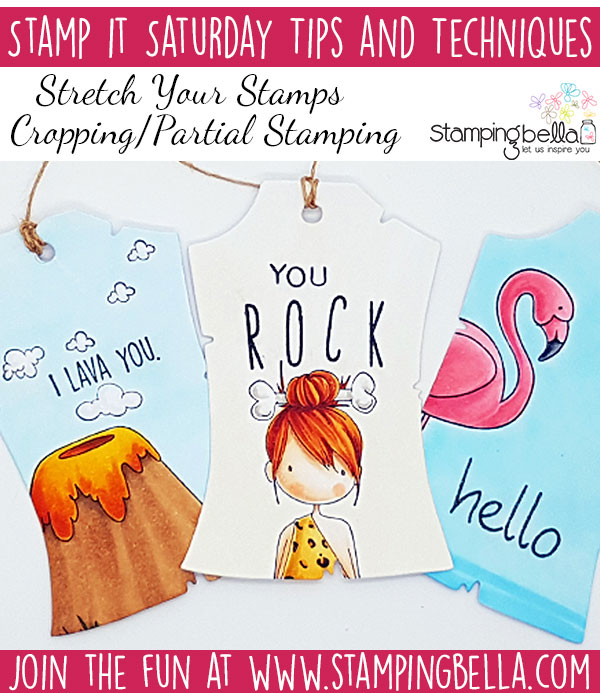
Partially stamping or cropping images is fantastic if you want to create tags to coordinate with your cards (if you have any of the Squidgies they mostly come with two sizes of stamps, one being mini which works brilliantly for this purpose too). I stamped up a few tags especially for this post:
Stamps Used: Cave Kids set, Cave Kids Add-Ons set, Littles Surfer set (coordinating dies available for all)
See? How cute? I partially stamped the images on my pre-cut tags, but you could also stamp then die cut the part of the image you want, either way works perfectly!
Have you got any tips/suggestions regarding storing ink pads? What are your favourites? Feel free to share with us in the comments section!
If you try out the techniques shown in any of the posts with your Stamping Bella stamps, be sure to share! We would love to see the results and hear how you feel about them. Show off your creations in the comments below and even better, share your own favourite tips with us. Let’s talk stamping!
If you are posting your images online, we would love to see them on Instagram and all the platforms mentioned above. To make it easier for us to find you just use #markergeekmonday and/or #stampingbella as a hashtag. Even better tag me @markergeek and @stampingbella . We love it when you connect, so don’t be shy!
If you’re on Facebook join us in our private chat group Stamping Bella Sistahood to share your creations there and chat all things Stamping Bella related!
Until next time, HAPPY STAMPING!
MWAH
Elaineabella
I’m going to have to do this. I seem to think I have to use the entire stamp on my cards. I’m going to try to be a little more creative in my Stamp usage! Thanks for sharing!?
What a great idea!!!
Great ideas! Thanks!
What great tips and ideas. ??
Love that idea with Quinn! So cute!!!
Hi!
Regarding ink storage, I have been using those kitchen binz acrylic trays. They measure approximately 4 x 4 x 14.5, and tilted on their side the ink pads fit 5 rows across, stacked 5 up for a total of 25 per tray.
I have then stacked the trays. Little dots on the fronts of the ink pads that I glued on to show the colors.
They will work for the larger distress inks I am sure, but haven’t needed to organize those yet as I have mostly the minis which are stored in the tins.
NOTE:
There are two types of the Fridge Binz brand trays that look almost identical. The ones with the pull-handle in the front measures apps. 14.5 including the handle so it doesn’t hold as many (4 rows of 5, with a gap at the side). The ones with oval cut-out handles are the ones that hold the 25.
Sorry for one more comment. I looked them up. It is InterDesign Refrigerator and Freezer Storage Organizer on Amazon… here is a link. https://www.amazon.com/InterDesign-Refrigerator-Freezer-Storage-Organizer/dp/B003E1OAQC/ref=sr_1_4?ie=UTF8&qid=1502723895&sr=8-4&keywords=fridge+binz+and+freezer
Can’t beat $12.99 each!