WELCOME TO BLOGABELLA

Marker Geek Monday: Colouring with Zig Clean Color Real Brush Pens

Time to get another week started off the way we mean to go on – with lots of colour! It’s me -Elaineabella – here to share some more colouring tips with you for Marker Geek Monday. This week I’m answering some requests that came via Instagram, to see some colouring with the Zig Clean Color Real Brush Markers. Connect with us folks, we’re listening!

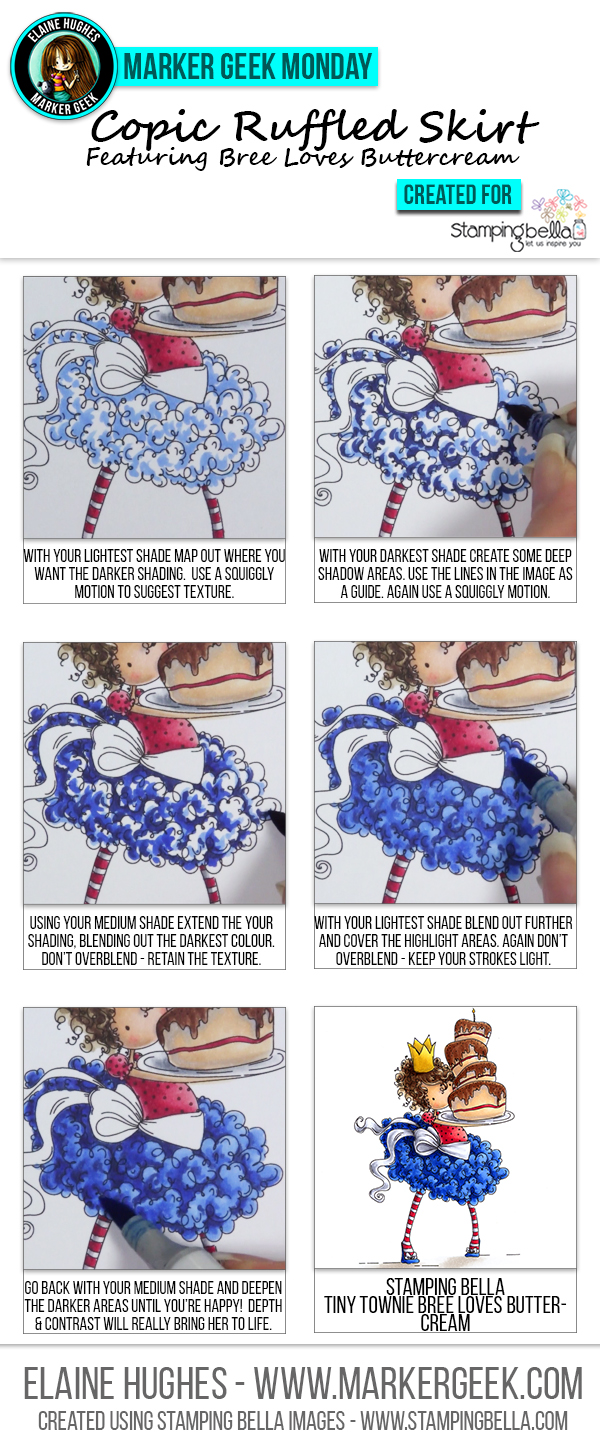
If you also enjoy colouring with alcohol based markers like Copics and you missed last week’s post take a look when you’re done here, especially if you find images like Tiny Townie Bree loves Buttercream a little daunting with those big lacy ruffled skirts : Marker Geek Monday: Copic Colouring a Ruffled Skirt with Step by Step and Colouring Video. Although that post was created using Copic Markers, I would actually approach the colouring in a similar way using other supplies like the Zig Clean Color Pens, so it is worth checking it out whatever your preferred medium.

Marker Geek Monday at Stamping Bella: Colouring Thinkingofyouabella with Zig Clean Color Real Brush Pens. Click through for tips and a video!


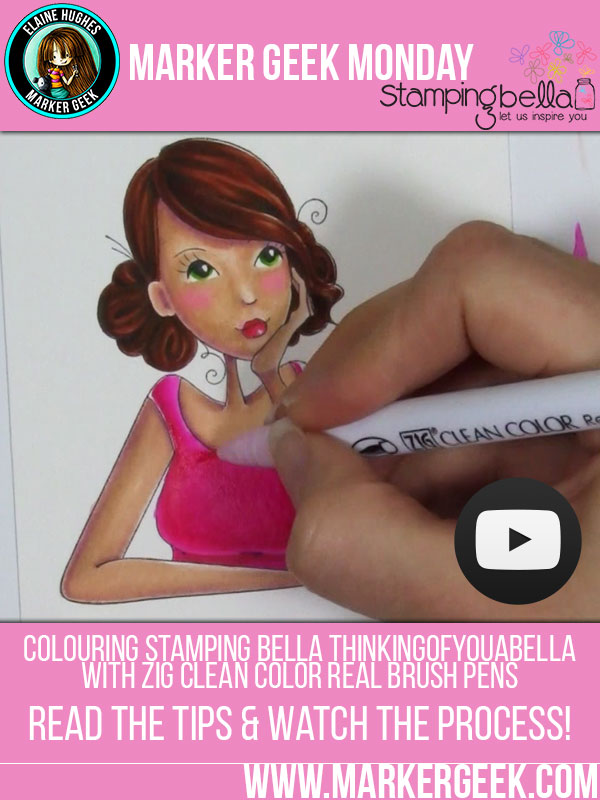
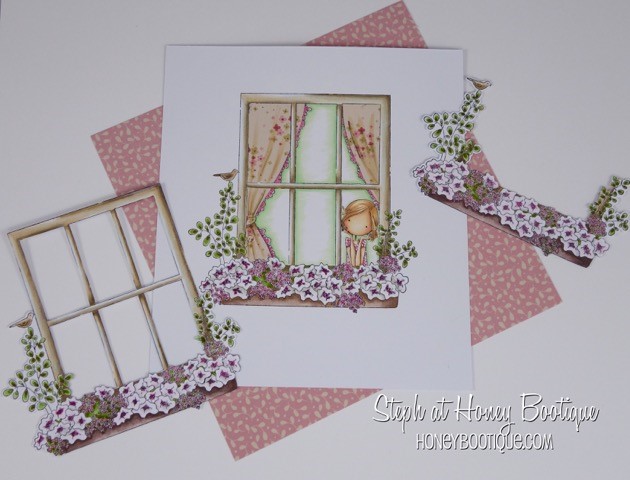
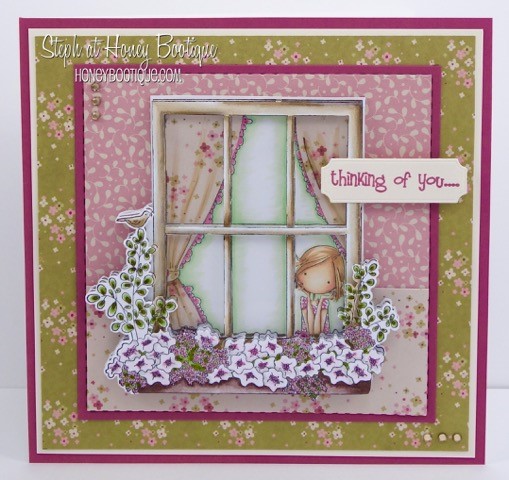
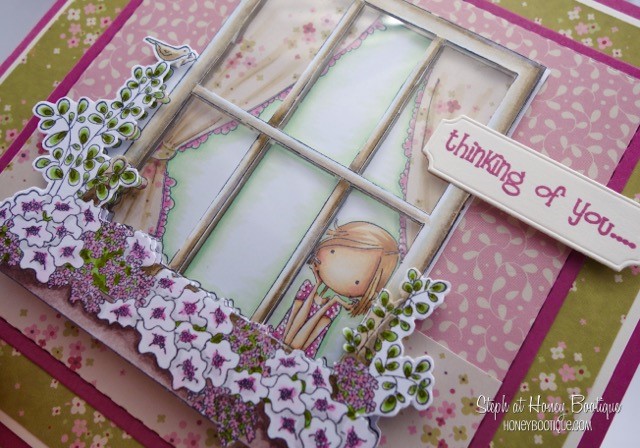
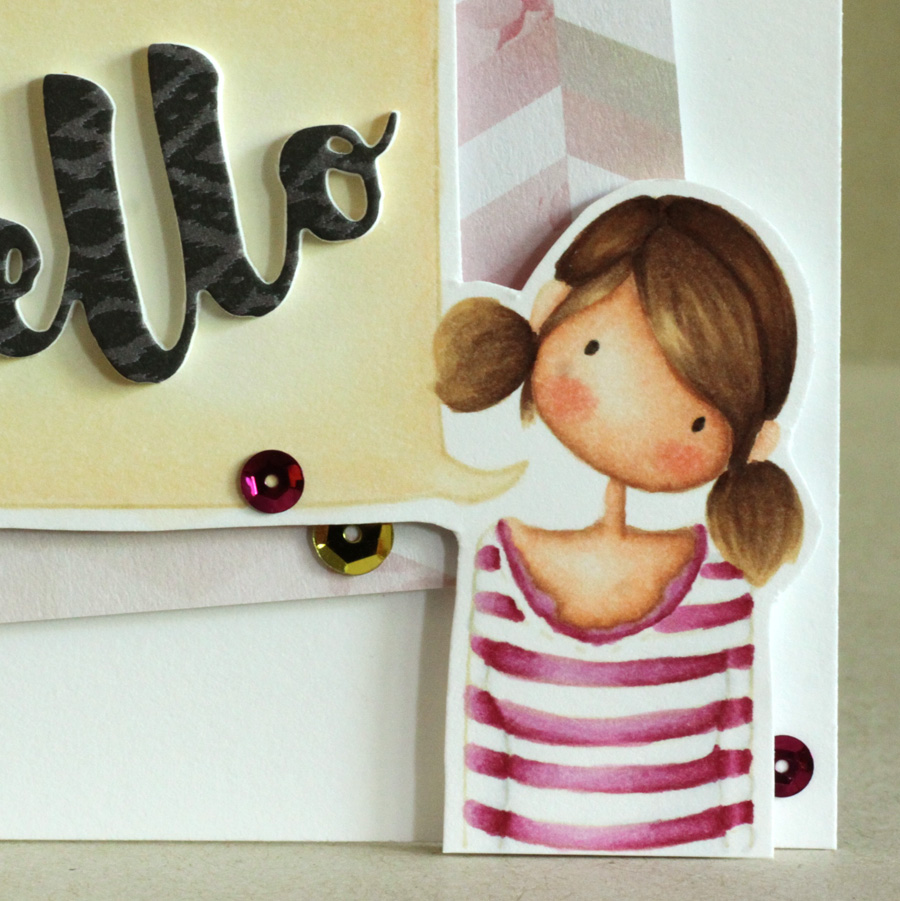
Over on the Stamping Bella Instagram feed, mperezdetagle asked if any of us have coloured Stamping Bella images with Zig Clean Color Real Brush Markers. I know that our current special guest Sandy Allnock has coloured some of the stamps in the past (see her awesome Nacho blog post with video), but I’m not sure I’ve seen any of our character stamps coloured with them and I certainly hadn’t attempted them personally. I had a quick play with mine and Thinkingofyouabella and this was the result:

Not too bad! I actually like her a lot more now than I did straight after colouring her, which is often the case with colouring.

TOP TIP: if you’re not loving your work, walk away for a while and return to it with fresh eyes. So often our opinions of our work can be tainted by the disappointment we feel when things aren’t going exactly as we envisaged, or the frustration of having to deal with technical issues in the process.

A few people, including our wonderful BOSSABELLA Emily requested that I do a post/video using the markers. I was a little hesitant, as while I am not new to the markers, I also don’t feel that I’ve practiced enough in this particular area with them. Then I thought it might still be fun to let you see how I approached colouring with them, and give you a little peek at the process. Hopefully this post will help you feel inspired to experiment yourself, whether with these particular pens or whatever you may have!

Zig Clean Color Real Brush Markers:

These markers are a completely different beast to my usual alcohol based markers (Copics, Touch Twin, ProMarkers etc). They are filled with a water-based dye ink. Unlike most watercolour markers however, they have a proper bristle tip. One very appealing advantage of the proper synthetic bristle tip is that it enables you to achieve beautiful fine details, which you will see if you take a look at Thinkingofyouabella‘s hair. The bristles give a flexibility that allows you to create lines that go from thick to thin quite naturally and fluidly. I absolutely loved colouring the hair with these pens using the direct to paper marker blending technique.

Kuretake Zig Clean Color Real Brush Markers. Click through to read the blog post and watch a colouring video!

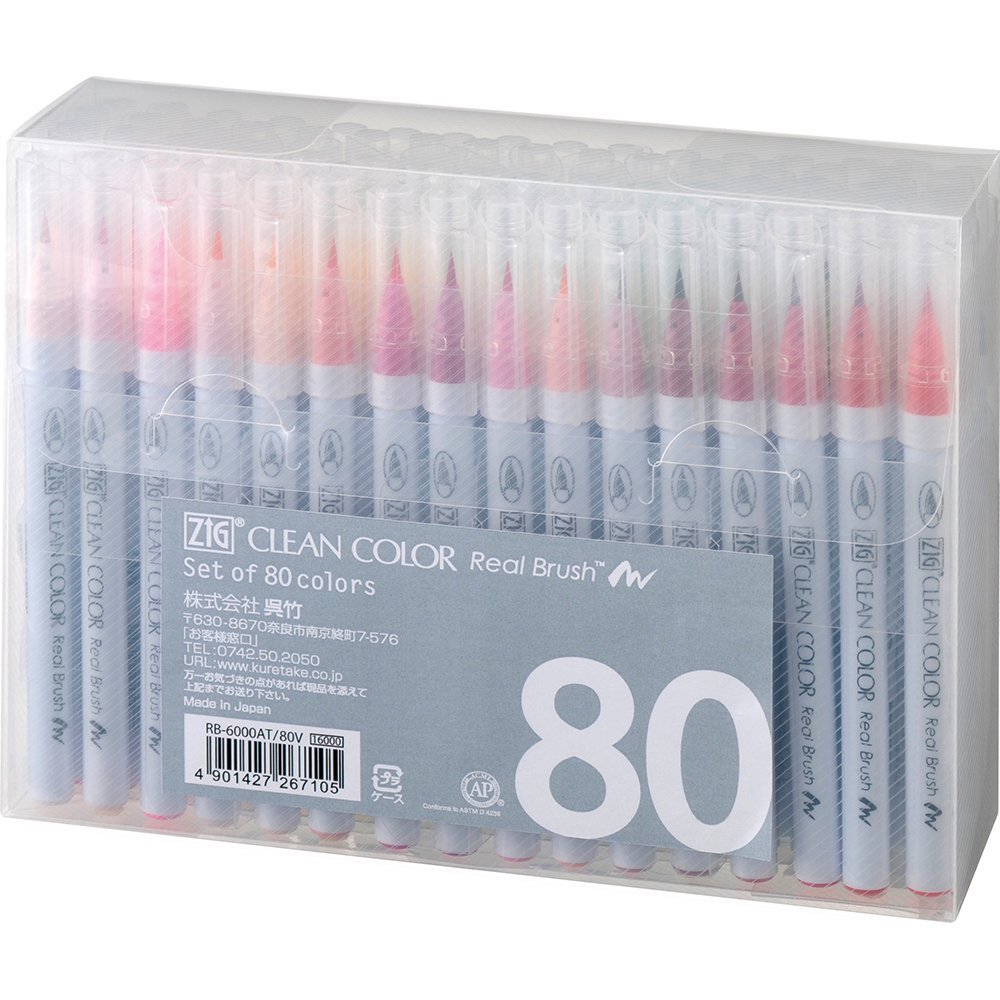
The Zig Clean Color Real Brush pens are available in sets ranging from small 6 marker packs to the large 80 pen set. They are also available as open stock, so you could start out with a smaller set to try them out and supplement with individual pens later on, or just buy individual pens from the outset. When I purchased mine last year I bought the 60 set and have since added a few pens here and there by buying them individually. Shop around – prices seem to vary and you can get some good deals online.

The fact that the pens are available individually is great, because these are not refillable. I’ve had mine for around a year now, but have not done a huge amount of colouring with them so can’t really comment on how long they last.

Mostly I’ve used my Zig Clean Color Real Brush Pens to colour in my adult colouring books. I tend to use them without water as most colouring books don’t stand up well to wet media, and so I used the same technique on the image above and on my second attempt which I also filmed for you (watch my video below). I lay down the darker colour and then blend it out with a lighter shade. This technique seems to work much better on a smooth paper as opposed to a rough watercolour paper. I used Strathmore Bristol Board here, and found it worked really nicely. The image I posted on Instagram and the image I coloured in today’s post are my first attempts at colouring skin tones with the markers.

One of my favourite things about these pens is that they are great to travel with. I store mine in a large cosmetic pouch, along with colour swatches for reference and a water brush.

As the ink in these pens is a water-based dye you will want to use an ink pad for stamping that plays nicely with water-based media. My personal preference is for Ranger Archival Ink Jet Black, but Versafine Onyx Black also works perfectly. These inks of course, do not work well with Copic Markers!

TOP TIP: If you’re stamping on a rough surfaced watercolour paper you may wish to use a stamp positioner like the MISTI stamping tool to allow you to easily re-stamp if your impression doesn’t come out perfect first time.

Thinkingofyouabella Coloured with Zig Clean Color Pens Video:

Here’s the video showing how I coloured my stamped image. Watch below or in HD over on YouTube (while you’re there make sure to subscribe and check out my Stamping Bella playlist).

If you’re using the pens with water, they behave quite differently to the technique I’ve shown here. Keep reading as you will find I’ve got some inspiration and information to share for this technique too!

NOTE: I’m not too happy with the way the blush colour on the cheeks dried. When the colour settled into the paper it actually lightened significantly, giving the cheeks more of a bleached out appearance. This fits with the way you can use the lighter marker to blend out the darker colours, it just didn’t occur to me while colouring that this would be the case. As you can see in the video, while wet the colour appeared much darker. Next time I will try a darker shade of pink for the cheeks and see how that works out.

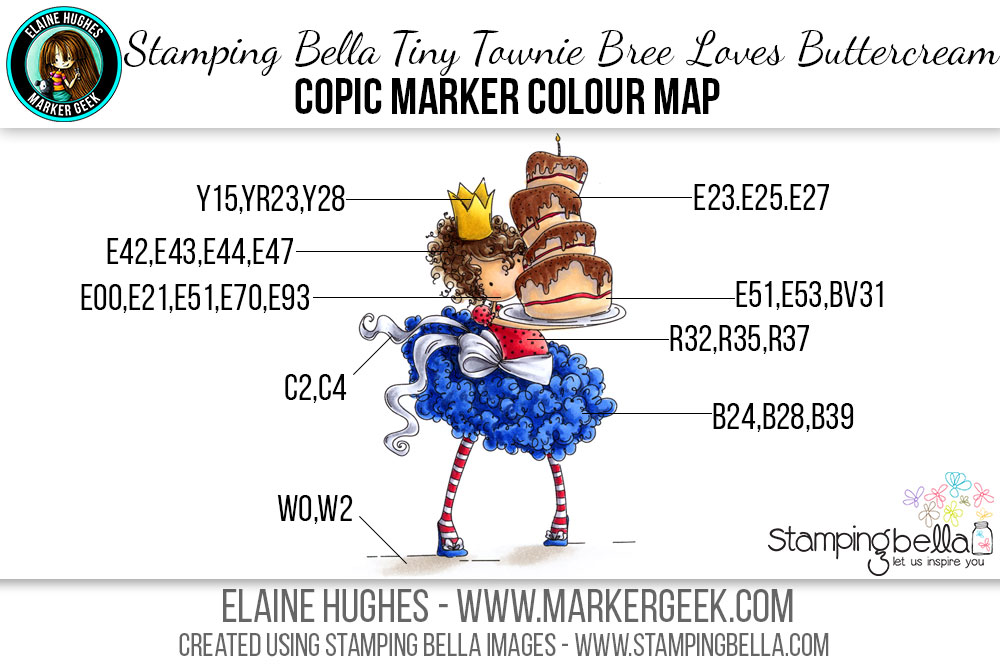
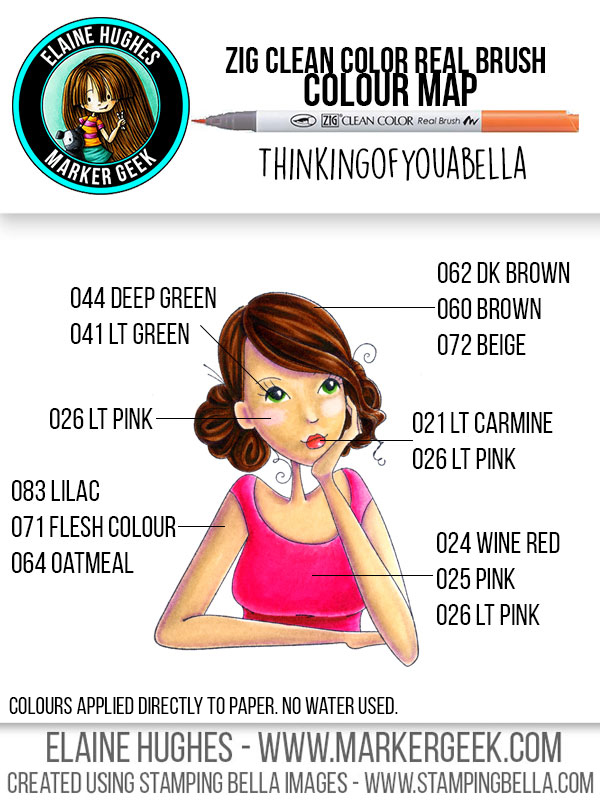
Zig Clean Color Real Brush Pen Colour Map:

I thought I’d add a handy colour map for the image, as I usually do with my Copic Marker posts. I’ve also included one for the first image I coloured as seen on Instagram.

Stamping Bella Thinkingofyouabella Zig Clean Color Real Brush Pen Colour Map. Click through to read the blog post and watch a video! Stamping Bella Thinkingofyouabella Zig Clean Color Real Brush Pen Colour Map. Click through to read the blog post and watch a video!

Remember that if you purchase Stamping Bella stamps you can obtain free Copic Colour Maps for the versions shown on the product packaging – go HERE to find out how to do that. Between those and the bonus colour maps often featured here on the blog, you can build up a great library of colour combinations to try out with your own Copic collection.

More Inspiration For You:

Over on my own blog – Marker Geek – I’ve got another video for you featuring Thinkingofyouabella and the Zig Clean Color pens. There’s a difference though – over there I’ve used a different technique by adding water and using them as watercolours. Click through to my blog to read the post and watch the video: Colouring with Zig Clean Color Real Brush Markers ft. Stamping Bella. I could only have been further outside my comfort zone if I were using actual watercolour paints! You know what though? I had a lot of fun, and it gave my brain a little workout.

TOP TIP: Step outside your comfort zone from time to time. You may surprise yourself, and you will definitely learn more than you will by always playing it safe. Make the time, take a chance and reap the creative rewards!

Over To You!

If you try out the techniques shown in this post with your Stamping Bella stamps, be sure to share! We would love to see the results and hear how you feel about them. Show off your creations in the comments below and even better, share your own favourite tips with us. Let’s talk colour!

If you are posting your images online, we would love to see them on Instagram and all the platforms mentioned above.  To make it easier for us to find you just use #markergeekmonday and/or #stampingbella as a hashtag. Even better tag me @markergeek and @stampingbella . We love it when you connect, so don’t be shy!

Until next time, HAPPY COLOURING!

MWAH

Elaineabella

it’s BELLARIFIC FRIDAY sistahs!

I hope you’re having a great week and I so hope you are loving all of our posts… I think they are so amazing ifidosaysomyself LOL

We are all in Montreal again.. we helped settle my father into the rehabilitation facility for his hip AGAIN.. and therapy has begun AGAIN.. it seems like he is recovering at a more rapid pace this time but his mindset is still quite negative so it is VERY tough..  but we are plowing through it hoping things will get better.  Meanwhile we are enjoying the city .. actually showing the kidlets where we are from.. from our old houses where we lived to restaurants we went to as kids to McGill University where I graduated from.. going for walks and of course ending almost every night with this..  please note MAJOR DIET STARTS in AUGUST LOL.

Ryan discovered this ice cream place called “LA DIPERIE”… omg the concept of this place is that you order vanilla soft serve, then they have 30 hot dips to dip the vanilla into… dips like coffee crisp.. dulce de leche.. oreo cookie, banana, … AND THEN.. wait for it… wait for it… they dip THAT into any TOPPING you want.. like oreos.. coffee crisp.. hazelnuts.. fleur de sel.. lavender.. smarties.. you name it.. is that INSANE OR WHAT?

diperie

Here’s Tyler with his OREO dip and OREO TOPPING

tylericecream

Here’s Jayden with her COOKIE DOUGH dip and OREO TOPPING.  I CANNOT EVEN…

jaydenicecream

we also tried to teach the kids about the Montreal “joie de vivre”.. just the feeling I used to have growing up… We randomly walked into this restaurant and found Ryan’s oldest friend and his family.. we pulled tables together, drinks flowing.. laughing.. reminiscing.. it was just the therapy and nostalgia I needed.. We then went to St. Viateur bagel at 11:30 PM.. a Montreal institution.. and couldn’t help MAWING (it’s my word for shoving down my throat) the FRESH HOT WOOD BURNING OVEN BAGELS …. sooooo good.  If you ever have a chance to visit Montreal you HAVE to go to St. Viateur.  Promise?  k

Now on to our regular show 🙂

Today’s Bellarific Friday theme is CHRISTMAS in July

AliceWERTZabella used PENGUIDEER

alicewertzabella

Carlabella used UPTOWN GIRL QUINN

carlabella111

Danabella used PETUNIA loves CHRISTMAS

danabella

FAYE-WJ-ABELLA used Uptown girl EVE under the MISTLETOE

fayeWJabella

Kerribella used THE CHOIR

kerribella

Sandiebella used UPTOWN GIRL EVE under the MISTLETOE

sandiebella

Shelabella used MAGGIE with PENGUIN AND  Edna Blows a kiss SIGN BASE

shelabella

and Stephabella used UPTOWN GIRL EVE under the MISTLETOE

stephabella

How’s that for some Christmas Cheer?  LOVE.

Check out our INLINKZ contributors at the bottom of THIS post

and now for our emailed sistahood contributions!

here’s Gail’s card closed

gail1

and then  when you open it she used MERRY EVERYTHING!

gail2

Heather used SANTA EXPRESS

heatherC

Lynda used SINGIN so BEAUTIFUL

lynda

Amazingness!!

Now for next week’s theme?

a MOJOBELLA sketch!

use any CURRENT Stamping Bella image following this sketch and send it ovah!

MojoBella 15


It’s DESIGN TEAM THURSDAY with STEPHABELLA!

Stamping Bella DT Thursday with Stephabella - Dimensional Images Cardmaking Tutorial. Click through to read the tutorial!

Hey everyone!

Steph here! Today I’m sharing some inspiration on how to give your stamping a fun 3-D decoupage effect!

I’ve made a couple of 3-D decoupage effect cards before- see my card below with Tiny Townie Bonnie Loves Bows

steph1 steph2

This time I’m using Uptownie Winnie Looking Out The Window…

steph3

Firstly, you need to look at the image to see what you need to stamp out to create the layers. Here I decided to stamp out:

  1. The complete image for the base of the image
  2. The complete image
  3. The window box and foliage
steph4

On the 1st image, I coloured the entire image and paper pieced the curtains. I didn’t worry too much about the quality of colouring on the frame, window box and foliage as these will be covered by other layers.

steph5

On the 2nd image (see left here), I coloured the frame and the window box and foliage (not worrying too much about the quality of colouring on the window box and foliage as this will be covered by a final layer). I then cut out the frame and the window box and foliage.

On the 3rd image (see right here), I coloured the window box and foliage and cut out. I then cut out a piece of acetate to fit the window

steph6

I then made the rest of the card and stamped out the accompanying sentiment. I attached the acetate to the second layer of window frame using very thin (3mm) double-sided tape and assembled all the layers using 3-D foam pads

steph7 steph8

You can see the layers here. I just love the effect it gives. Doesn’t she look so dreamy??!!

Hope you enjoyed this week’s tutorial and have fun creating your own 3-D scenes! x

it’s Wonderful Wednesdays With

Sandy Allnock-abella (lol)  I love how that sounds!

Hello again, sistahs! I’m Sandy Allnock – and I’m back again! This is installment #2 in the Bella 2.0 series this month…and I’m so grateful Em invited me to guest all through July!
Sandy Allnock Adding Facial Details

I wanted to give her some dimension in her face, as well as play with that pretty hair, so I got out my copics to have some fun. If you want to see some other ROCKING color combinations and techniques, be sure to see what Elaine did HERE. She’s my Copic hero! Watch my video below, or click HERE to see it in HD on YouTube.

I’ll be back next Wednesday with another video – see you then!
SandySig PS In case we didn’t meet last week – I’m a crazy colorist and I post a couple videos a week, so if you’re a visual learner, come on over and visit on my blog and YouTube channel and we can have some fun. Oh and be sure to visit on Instagram too…since I’ll be sharing more Stamping Bella fun there all month, too!

Save

Save

Save

Marker Geek Monday: Copic Colouring a Ruffled Skirt Step by Step and Colouring Video

Hope you all had a fantastic weekend! It’s me -Elaineabella – here to share some more colouring tips with you for Marker Geek Monday. Today I’m answering a request from last week’s comments section, where Annette asked for help with frilly/ruffled skirts like the one our adorable Tiny Townie Bree Loves Buttercream is modelling. I hope this helps, Annette!

If you missed last week’s post take a look when you’re done here, especially if fabric folds/pleats have been giving you a headache: Marker Geek Monday: Copic Pleats and Folds with Step by Step and Colouring Video.

Visit my Marker Geek Blog where you can find a card today featuring Tiny Townie Bree and watch a quick video showing how I coloured the whole image.

Step by Step Copic Colouring a Ruffled Skirt

Copic Colouring a Ruffled Skirt by Marker Geek ft Stamping Bella Tiny Townie Bree. Click through to read the article and watch a video!

The key here is not to aim for perfect blending. Lay down colour with a squiggly motion, creating irregular strokes following the curly puffy shapes in the image. This will give you a nice textured effect.. Use the lines in the image to decide where the shadow areas will be, and create some nice contrast between these and the highlight areas. It is this that will create real interest and bring the image to life. Don’t overthink it! In fact, before you start colouring try practicing on a scrap piece of paper, creating squiggly slightly messy textures, this will help you to loosen up before you get started on the image. Most importantly, as always, have fun!

Ruffled Skirt Copic Colouring Video

I have also put together a video showing how I coloured the ruffled skirt Bree is wearing. Like my Copic Hair Colouring Video and my Copic Pleats and Folds Colouring Video this video has only been sped up slightly, to allow you to see more clearly how I colour.

Tiny Townie Bree Loves Buttecream Copic Colour Map

Here is a full Copic Colour Map for the Tiny Townie Bree Loves Buttercream colouring featured in the videos. Remember that if you purchase Stamping Bella stamps you can obtain colour maps for the versions shown on the product packaging – go HERE to find out how to do that. Between those and the bonus colour maps featured here on the blog, you can build up a great library of colour combinations to try out with your own Copic collection.

Stamping Bella Tiny Townie Bree Loves Buttercream Copic Colour Map by Marker Geek. Click through to read the article and watch a video!

Over To You!

If you try out the techniques shown in this post with your Stamping Bella stamps, be sure to share! We would love to see the results and hear how you feel about them. Show off your creations in the comments below and even better, share your own favourite tips with us. Let’s talk colour!

If you are posting your images online, we would love to see them on Instagram and all the platforms mentioned above.  To make it easier for us to find you just use #markergeekmonday as a hashtag.

Until next time, HAPPY COLOURING!

MWAH

Elaineabella

it’s BELLARIFIC FRIDAY!

Hiya sistahs Hope you had an amazing week!

We are heading to Montreal this week to take care of some loose ends.. and to really show my kidlets where we grew up.. yes they are 11 and 14 but every time we go in, it’s to someone’s house.. to visit etc.  I want to show them where we lived.. where our schools were.. the olympic stadium.. the old port.. beaver lake.. st. sauveur.. some fun stuff.. and at the end of that week we are going to Cape Cod for 5 days.  I CAN’T WAIT!  OF course I will be online at all times.. and of course you won’t even know I’m gone… LOL but just wanted to share what I’m up to!.  Oh another thing I’m up to?  AN AMAZING FANTASMAGORICAL holiday release!! Yup.. I’m aiming for mid august… and If I tell you how amazing it is.. I mean it’s AMAZING!  And yes I am like the GIRL who cried wolf because I say it all the time LOL.. but my stamps are my babies ya know 🙂

Ok enough blabla.  Let’s begin our Bellarific Friday show

This week’s theme was a MOJOBELLA sketch created by JULEE Tilman from VERVE

her sketches are amazing no?

MojoBella 14

I must begin by saying that our TRACYMACABELLA has stepped down from the team.  I can’t even.  really.  I love TracyMACabella so much and her work is BAR NONE amazing!  She has lots of things on the go at the moment and she needs to focus on them and I totally understand… BUT I’M A SAD BELLA.  I wish Tracymacabella ONLY amazing things and she will ALWAYS have a spot with us whenever/if she is ready to come back.  MWAH TRACYMACABELLA.  WE LOVE YOU!!

AliceWERTZabella used TINY TOWNIE HAYLEY the HERO

alice

Carlabella’s card using Harry the Stuffie loves Happy mail

carlabella

Danabella used TINY TOWNIE AMANDA is AWESOME

danabella

Faye-WJ-abella used UPTOWN GIRL ISABELLE loves ICE CREAM

fayeWJabella

Kerribella used MILK AND COOKIES

kerribella

Sandiebella used CHRISTMAS PENGUINS

sandiebella

Shelabella used UPTOWN GIRL POSH has a PRESENT

shelabella

Stephabella used UPTOWN COUPLE BELLA and BARNEY have a BBQ

stephabella

Amazingness no?

Check out our contributions on INLINKZ at the bottom of THIS POST

And now for our Sistahood emailed contribution!

faywiz

Fay used WIZ

and now for NEXT WEEK’s THEME?

CHRISTMAS IN JULY!  Just use any Stamping Bella Christmas Themed stamp or Christmas papers with a bella stamp and off you go!


Save

Save

Save

It’s DT THURSDAY with

AliceWERTZabella!

Alice made a GORGEOUS card for us today with her amazing NO LINE technique!  She uses ANTIQUE LINEN Distress Ink and Copic markers.. and she works her magic!

On this card she used our Tiny TOWNIE ANABELLE needs your ADDRESS

Anabelle is such an amazing stamp because as you see, you can put a die cut message in it.. you can use your favorite stamp sentiment in it.. you can even use it in your journal with your thoughts of the day!  So versatile, ifidosaysomyself

here’s the closeup just showing you the detail and how beautiful it is.. kind of like watercoloring no?

anabellecloseup

and here is the final card… I just love it! I hope you do to0!

anabelle1

MWAH

Em


It’s Wonderful Wednesdays with…..

SANDY ALLNOCK!!! 

Ya know, da sistah who created the amazing HEX CHART

da sistah who colours so beautifully in every medium out there?  Ya THAT Sandy Allnock. mmhmm


Hello sistahs! I’m Sandy Allnock – and I am so stinking excited to be guesting here on the blog all month! A little about me for those who I haven’t yet met: I color all the things. Yes, #allthethings. Give me any stamp with lines and I’ll go at it with some coloring medium or another! I create a couple videos a week, so if you’re a visual learner, come on over and visit on my blog and YouTube channel and we can have some fun. Oh and be sure to visit on Instagram too…since I’ll be sharing more Stamping Bella fun there all month, too!Sandy Allnock Fixing Coloring Mistakes

The first installment in my four Bella videos uses Beachabella – I’m first off jealous she rocks a bikini like that. But I also wanted to share some mistakes I made along the way with my Copic markers. Oopses can be our best way to learn, and since I make a lot of them – well, heck, I’m a learner extraordinaire! Watch the video below, or click HERE to see it in HD on YouTube.

I’ll be back next Wednesday with another video – see you then!
SandySig

it’s CRAZY TOOSDAY sistahs!

and you know what that means?  CRAZY PRICES for handpicked images for 24 hours only! These prices do not include the “CUT IT OUT DIES” but it makes buying them even more tempting.. BWAHAHAHAHA

Crazy  Tuesday happens every FIRST tuesday of the month and it’s SO MUCH FUN!  It’s a great way to continue your collection.. to start your collection.. to start a collection for someone else?  To start a gift pile?  Or simply to be able to have a little retail therapy without the guilt!

crazytuesdayJULY2016

to check out the CRAZY prices.. go to our website.. it’s on our front page!  It sure is CRAZY!

Happy shopping sistahs!

Marker Geek Monday: Copic Pleats and Folds Step by Step with Colouring Video

Another Monday rolls around, bringing with it a whole new week of possibilities and colour! It seems much better when you look at it that way, right? Positivity through colour!

This week I’m addressing a topic that I know many of you have been hoping for: Pleats and Folds. I have used Copic Markers for this post, but the approach will be similar for other mediums too. Whatever medium you use, hopefully this post will help you start to visualise how you can break down the colouring and approach adding pleats and folds to an image.

As of this week I’ve added an extra element to Marker Geek Monday. Over on my own Marker Geek Blog you can find a card featuring today’s image, along with a bonus Copic colouring video showing how I coloured a background for the image. When you’re done here, I invite you to pop on over and check it out: Flowersbehindmybackabella Simple Copic Background with Video. While you’re there I invite you to subscribe or bookmark the blog for regular Stamping Bella inspiration!

Step by Step Copic Colouring Pleats and Folds on Flowersbehindmybackabella

The Flowersbehindmybackabella rubber stamp from our recent release is perfect for practicing adding pleats and folds to an image. That dress offers lovely open space to colour in and get creative. The lines of the image offer some hints at where you might place the creases, without boxing you in with black lines. This makes it a little bit easier to “go with the flow”. Plus she’s quite simply a gorgeous image, perfect for numerous occasions.

If you have trouble visualising the marker strokes, keep on reading this post to find a Copic colouring video that should help! To see the Copic colours used, read on to the end of the post where you will find a Copic Colour Map for this image.

Marker Geek Monday Colouring Pleats and Folds with Copic Markers on Stamping Bella Flowersbehindmybackabella. Click through to read the article, watch a video and get full Copic marker colour info!

Pleats and Folds Copic Colouring Video

I have also put together a video showing how I coloured the folds in the dress of Flowersbehindmybackabella. Like my Copic Hair Colouring Video last week this video has only been sped up slightly, to allow you to see more clearly how I colour.

Flowersbehindmybackabella Copic Colour Map

Here is a full Copic Colour Map for the Flowersbehindmybackabella colouring featured in the videos. Remember that if you purchase Stamping Bella stamps you can obtain colour maps for the versions shown on the product packaging – go HERE to find out how to do that. Between those and the bonus colour maps featured here on the blog, you can build up a great library of colour combinations to try out with your own Copic collection.

Stamping Bella Flowersbehindmybackabella Copic Colour Map by Marker Geek

Marker Geek - Copic Pleats and Folds Festive Edition. Visit www.markergeek.com to watch the video and read the post!

Other Posts You May Like!

Over on my own Marker Geek Blog I have a festive version of this guide, featuring one of the Stamping Bella Holiday 2016 Releases – Christmasgiftabella. Click through to check it out!

Marker Geek: Stamping Bella Christmasgiftabella Copic Pleats & Folds (w/card, video & step by step).

The process is the same, but you may find it interesting to watch the video and look at the step by step for a slightly different shape/style of dress.

Over To You!

If you try out the techniques shown in this post with your Stamping Bella stamps, be sure to share! We would love to see the results and hear how you feel about them. Show off your creations in the comments below and even better, share your own favourite tips with us. Let’s talk colour!

If you are posting your images online, we would love to see them on Instagram and all the platforms mentioned above!  To make it easier for us to find you just use #markergeekmonday as a hashtag!

Until next time, HAPPY COLOURING!

MWAH

Elaineabella