WELCOME TO BLOGABELLA

Spotlight On: November DOUBLE Crazy Tuesday Offers!

I know many of you have been missing the Crazy Tuesday offers, which had to give way to all the amazing new releases over the past couple of months. Patience certainly brings its rewards, as this CRAZY TUESDAY is TWICE as crazy as your average Crazy Tuesday. Whoo!

That’s right, there are SIX stamps on offer at Crazy Tuesday prices today and only for today! Check out the inspiration below to see why you need them, then click on over to the store to grab them before the prices return to normal! (by midnight tonight!)

Continue reading

Spotted on Sunday: Peri’s Fab Edna Card!

Hey everyone! Elaineabella here with another SPOTTED ON SUNDAY. Every Sunday I’m sharing cards and other creations that have caught my eye featuring Stamping Bella stamps.

This week’s Spotted on Sunday star is…

PERI MADE IT

I spotted this gorgeous creation over on Instagram. So beautifully coloured.

A post shared by Peri Hill (@nikerih) on

Stamp Sets Used: Edna Needs a Martini (coordinating die set also available)

This caught my eye over on Instagram! Thank you for sharing, Peri!

Want to catch my eye? HASHTAG IT!

We love to see what you’ve all been up to with your Stamping Bella stamps, and there are lots of ways to share with us.

If you want to be “Spotted On Sunday” make sure you tag us with #SpotThisStampingBella  so we know you give permission for your makes to be shared here on the blog! We will be featuring things we’ve spotted from all over the place, but by using the hashtag you’ll make it much easier for us to know you don’t mind us sharing.

Stamping Bella on Instagram: @StampingBella
Stamping Bella Facebook Page: Stamping Bella on Facebook
Stamping Bella Facebook Group: Stamping Bella Sistahood Chat Group

Stamp It Saturday: Beautiful Stamped Backgrounds

For this week’s Stamp It Saturday post I thought I would share some more of the cards I created for the recent Holiday 2017 release and talk about how I created the backgrounds for them.

For the backgrounds on all of these cards I used the snowflake stamps from the new Little Bits Snowman Set – they are so pretty, and oh so handy. I love to create inked and stamped background pieces for cards, as while I do love designer papers, I never seem to have quite the right colours, or enough of my favourite ones, and something about my brain seems to get a little stuck when working with them. I can sit for hours staring at a pile of printed papers, deliberating over which to use, so creating my own often works out much faster!


Stamp & Die Sets Used: Polar Bear & Mousie Stuffies, Little Bits Snowman Set, Holiday Sentiment Set

To create the background I used a few different shades of Distress Oxide inks on Strathmore Bristol Vellum Surface paper. The Distress Oxides have become my personal favourites because they go on so smoothly – the pigment ink content makes them so creamy to use. You could however, achieve a similar look using regular Distress Inks, or just try something similar with inks you have on hand (bear in mind, other inks may not react with water like the Distress range to create the splotchy textured effects).

Instead of spritzing the background pieces with water I used a Glimmer Mist spray, which works in the same way but of course adds a gorgeous shimmer to the paper which you can’t quite see in the photos. This is perfect for festive cards. You could use a pre-mixed spray like Glimmer Mist, or create your own using a spray bottle, some water and some Perfect Pearls powder or similar products.

I then stamped the snowflakes randomly using one of my favourite inks – Delicata – I love the Delicata metallic pigment inks, the gold has been my favourite for quite some time. On these cards I used Delicata White Shimmer. Because these inks are pigment based, you will need to allow longer for them to dry, or heat set them (which I did, because I am impatient!).


Stamp & Die Sets Used: Little Bits Skating Quartet Set, Little Bits Snowman Set, Holiday Sentiment Set

Stamp & Die Sets Used: Littles Elf with a Reindeer on Top, Little Bits Snowman Set, Holiday Sentiment Set

Creating your own inked and stamped backgrounds is a great way to create perfectly coordinating cards and projects. It’s also excellent for Christmas cards or other occasions when you need to create multiples of similar designs – simply create all your backgrounds in one sitting using a batch processing approach!

Over To You!

If you try out the techniques shown in any of the posts with your Stamping Bella stamps, be sure to share! We would love to see the results and hear how you feel about them. Show off your creations in the comments below and even better, share your own favourite tips with us. Let’s talk stamping!

If you are posting your images online, we would love to see them on Instagram and all the platforms mentioned above.  To make it easier for us to find you just use #markergeekmonday and/or #stampingbella as a hashtag. Even better tag me @markergeek and @stampingbella . We love it when you connect, so don’t be shy!

If you’re on Facebook join us in our private chat group Stamping Bella Sistahood to share your creations there and chat all things Stamping Bella related!

Until next time, HAPPY STAMPING!

MWAH

Elaineabella

it’s BELLARIFIC FRIDAY sistahs featuring our STAMP OF THE MONTH!

Hiya sistahs!  hope you had a great week!  This week we announced our Stamp of the Month which is GIFTABELLA.  We are offering the stamp AND her corresponding “CUT IT OUT” die at 20% off all month long!  Dies are limited so first come first serve and no rainchecks 🙂

Shall our baberoonis taunt and tempt you and show you all that you can do with that stamp?  Me thinks so 🙂

so let’s GOOOOOO!

Here’s ALICEWERTZAbella’s card

www.stampingbella.com: RUBBER STAMP USED: GIFTABELLA card by ALICE WERTZ

Continue reading

Marker Geek Monday: Halloween Colouring Fun with Coloured Pencils!

Marker Geek Monday time! I’m in the midst of moving house, so I’m swapping between colouring images and colouring walls at the moment. Fingers crossed, I’ll be all settled in to a new craft room before the end of November. Wish me luck!

Today I thought I would share some details for images I have been colouring and sharing over on Instagram recently.

Firstly, here’s gorgeous little Tiny Townie Hattie loves Halloween.

I stamped Hattie using Ranger Archival Ink in Sepia on Strathmore Toned Tan paper, before colouring her using Faber-Castell Polychromos coloured pencils.

Stamping Bella - Marker Geek Monday - Halloween Fun with Coloured Pencils

Faber-Castell Polychromos Pencils Used:
Skin: Light Flesh, Medium Flesh, Cinnamon, Dark Flesh, Ivory Hair: Venetian Red, Indian Red, Caput Mortuum, Terra Cotta, Caput Mortuum Violet, Ivory Hat/Cloak: Black, Warm Grey II, V, VI Dress/Hat Band:May Green, Earth Green Yellowish, Olive Green Yellowish Buckle/Broom: Burnt Umber, Dark Chrome Yellow, Sepia, Dark Naples Ochre, Cream Broom Handle: Burnt Ocher, Raw Umber, Ivory

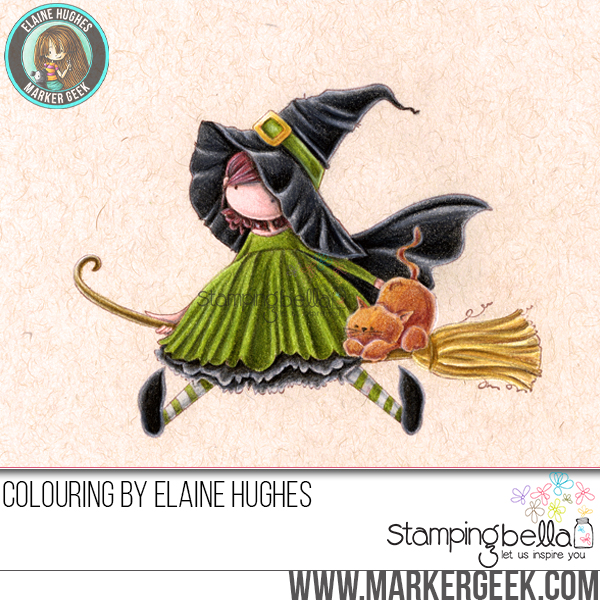
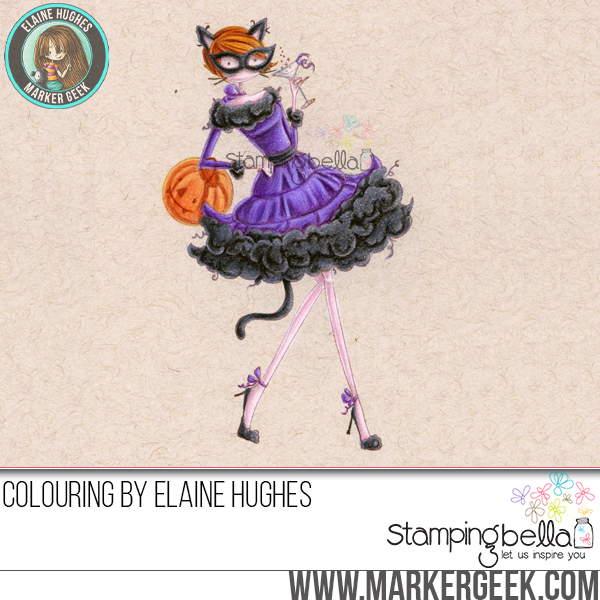
Secondly, here’s my pencil version of Uptown Girl Kitty loves Halloween.

I stamped this stylish trick-or-treater using Ranger Archival Ink in Sepia on Strathmore Toned Tan paper, then coloured her using my new Derwent ProColour coloured pencils. I will be posting my thoughts on these pencils in the near future, as soon as I get chance to play a little more!

Stamping Bella - Marker Geek Monday - Halloween Fun with Coloured Pencils

Derwent ProColour Pencils Used:
Skin:Flesh Pink, Salmon, Pink Madder Lake, Mars Violet Hair: Nutmeg, Autumn Leaf, Sunset Gold Ears, Tail etc: Ivory Black, Gunmetal, Blue Grey Dress: Grape, Imperial Purple, Blue Violet Lake Pumpkin: Yellow Ochre, Spectrum Orange, Autumn Leaf

TIP: Should you try colouring on a kraft/tan paper or any other different shade from the usual white, I highly recommend creating a swatch/colour chart on the same paper first. That way you can see exactly how the colours behave.

If you’d like me to cover a specific topic here, do let me know by leaving a comment, and I will see what I can do! Bear with me for the next few weeks though, as I am in the process of moving house and will be busy for a little while setting up my new craft room!

Over To You!

If you try out the techniques shown in any of the posts with your Stamping Bella stamps, be sure to share! We would love to see the results and hear how you feel about them. Show off your creations in the comments below and even better, share your own favourite tips with us. Let’s talk colour!

If you are posting your images online, we would love to see them on Instagram and all the platforms mentioned above.  To make it easier for us to find you just use #markergeekmonday and/or #stampingbella as a hashtag. Even better tag me @markergeek and @stampingbella . We love it when you connect, so don’t be shy! Make sure you use the #SpotThisStampingBella hashtag on social media if you’re happy for me to feature your work in my Spotted On Sunday posts!

If you’re on Facebook join us in our private chat group Stamping Bella Sistahood to share your creations there and chat all things Stamping Bella related!

Until next time, HAPPY COLOURING!

MWAH

Elaineabella

Stamp It Saturday: Tips for Creating a Scene using the Littles & Cut It Out Dies!

For this week’s Stamp It Saturday post I thought I would share a few tips to help you get creating fun scenes with the Little Bits and their coordinating dies.

Here are a couple of cards I created for the Holiday 2017 release, featuring some of the new Little Bits stamps and one of the backdrops. On both cards I used the die cut images to assemble cute scenes.


Stamp & Die Sets Used: Little Bits Winter Tree & Deer Ball, Little Bits Set of Elves, Little Bits Santa’s Gifts, Holiday Sentiment Set


Stamp & Die Sets Used: Winter Backdrop, Little Bits Sledding, Little Bits Snowman Set, Holiday Sentiment Set

Tips:

  • Since the dies cut the images with a narrow white border all around, I tend to find that I prefer them popped up against lighter backgrounds. This is a personal preference, but I find they look less stark. Another option of course is that you could fussy cut right up to the stamped outline (if you do this, I recommend colouring the cut edges with a black pen so everything looks neat).
  • Try it out first! I like to play around with the arrangement for a little while, and see how things look in different positions. This is a lot easier to do with die cut pieces than masking and stamping, so that’s a real plus. A little tweaking to the positioning can make a world of difference to the final result. Once I find a layout I’m happy with, I take a quick photo with my smart phone that I can refer to when doing the final assembly.
  • Create dimension! I like to create dimension by having some elements adhered flat to the background, and others that would be further forward in the scene popped up on foam pads, or double layers of foam pads.
  • Keep it simple! Don’t go too crazy with the elements – use enough to tell a little story, but not so many that you overwhelm the eye.

This approach is a lot simpler to replicate than masking and stamping, as you could easily stamp a number of each element, colour them in batches, die cut and then assemble in the same way.


Useful Links:


Using Cut it Out Dies – tips for using the coordinating cut it out die sets to get great results.


Over To You!

If you try out the techniques shown in any of the posts with your Stamping Bella stamps, be sure to share! We would love to see the results and hear how you feel about them. Show off your creations in the comments below and even better, share your own favourite tips with us. Let’s talk stamping!

If you are posting your images online, we would love to see them on Instagram and all the platforms mentioned above.  To make it easier for us to find you just use #markergeekmonday and/or #stampingbella as a hashtag. Even better tag me @markergeek and @stampingbella . We love it when you connect, so don’t be shy!

If you’re on Facebook join us in our private chat group Stamping Bella Sistahood to share your creations there and chat all things Stamping Bella related!

Until next time, HAPPY STAMPING!

MWAH

Elaineabella

It’s Bellarific Friday sistahs! Today’s theme>> an INSPIRATION PHOTO!

Hiya sistahs!  I am enjoying a moment’s peace in the corner of our hotel room in Philadelphia today!  We drove 10+ hours (CANNOT DISCUSS) yesterday and we are here for a hockey tournament for the boy child.  What’s kind of nice is that we met an amazing couple on our HONEYMOON twenty years ago have kept in touch on and off and we are meeting them again for dinner tonight!  The only thing is, apparently they’re not married anymore LOL but are still very close.. it’s amazing what time brings.. how life takes its turns and jumps and hops and sprints and nose dives..I am still happy that we get to see them again after all these years!  Second, I am apparently not allowed to breathe, speak, sniffle, shuffle, speak loud, whisper, tell a joke etc.. little boy who’s bigger than me seems a bit embarrassed.  HMPH.. it’s all about him bonding with his team mates.. there used to be a time when I was the CENTER of this BONDATION… now.. I am not needed anymore.  SIGH.. that circle of life I tell ya.  it’s ok, he went to one of the boys’ room last night to talk.. and when he came home he whispered to me.. “ma.. you wanna hear some stories??”.. how happy was I that the boy still wants to tell me things?  SO SO happy.

Ok enough blabla and on to our Bellarific Friday theme which was an inspiration photo

Continue reading