


Hey everyone, Elaineabella here with this week’s Marker Geek Monday post!
Today we’re following on from the last two weeks and my Copic Marker Basics Part 1 and Copic Marker Basics Part 2 posts. I hope you’re finding this series of posts useful!
Copic Marker Basics:
Over the past couple of weeks we have covered the differences between the available styles of Copic marker, choosing markers, storing them, and the purpose of the Colourless Blender. If you’ve only just joined us, here are the links for the first two posts in this mini-series:
Today we’re going to cover a few more essential topics to help you get started with Copic markers, or refresh your memory!
Paper for Copic Markers:
There are lots of different papers on the market, and it can be tough to know which one is “best”. Unfortunately, as with many things, the answer I have to give when asked which paper is best for Copics is: “it depends”. Annoying, I know, sorry! I can offer some pointers though, to help you in the selection process.
In general, the best papers for alcohol based markers like Copics are very smooth, uncoated papers. The alcohol based dye ink moves and blends within the fibres of the paper, and soft textured papers tend to result in lots of feathering.
My advice is to test papers that are readily available to you and make notes on what you do and don’t like about them. What suits one colouring style may not suit another as well, and an approach to colouring may work beautifully on one particular paper, but not so well on others. Often we need to adapt our technique slightly to accommodate the paper.
I would not recommend the Copic branded pads of “marker paper” – these tend to be a very thin paper and for our purposes and the colouring approach commonly used with stampers they really don’t work that well, these are best suited to graphic design work.
Papers that do generally work well and which I have had good experiences with are Copic X-Press It and Make it Colour blending card (the latter is only available in the UK currently via my website). Neenah Classic Crest in Solar White is another popular paper, and is one I used extensively when I started using Copics, however I wouldn’t now recommend it personally as I don’t find it stands up well enough to the amount of layering I like to do when colouring, and I also find that the ink tends to feather more than it does on X-Press It or Make it Colour. Copic Perfect Colouring Paper by Transotype is a paper I haven’t personally tried, but which I have heard positive comments about.
Note: Alcohol based markers will bleed through to the back of most papers to varying degrees. This is to be expected as the dye ink soaks into the fibres of the paper. Because of this I always recommend working with some sheets of copy paper or a cheap cardstock underneath your paper, to avoid marking your work surface or other work with ink that has soaked through. When working in a journal, sketchbook or colouring book I slip a few sheets of copy paper behind the page I’m working on to protect the next page.
Copic Marker Maintenance:
As discussed in Copic Marker Basics Part 1, one of the features of Copic Markers is that they are refillable and have replaceable nibs. I love this feature of the markers.
Refilling Copic Markers:
Refilling the markers is pretty easy once you know how. There are a few different methods:
- Dripping ink into the marker. This is the method I personally use. All you have to do is uncap both ends of the marker, remove the nib from the chisel end and drip ink from the refill bottle carefully into the opening. I don’t have a precise method for working out how much ink I need to use, I just add the ink slowly, a few drops at a time and keep an eye on the brush nib – when it starts to look nice and wet I’m done! If you do overdo it and ink drips from the brush nib, don’t panic – dab the excess onto some scrap paper until the dripping stops.
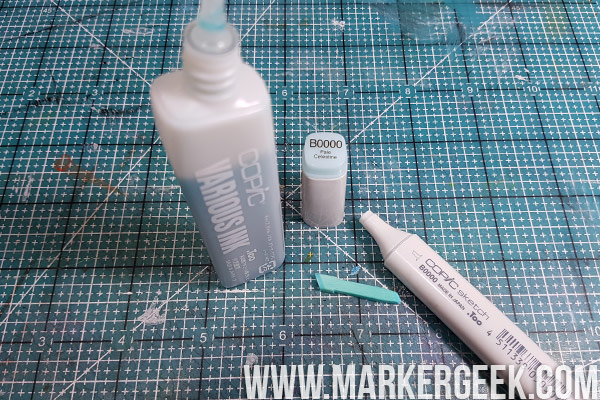
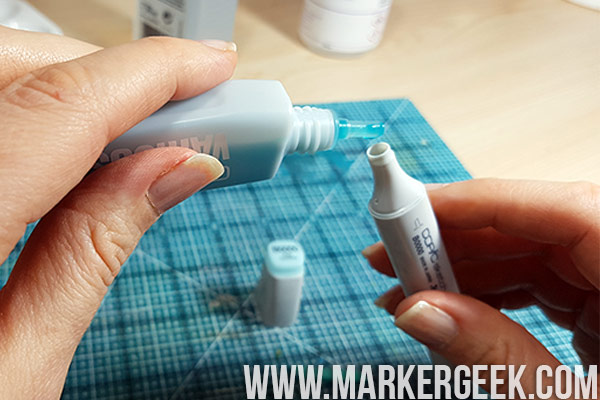
- Dripping ink on to the nib. I use this method occasionally when I’m in a hurry and just need to add a bit more ink to keep going. Uncap both ends of the marker and drip ink from the refill bottle on to the chisel nib. Again, do this slowly and keep an eye on the brush nib to see when it starts to turn wet.
- Booster Method – this is essentially the same as the first method described above, but using a special booster needle tool to measure the ink. You can find full info for this on the Copic website. I’ve never used this method, because my tolerance for faffing is fairly minimal, and refilling with the above methods is so easy I just didn’t feel it was necessary to add any extra steps. You may like to be more precise and careful than me though!
TIP: when refilling, do so over an easy to clean surface, or scrap paper. Keep some tissue and cleaning solution/alcohol/alcohol wipes on hand for any spillages or drips.
If you would like to be more precise when refilling your markers, some people do use small jewellers scales to weigh the markers and determine how much ink to add. I’ve never done this, but there are tutorials out there! I don’t personally think it is necessary, and for me it just adds more “faffing” to the process. I’m big on faffing with details in my colouring, not so big on faffing with things that hinder me getting to the colouring!
Cleaning and Maintaining Copic Markers:
I will freely admit that I do not make a habit of keeping my markers in pristine condition! As you will see in my videos, the caps and barrels of my markers are often fairly grungy. I would far rather colour than clean. That said, sometimes I do go on a marker maintenance blitz (usually when my creative mojo is off on vacation) and it always feels great to get it done!
If your markers are starting to feel a bit sticky, and if they aren’t performing that well (sticky nibs, etc) it may be time to give them a little TLC.
TIP: for removing nibs you can purchase a set of Copic branded tweezers, these are an essential tool as they will allow you to get a good firm grip at the base of the nib for removing it without causing damage. This is particularly important for the brush nib, as if not removed correctly it can break off and leave the core behind.
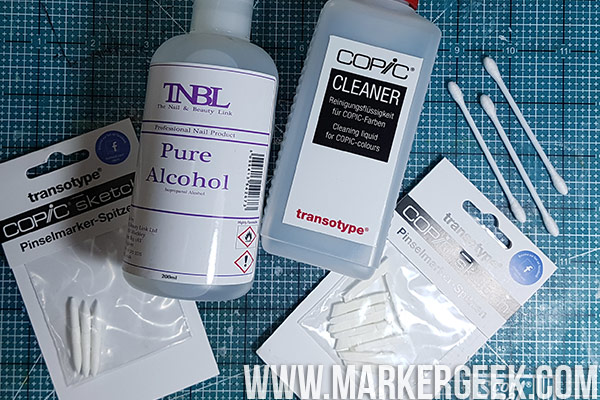
As you can see in the picture, you can buy Copic branded cleaning solution. This does tend to be a little pricey however, and I have found that Isopropyl Alcohol works equally well.
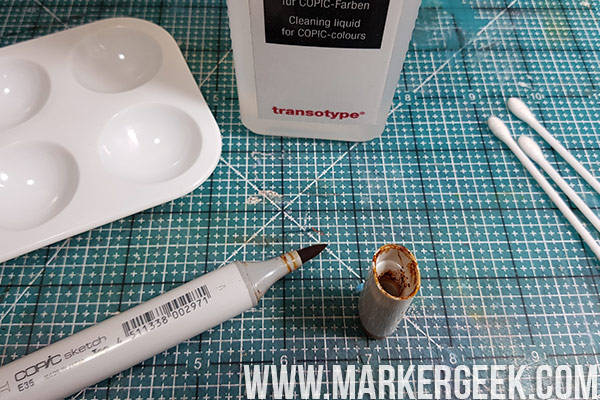
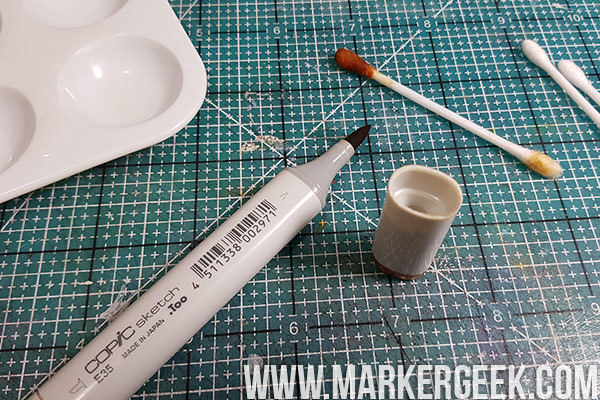
I pour a little of the solution or alcohol into a small dish or palette, dip a cotton bud into the solution and then wipe the plastic area near the nib and the inside of the marker cap with it.
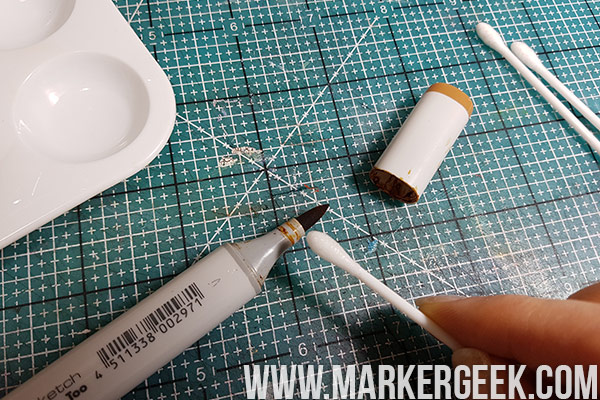
If a cap is really grungy I drop it into a little pot with enough solution to cover it and allow it to soak for a little while before wiping it out with a cotton bud.
Cleaning or Replacing Copic Nibs:
Copic nibs are replaceable, and there may well come a time when you absolutely need to replace a nib, if it has become worn through being removed frequently, or through constant use. Sometimes, however, you may be able to save yourself the expense of replacing the nib by simply giving it a good clean.
For nibs which are looking a little sticky, and which are not laying down ink well, try cleaning them in some of the Copic cleaning solution. I usually pop a small amount of the solution into a pot or dish and dip the nib into it, swirling it around a bit. Then I wipe the marker off and scribble on some scrap paper to remove the excess cleaning solution – the ink colour should return to normal after a few scribbles. I tend to do this cleaning step if necessary, before refilling the marker.
An alternative method for cleaning a nib, which might work a little better for you if the nib is really gunky, is to pop some cleaning solution in a resealable clear plastic bag, remove the nib from your marker, pop the nib in the bag with the solution and then gently smoosh it around. You may want to leave the nib to soak for a while in the solution too.
Join me next week for the final part of this mini-series!
Copic Videos:
If you would like to take a look at how I colour using Copic Markers, you can watch some of my colouring videos in the playlist below or over on my YouTube channel.
Over To You!
If you have any Copic tips please share! Especially if you have a great way to store the markers and refills. Let’s talk colour!
If you are posting your images online, we would love to see them on Instagram and all the platforms mentioned above. To make it easier for us to find you just use #markergeekmonday and/or #stampingbella as a hashtag. Even better tag me @markergeek and @stampingbella . We love it when you connect, so don’t be shy!
If you’re on Facebook join us in our private chat group Stamping Bella Sistahood to share your creations there and chat all things Stamping Bella related!
Until next time, HAPPY COLOURING!
MWAH
Elaineabella
Great explanation on how to refill Copics with ease.
Suggestion: Keep an acrylic block beneath the marker you’re refilling so that the drips (if any) land there.
The drip-age may dry, however it can easily come back to life with a Copic blender and be using to ‘paint’ in a small image or area.
I place a very large acrylic block under my marker when I refill, then slide it to the right and refill another marker. By the time I”m done I could have several ink spots to work with at another time.
Copic inks are so costly it’s a shame to waste it. I hope you try this method, and find like me, it’s WONDERFUL!
That’s a great idea! Thank you for sharing. 🙂
Thanks for this tutorial! Learned a lot.
Thank you so much for clear and easy-to-understand instructions and information. This made so much sense to me!
Wow, who knew Copic markers were so involved? Certainly not me, that’s for sure. I thought they were just like other markers in the respect that you really don’t have to care for them, you just use them. Unless your yellow marker got into a black for instance and ruined the tip, you just used them but never had to clean them.
Friends of mine in a card making group used them and I loved how they looked on their cards. They didn’t look like your basic markers and that’s why I bought some when they were on sale at SS stamps. I can’t afford to buy a whole bunch of them and then I have to learn how to use them to get the effects that my friends did.
I am going to save this so that when I get a whole bunch of them, more then I have now, I will know what to do with them and how to take care of them.
Thanks for sharing Elaine! I try to keep my Copics clean, but, with constant use, this is hard to do. Thanks so much for sharing your tips on cleaning the nibs. I will give it a try on a couple of mine that seem to be “sticky”. 🙂
Elaine this is a great blog post.One of the papers I have found that works well with Copic Markers is Hammermill Digital Color Cover 100lb. it is a little less expensive then the other papers, great if you teach classes.