


Happy New Year! Elaineabella here with the latest Marker Geek Monday post.
Today I’m sharing another video of one of the gorgeous Zodiac Girls released in early December. This time however, there’s a little extra useful info as you can watch me fixing a problem that occurred while colouring her!
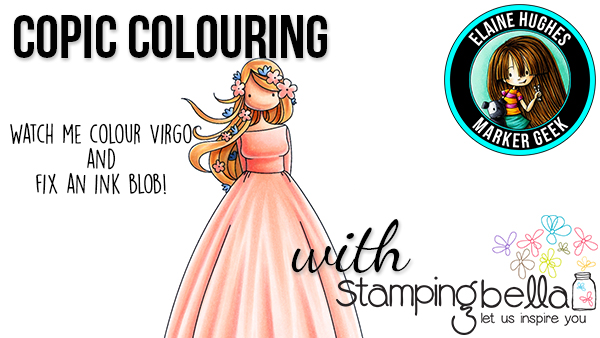
Copic Colouring Zodiac Girl Virgo:
Beautiful Virgo is another girl with a gorgeous dress, perfect for practicing how to create pleats and folds, or for paper piecing, or colouring more simply. She’s also a great multi-tasker – there’s no reason she couldn’t be used for all sorts of occasions and projects that are non-zodiac in theme!
As I mentioned above, the bonus with today’s video is that you get to watch how I deal with an ink blob on my coloured image! It’s so frustrating when colouring away merrily with markers, and all of a sudden a blob of ink drips on to your precious coloured image. It always seems to happen towards the end of colouring too, rather than at the start! When you’ve got some time invested in an image, it’s always worth trying to save it rather than throwing it away and starting again. A lot of issues can be fixed, or creatively covered. Watch the video to see how I fixed the problem.
Watch me colour Virgo below or in HD over on YouTube.
Stamp Used: Uptown Zodiac Girl Virgo (coordinating die also available)
Tips for Fixing & Avoiding Ink Blobs:
As they always say, prevention is better than cure! A couple of good tips to help avoid the dreaded ink blob:
- When refilling take care not to overfill your markers. Add ink slowly and stop as soon as the brush nib starts to go shiny.
- Keep an eye on your brush nib – if it looks especially shiny and juicy, take the cap off the other end for a little to help equalise the pressure inside the marker as you work or scribble the excess on some scrap paper.
If you do find yourself the victim of an ink blob attack:
- Quickly dab the area with a paper towel or absorbent cloth, this will help soak up any excess ink on the surface of the paper and stop it spreading further. I always have some paper towel on my desk, so I can grab it quickly.
- When the ink has dried, take the 0 Colourless Blender and start working on pushing the colour back. Don’t over soak the area with colourless blender as this will create a bigger mess. Use a dabbing motion and stop to let it dry every so often. You can also try popping a piece of paper towel underneath to help soak up the ink (in any case you should always have some scrap paper underneath your work).
- When you’ve removed as much of the offending colour as you can, assess and see if you can simply go back in with your original colours and fix it, or if you may need to go a little darker to help cover the problem. In the video above I was able to simply go back in with my original colours, with a darker ink blob I may have needed to opt for a darker look to cover it.
The paper you use will have an impact on how successful your efforts to correct errors using the 0 Colourless Blender are. The paper I use – Make it Colour Blending Card – is excellent, and I find that I can even remove a significant amount of red ink. This also applies to creating special effects with the Colourless Blender – ink will behave differently on different papers depending on the fibres of the paper. If you’re in the US XPress-It is also quite good. Neenah Classic Crest Solar White I have always had more trouble with for fixing mistakes and Colourless Blender techniques. TEST your papers and see how they react with the Colourless Blender, and bear the results in mind when the situation comes up!
Over To You!
If you try out the techniques shown in any of the posts with your Stamping Bella stamps, be sure to share! We would love to see the results and hear how you feel about them. Show off your creations in the comments below and even better, share your own favourite tips with us. Let’s talk colour!
If you are posting your images online, we would love to see them on Instagram and all the platforms mentioned above. To make it easier for us to find you just use #markergeekmonday and/or #stampingbella as a hashtag. Even better tag me @markergeek and @stampingbella . We love it when you connect, so don’t be shy! Make sure you use the #SpotThisStampingBella hashtag on social media if you’re happy for me to feature your work in my Spotted On Sunday posts!
If you’re on Facebook join us in our private chat group Stamping Bella Sistahood to share your creations there and chat all things Stamping Bella related!
Until next time, HAPPY COLOURING!
MWAH
Elaineabella
that’s amazing and why I prefer Copic markers….it’s what I call “learning from our mistakes”
beautiful coloring….thanks for sharing your talent
Thanks Elaine! Thanks for sharing and teaching. I so appreciate both.
Thanks for sharing and giving tips re: blobs. Just experienced the same thing. Can be a real downer. Loved how in the very end you could not even tell it was there. Thanks again.
That was amazing. When I saw the blob I thought you would have to alter the picture somewhat. But no, good as new.
Oh I have had that happen to me! I’ve learned to just uncap both ends when I am coloring….haven’t had a problem since! Thanks for your tips on cleaning up an ink blob! 🙂
I love your colouring. Great save!! Thank you for the blob tip 🙂