


It’s Monday again, in case you hadn’t noticed! If like me you’re a little stressed by the rapid pace at which the weeks are whizzing by, take a little time to lose yourself in colouring. It won’t slow time down, but it does help reduce stress!
If you’re joining us for the first time you may want to check out the previous Marker Geek Monday posts HERE.
This week we’re back to Copic Markers, and this post is packed with colour combos and tips, so grab a cup of your preferred beverage and settle in! Make sure you read right to the end to grab a bonus colour map for the Stamping Bella Cherry Chick stamp!
Many people complain about colouring with reds, and I’ll admit that they can be tricky. I love colouring reds and maybe that’s because they can be a little challenging. One of the problems you might be experiencing with reds is achieving a nice blend while maintaining depth and contrast. This is where shading with other colours can really help.
In the chart below you will see that I have taken one of my favourite Copic red combos and added shading with markers from other colour families.
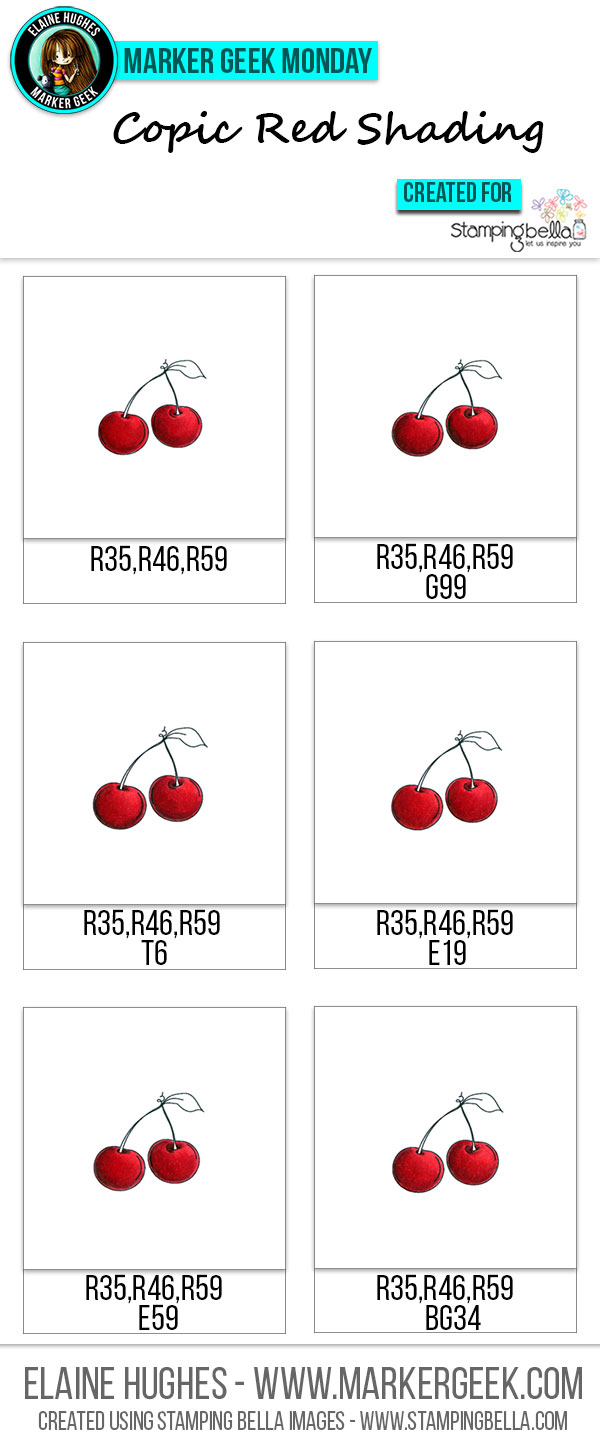
The cherry image used in my chart above comes as a separate stamp included with the CHERRY CHICK rubber stamp set.
You can see a similar chart over on my own blog HERE which also has a couple of other base red combos.
For more colour combos for the Cool Chicks check out my previous Marker Geek Monday post HERE.
Copic Reds – General Colouring Tips:
These tips may help if you’re having problems colouring with reds or other rich colours. They aren’t hard and fast rules, but may assist you in “troubleshooting”.
- Use a light touch: when colouring with markers in general (and most media) I find it best to use a light hand, and this is definitely the case when colouring with reds and other richly pigmented colours. If you are heavy handed and lay down too much colour at once blending becomes more difficult, and in laying down even more ink to blend you will run in to problems with the ink bleeding over the lines. Use a light touch and lots of layering.
- Feather/flick: rather than colouring in circles, lay colour down with a flicking/feathering motion. Don’t try to soak the paper evenly.
- Save reds till the end: if you plan on colouring other surrounding parts of your image in lighter colours, colour those areas first so that you can avoid accidentally pulling reds in to areas you don’t want them. At the same time, you may want to allow the lighter areas to dry completely before starting to colour the reds to avoid the red ink travelling into those areas.
- Avoid the lines: if you experience issues with reds bleeding over the lines even when using a lighter touch, try not colouring right up to the lines of your image. This will give the ink a “buffer zone” to move in.
- Don’t fuss with small areas: avoid trying to blend too much in small detail areas, it is almost guaranteed to end in a mess. You can get away without achieving a smooth blend in many small detail areas and avoid a headache in the process.
- Try a different paper: if you are having real difficulties working with reds, you may want to try out some different papers. Softer more absorbent papers will tend to bleed more.
- Adjust your colours: if you are having to lay down a lot of ink to blend your chosen colours, you might find tweaking the colour combo helps. Test out some alternatives and see if they play together better. The more ink you are having to lay down to achieve a reasonable blend, the more likely you are to experience issues with bleeding.
I work by adding a base layer of my lightest red shade, then using my shadow colour to lay down the shading followed by my darkest red shade, then the medium red and back to the lightest red again (I usually repeat the last two steps until I am happy). I use a light hand with each layer, and I try not to go over the darkest areas too much. In very small areas you may wish to start with your darkest shade and work backwards (I talked about this in my hair combos post HERE).
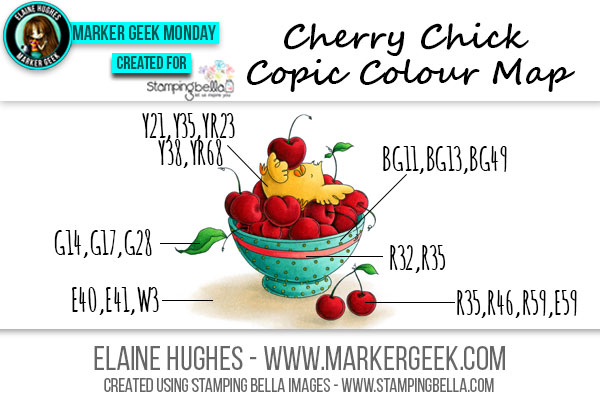
While I was colouring cherries I decided to colour up the entire CHERRY CHICK image again. Love this stamp set, it is perfect for some really fun summer cards and projects, and it presents a great opportunity to play with RED and really get some practice in! Here’s a bonus colour map for you (see HERE for instructions on obtaining the main colour maps for Stamping Bella images).
Have a fantastic, colourful week!
MWAH!
~Elaineabella
Thanks for the coloring tips. I’m such a novice.
We all start somewhere, Susan! Hope the tips help. Enjoy the process and just keep practising. The more you colour, the better your colouring will become!
Oh thanks so much for sharing Elaine! You have given me some more color combination options! 🙂
So happy to hear that, Nancee! Happy colouring!