


I love Marker Geek mondays.. do you? If you do, just take a mo’ (i love that..) to leave a comment down below.. I’m sure it would make Elaineabella feel so good 🙂
Here we go!
There’s more than one way to skin a cat ahem… colour a bear! I’m here to share three simple ways to colour one of Stamping Bella’s adorable Stuffie images. Today’s Marker Geek Monday graphic features Harry the Stuffie Gets Happy Mail . I have coloured him using Copic Markers, but the techniques discussed should work for any alcohol based markers that you have. I have supplied the Copic marker combination I used in the graphic below for those of you that do have Copics.
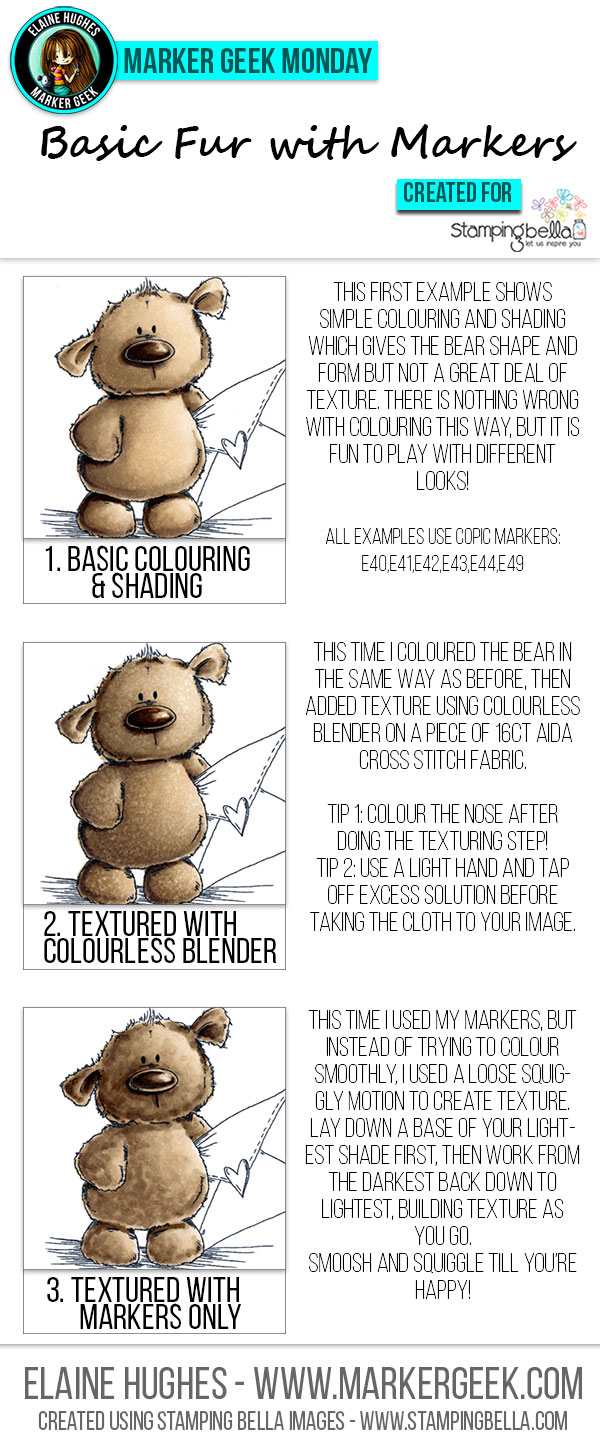
The first example is, as noted, just coloured and shaded with markers as normal with no special techniques. There is absolutely nothing wrong with colouring your Stuffies or other similar images this way, they look just as adorable like this, but it’s fun to play right? 😉
The second example shows Harry the Stuffie coloured in the same way as the first example, then textured with colourless blender solution (I simply used a Copic Colourless Blender refill) on a piece of textured fabric. The technique is really simple, you apply the colourless blender to the fabric, test and dab off excess on a piece of scrap paper then gently apply to the coloured image.
- Leave colouring of areas like Harry’s nose to the end, to avoid accidentally adding texture where it isn’t desired!
- Go lightly and gently, it is better to build up the texture by going back in stages than it is to go heavy with the colourless blender solution and end up with a blotchy mess!
- Experiment on a piece of scrap paper – see how long you need to hold the fabric to the paper to get the desired effect (not long – tap/dab and wait a few secs as the blender solution works its magic).
- This colourless blender technique works by pushing the colour around to create light areas. Test out some different fabrics to get different results. I used 16ct aida cross stitch fabric, but a textured rag/flannel works well too. Play around with what you have on hand.
The third example is quite therapeutic and uses just your markers to create a textured look that works really nicely for Stuffies!
- Rather than colouring with a flicking motion or in smooth circles, try using a loose squiggly motion.
- Practice on a piece of scrap paper.
- Create a base with your lightest shade, then using your darkest shade create some dabs and squiggles. Don’t think about it too much, be loose and fairly free with it (practice really helps with this). Work back down from your darkest shade to the lightest, and repeat where necessary. The idea is to create a smooshy, plushy look.
- You can add extra definition and depth to shadow areas at the end.
That’s it! These are by no means the only ways to colour your Stuffies, but hopefully the examples shown will give you some inspiration to play! Have a go and let us know how you got on by sharing your work here in the comments section, over in the Stamping Bella Sistahood chat group on Facebook, directly on the Stamping Bella Facebook page or on Instagram by using the tag #markergeekmonday . We love hearing from you and sharing the enthusiasm for Stamping Bella!
MWAH!
~Elaineabella
Thanks so much for these postings. They are so helpful! I’m going to try this tonight on my Easter bunnies.
Ah, great Carol! Happy colouring!
love these tutorials! thanks!
Great tutorial! Stamping Bella images will all be colored
perfectly because of you! Thank you.
These tutorials are really great. Thanks.
These tutorials are so helpful! I know they take alot of time and I so appreciate your efforts 🙂
I love Mondays now because I know there will be a Marker Geek Monday inspiration :). I love this little bear and I have this little bear, so clearly I need to try these 3 different techniques! Thanks Elaineabella!!!
You so do Lesliebella! 🙂 I want to see your results!
Thanks Elaineabella for your wonderful tutorials! Sure gives Mondays a lift.
Ah, I’m so glad! We all need a little cheering up on Mondays, I know reading the comments here gives me a boost!
Thank you for this tutorial. I am a visual person — is their a tutorial I can watch for this?
Hi Debbie. Not right now, but if you keep following Marker Geek Mondays here, you may well find that a video pops up in the future. At the moment I’m doing what time allows!
I love marker geek Monday’s thank you fur your lesson this week 😉
I am pretty good with shading with colored pencils. You should see the leaves I did on a coloring book page. Markers, not so much, so I am glad you are showing us how to do this. I don’t have this stamp but I do have something with a bear so this will be helpful. Thank you for showing us how to use our markers! I plan to put your pages to good use.
It’s all practice, Gail, that’s all. Totally not restricted to bears – these techniques will work on anything you might want to add some fluffy/furry/fuzzy texture too. When I coloured the product image for Stamping Bella Mimi the Chick I used the second technique, so it works for chicks too. 😉
Thanks Elaine! You’re the best w/tutorials and tips! Would you consider a quick, live lesson on FB sometime? That would be wonderful!
Hey Linda! 🙂 Ahh, thank you! I’m just so happy you’re enjoying them. I don’t know about live, I’m the shy retiring type. 😉 But when I get time this year I hope to get back to doing some colouring videos.
LOVE LOVE LOVE MARKER GEEK MONDAYS!! Thanks so much Elaine for the wonderful tutorial – you are a very talented artist!
Amazingly helpful- THANK YOU SO VERY MUCH!!!
Oh thanks so much for sharing! I’ve used the colorless blender technique before, but have not tried cross stitch fabric before. I’m going to have to try that! The third technique looks like fun! 🙂
Thanks to your tutorial I will be able to colour ‘furry friends’ perfectly.
Once again thank you