


Time for DT Thursday with another fun card making project from Sandiebella to help us get through to the weekend! Click on through for Sandiebella’s fab step by step tutorial showing how to create a gorgeous Wiper Card featuring one of our fabulous Bella V2.0 stamps!

Wiper Card Tutorial:

Supplies:
Cut two 4 1/4″ x 8 1/2″ pieces of card, for your card base
Cut one 1 1/2″ x 3″ piece of card, for your “wiper”

Prefold the scored lines as shown, and crease well with a bone folder.

Repeat for the other side

Taking the 1.5″ x 3″ piece of card, mark down 1.5″ with a pencil

Score diagonally from the top right corner to the pencil mark.

Cut a piece of card 1 1/4″ x 1 1/4″ and a piece of patterned paper slightly smaller. Adhere the paper to the card.

Turn the wiper over, and around, so that the diagonal score is on the bottom, as shown. Adhere the panel to the top section.

Apply tape or liquid glue to the bottom triangle of the scored section.

Take one of the card base pieces and lay it down with the score lines to the right. This is the card front. Adhere the strip, image facing down, between the two score lines.

Line up the end of the diagonal score with the edge of the card front.

Apply tape to each end.

Place the second 4 1/4″ x 8 1/2″ piece of card over the card front. Make sure the score lines are on the left.

Turn the card over. The wiper should be facing forward,

Stamp the image onto white card.

As the image is tall, measure to size and cut.

Colour using your preferred medium.

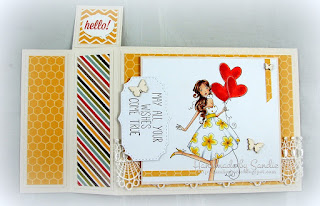
Mat the image onto some cream card and mount on the front of the card,

Embellish as desired.

Over To You!
Hopefully I’ve inspired you to sit down and try your hands at this lovely project.
We also encourage you to share your personal favourite Stamping Bella creations with us. We LOVE to see what you’ve been creating with Stamping Bella stamps.
Another way to connect is by joining us in the Stamping Bella Sistahood Facebook Group and share your pictures.
If you are posting your images online, we would love to see them on Instagram and all the platforms mentioned above. To make it easier for us to find you just use #stampingbella as a hashtag. We love it when you connect, so don’t be shy!
Until next time, HAPPY STAMPING!
Oh how fun! I’m going to have to give this a try! Thanks so much for sharing and giving such great step by step instructions! 🙂
This looks a little complicated for me and I don’t have some of the things you used to make this card. You did use my favorite color, yellow, in your card and you get 10 extra points for that1 LOL I love that stamp and how you colored your card. Someone is going to love getting that card.