GIFT CERTIFICATE!

Treat someone special to a Stamping Bella

Click to continue

DT Thursday: Create a Fun Peek-a-BOO Card with Sandie!

It’s time for another DT Thursday post from Sandiebella. This week Sandie is showing us how to create a fun Peek-a-BOO card! We’re heading into Halloween, so Sandie has used one of our awesome new Halloween themed stamp sets, but this project could easily be adapted for other occasions (you know, like that other holiday that is creeping ever closer). Click through for the full step by step tutorial.

Stamping Bella DT Thursday - Peek-a-BOO Card. Click through for the full step by step tutorial!

Peek-a-BOO! Card

Stamping Bella DT Thursday - Peek-a-BOO Card. Click through for the full step by step tutorial!

Supplies:

Black Card
Halloween Themed patterned papers (Authentique Moonlit used)
Oval Dies (no wider than 2 3/8″, to create the windows and one larger to create the frames. Spellbinders Petite Ovals Large used)
Scoring board & bone folder
Repositionable tape
Wet glue
Halloween themed embellisments/dies

Step by Step:

Cut out 3 pieces of black card:
5 1/2″ x 8 1/4″
5 1/2″ x 8 1/2″
5 1/2″ x 5 3/4″
Cut out 3 pieces of patterned paper:
5 3/8″ x 5 3/8″
Two at 5 3/8″ x 4 1/8″

Stamping Bella DT Thursday - Peek-a-BOO Card. Click through for the full step by step tutorial!

Score the 5 1/2″ x 8 1/4″ piece of black card at 2 3/4″ and mountain fold along the score line. (fold underneath)
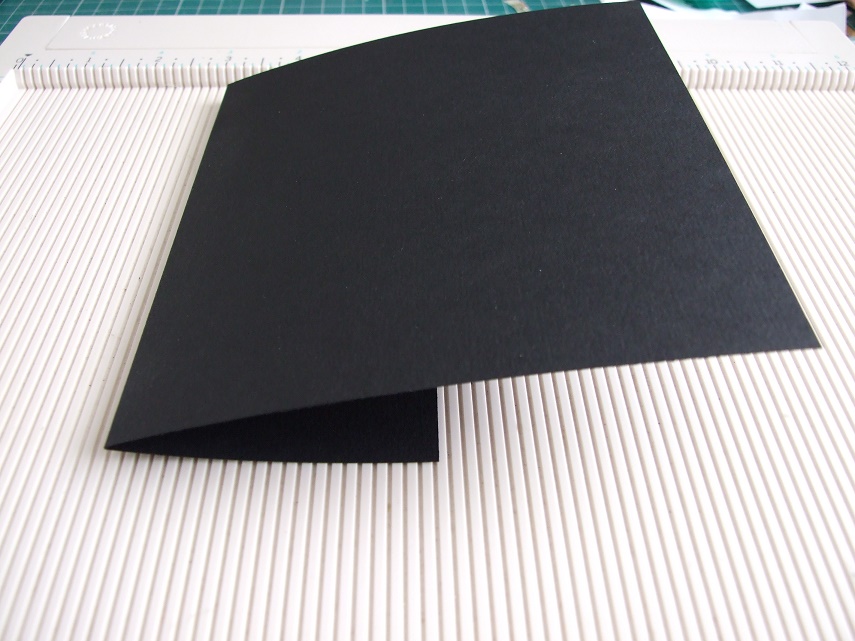
Stamping Bella DT Thursday - Peek-a-BOO Card. Click through for the full step by step tutorial!

Stamping Bella DT Thursday - Peek-a-BOO Card. Click through for the full step by step tutorial!
Adhere the 5 3/8″ x 5 3/8″ patterned paper to the card as shown. This is for the card front.

Stamping Bella DT Thursday - Peek-a-BOO Card. Click through for the full step by step tutorial!

Score the 5 1/2″ x 8 1/2″ piece of black card midway at 4 1/4″ and valley fold along the score line.
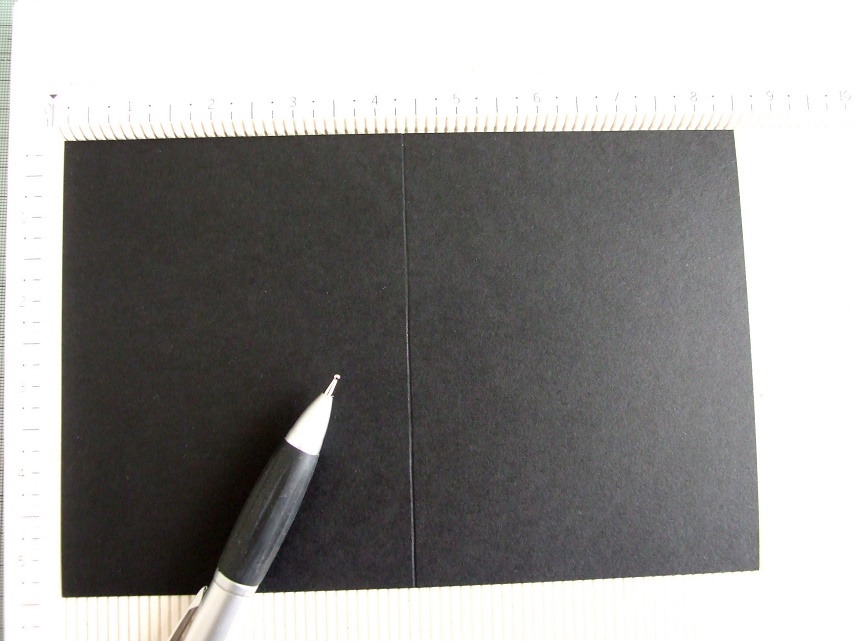
Stamping Bella DT Thursday - Peek-a-BOO Card. Click through for the full step by step tutorial!

Adhere the two pieces of 5 3/8″ x 4 1/8″ patterned paper to the card as shown. This is the inside of the card.

Stamping Bella DT Thursday - Peek-a-BOO Card. Click through for the full step by step tutorial!

Score the 5 1/2″ x 5 3/4″ piece of card at 5 1/2″, and fold along the score line. This is back of the card.
Stamping Bella DT Thursday - Peek-a-BOO Card. Click through for the full step by step tutorial!

Turn the card front upside down and place the oval die, with the blade side down, centered between the top and bottom, with the cutting blade flush against the edge of the folded panel. Secure with removable tape. Unfold the 2 3/4″ flap of card from underneath the edge of the Die and run through the Cuttlebug, or similar die-cutting machine.
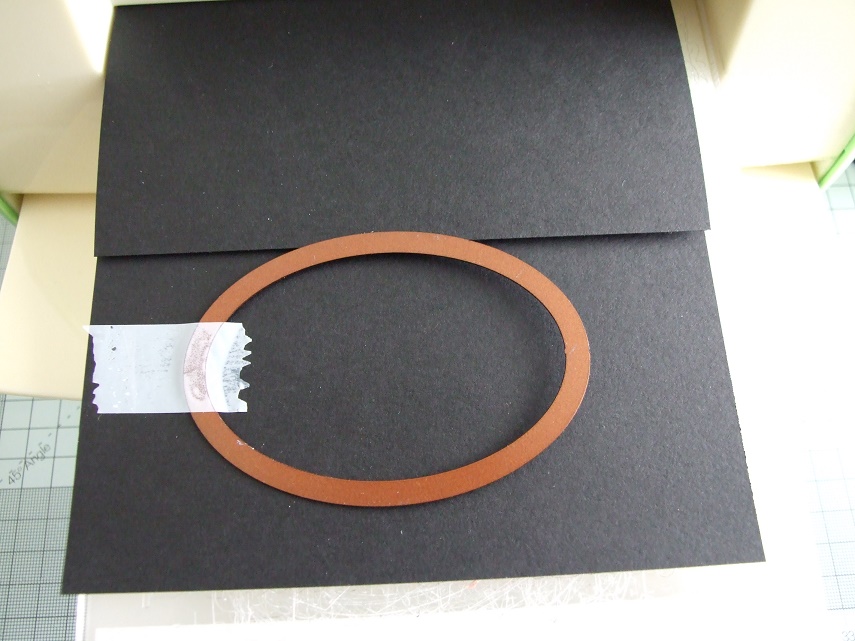
Stamping Bella DT Thursday - Peek-a-BOO Card. Click through for the full step by step tutorial!

Remove the oval, but leave the die in place. (Window #1)

Stamping Bella DT Thursday - Peek-a-BOO Card. Click through for the full step by step tutorial!

Take the inner card piece and place it back-to-back with the card front. Be sure to align the edges.

Stamping Bella DT Thursday - Peek-a-BOO Card. Click through for the full step by step tutorial!

Using a pen, trace the inside edge of the oval die lightly.

Stamping Bella DT Thursday - Peek-a-BOO Card. Click through for the full step by step tutorial!

Remove the oval die from the card front and place it precisely around the drawn oval on the inner card. Use the removable tape to secure it.

Stamping Bella DT Thursday - Peek-a-BOO Card. Click through for the full step by step tutorial!

Keeping the inner card piece folded in half, run through the die-cutting machine to cut the window. (Window #2)

Stamping Bella DT Thursday - Peek-a-BOO Card. Click through for the full step by step tutorial!

Open the inner card. If your paper/card was thin enough it may have cut through both sides of the inner, but if not, there will be a groove from the oval die on the right-hand side. Place the die into the groove and run it though your die-cutting machine again. (Window #3)

Stamping Bella DT Thursday - Peek-a-BOO Card. Click through for the full step by step tutorial!

Refold the inner card and adhere the front of the card, aligning all the edges.

Stamping Bella DT Thursday - Peek-a-BOO Card. Click through for the full step by step tutorial!

Stamping Bella DT Thursday - Peek-a-BOO Card. Click through for the full step by step tutorial!

Apply glue to the 1/4″ flap of the card back and adhere to the back of the inner card that has Window #3.

Stamping Bella DT Thursday - Peek-a-BOO Card. Click through for the full step by step tutorial!

Colour your images and fussy cut. (Alternatively, you can stamp the images and cut out using the oval die you used for the windows.)

Stamping Bella DT Thursday - Peek-a-BOO Card. Click through for the full step by step tutorial!

Take the ovals you cut earlier,

Stamping Bella DT Thursday - Peek-a-BOO Card. Click through for the full step by step tutorial!

Apply glue to one of the ovals. Close the card and position the oval into the window. Press firmly to adhere.

Stamping Bella DT Thursday - Peek-a-BOO Card. Click through for the full step by step tutorial!

Open the card and adhere the second oval through the window.

Stamping Bella DT Thursday - Peek-a-BOO Card. Click through for the full step by step tutorial!

Adhere the images onto the ovals.

Stamping Bella DT Thursday - Peek-a-BOO Card. Click through for the full step by step tutorial!

Stamping Bella DT Thursday - Peek-a-BOO Card. Click through for the full step by step tutorial!

When you open and close the card, the images should change.

Stamping Bella DT Thursday - Peek-a-BOO Card. Click through for the full step by step tutorial!

Taking a slightly larger die than you used for the windows, cut 3 ovals. Centre the die you used on the windows on the larger ovals and run through the cutting machine.

Stamping Bella DT Thursday - Peek-a-BOO Card. Click through for the full step by step tutorial!

This creates 3 frames for your windows. Set the smaller ovals aside for a future project.

Stamping Bella DT Thursday - Peek-a-BOO Card. Click through for the full step by step tutorial!

Adhere a frame to each of the windows.

Stamping Bella DT Thursday - Peek-a-BOO Card. Click through for the full step by step tutorial!

Embellish the outside and inside as desired.

Stamping Bella DT Thursday - Peek-a-BOO Card. Click through for the full step by step tutorial!

Stamping Bella DT Thursday - Peek-a-BOO Card. Click through for the full step by step tutorial!

Over To You!

Hopefully I’ve inspired you to sit down and try your hands at this lovely project.

We also encourage you to share your personal favourite Stamping Bella creations with us. We LOVE to see what you’ve been creating with Stamping Bella stamps.

Another way to connect is by joining us in the Stamping Bella Sistahood Facebook Group and share your pictures.

If you are posting your images online, we would love to see them on Instagram and all the platforms mentioned above. To make it easier for us to find you just use  #stampingbella as a hashtag.  We love it when you connect, so don’t be shy!

Until next time, HAPPY STAMPING!

Post navigation

3 comments

  1. I’ve tried to make one of these cards before but wasn’t happy with how it came out. These instructions are great! They showed me where I went wrong on the first one I made. I’m going to try this again! Thanks so much for the great instructions and for sharing! Bookmarked!! 🙂

  2. I don’t have a die cutter but I think I could do it with my biscuit cutter, a glass or a plastic lid to cut the hole. My mom gives me all her scrap paper from work that they would have to shred so I can use it for stuff like this and not waste my good paper. I can use whatever I cut out as templates and mark them so the next time I make this card, I’m not wondering which thing to use to cut out the circles. I never thought I could do this without a die cutter but as I look at it, I see that I can! Thanks for the inspiration!

Leave a comment

Your email address will not be published. Required fields are marked *