Wonderful Wednesday at Stamping Bella with Kelly Latevola: Multi-Coloured Embossing Paste Background feat. Tiny Townie Raven!

Hey folks, Elaineabella here! Today I’ve got another fantastic post for you from our Wonderful Wednesday guest for March… KELLY LATEVOLA

If you missed Kelly’s Irish Chicks card make sure you check it out HERE, and to see her Gnome on a Swing card click HERE. For today’s post, click through and settle in to watch another awesome video.

Wonderful Wednesday at Stamping Bella with Kelly Latevola!

Continue reading

Wonderful Wednesday at Stamping Bella with Kelly Latevola: Gnome on a Swing & Zig Clean Color (with video)

Hey folks, Elaineabella here! Today I’ve got another fantastic post for you from our Wonderful Wednesday guest for March… KELLY LATEVOLA

If you missed Kelly’s Irish Chicks card last week make sure you check it out HERE. For today’s post, click through and settle in to watch another awesome video.

Wonderful Wednesday at Stamping Bella with Kelly Latevola!

Continue reading

Wonderful Wednesday at Stamping Bella with Kelly Latevola (and a video)!

Hey folks, Elaineabella here! I’m excited to share today’s post with you. Wonderful Wednesdays are back, and this month we’ve got an awesomely inspiring guest for you…drum roll please…

KELLY LATEVOLA is joining us every Wednesday this month, bringing her fabulous brand of crafty inspiration to Stamping Bella. I’m sure you’ll agree, Kelly’s cards are a bright splash of colour, and her videos are always inspiring and often entertaining. Make sure you watch the video, leave her some love in the comments below, and visit her on her own blog (take a drink…and some snacks…you’ll be there a while). Read on to see what Kelly created for us this week and how she did it – I’m still trying to reattach my jaw.

Wonderful Wednesday at Stamping Bella with Kelly Latevola!

Continue reading

It’s our last WONDERFUL WEDNESDAYS WITH Francine Vuilleme.. FOR NOW LOL

Hello everyone! It’s Francine from Switzerland here with one last guest designer spot for Stamping Bella’s Wonderful Wednesday!

I’ve created this winter card:

www.stampingbella.com: Rubber stamp used WINTER BACKDROP, card by Francine Vuilleme

I decided to use the wonderful Winter Backdrop stamp as a main and focal image. I first made a top-folded card base from white cardstock. I sponged the top of the card front with blue Distress inks to get a beautiful gradient from blue to white. I then stamped the image on white cardstock, colored it, created a gradient for the sky using Distress inks and blending tools too and cut around to get a square image. I die cut two scalloped frames from white cardstock that I glued on top of each other and attached the square image behind the frames. It looks a bit like a postage stamp, right? I fixed the frame to the sponged card front with foam pads for more dimension.

Did you see January’s stamp of the month? It’s the Winter Backdrop stamp I used on my card! That means: 25% off, all month long! Yay! Don’t miss the offer! If you want to get the stamp, it’s now or never LOL!

Spotlight On Stamping Bella Stamp of the Month January 2018 Winter Backdrop

That’s all for me now! Thanks so much for all the lovely comments you’ve left on all my guest spots during the last weeks! I enjoyed playing with these fabulous stamps. Thanks also to Emily for having me as a guest and for being so generous!

Hugs from Switzerland!

Francine

it’s WONDERFUL WEDNESDAYS with FRANCINE VUILLEME!

Hello everyone! It’s Francine from Switzerland here! First of all: HAPPY NEW YEAR! I hope you had a fabulous New Year’s Eve.

For my first post this year, I have a holiday card to share with you:


I absolutely love walking in the snow with my Moon Boots and having snowball fights. This is probably why this rubber stamp (called The Littles Snowball Girl) immediately caught my attention. The sentiment is from the Holiday Sentiment rubber stamp set. I went for a clean and simple design using dotted patterned paper to make the image pop against the background. I stamped the snowball girl on cardstock, colored her and cut around, keeping a white border at the bottom. I glued dotted paper to a top-folded card base and adhered the image with the white border to the card front with foam pads for more dimension and interest.

It’s all for me today! I have one more card to share with you next Wednesday.

Best wishes for 2018 to all of you!

Francine


It’s WONDERFUL WEDNESDAYS with FRANCINE VUILLEME

Hello everyone! Francine here! I hope you had a fabulous Christmas! Did you get a lot of crafty gifts and stamps for Christmas? LOL


Today, I have a fun winter project to share with you featuring the Little Bits Figure Skaters. Here is what I came up with:


www.stampingbella.com:  rubber stamp used: Little bits FIGURE SKATERS and HOLIDAY SENTIMENT SET, card by FRANCINE VUILLEME


I decided to create a scene showing a reflection on the ice. This ice reflection stamping is a super fun and easy technique! I started by creating a mask for the skater using masking paper. I then stamped the skater in black ink on white cardstock and masked him. I also drew a horizon line to divide the iced surface and the sky. Next, I stamped the skater in black ink on a transparent sheet and I pressed the sheet onto the white cardstock below the skater (upside down) to create the reflection. I sponged the sky using various blue Distress inks and I removed the mask. I colored the skater as well as the reflection and the iced surface. I heat embossed the wonderful sentiment from the Holiday Sentiment set with white embossing powder. The white sentiment really pops against the blue background. I added a tiny orange heart for more cuteness. To finish off the card, I matted the scene on white cardstock and a blue card base.


I hope you enjoyed this technique! Let me know if you give it a try!


That’s all for me this year! LOL See you in January! I wish you all the best for 2018! Happy New Year!


Francine

It’s WONDERDFUL WEDNESDAYS WITH FRANCINE Vuilleme!

Hello everyone! Francine from Switzerland here! Have you been busy creating Christmas cards? I hope you have a lot of fun using all these super sweet Christmas stamps.

Today, I have a new project for you featuring the Little Bits Snowman and the Little Bits Sledding sets:


I decided to create a sponged background to make the white snowman pop. I used the Sunburst stencil from Wendy Vecchi that I sponged with teal and blue Distress inks using blending tools. Next, I colored and cut the girl and the snowman (LITTLE BITS SNOWMAN SET, and  LITTLE BITS SLEDDING SET ) I adhered them with foam pads to the sponged background for more dimension. I stamped the “merriest wishes” sentiment from the Holiday Sentiment set in black ink on a white banner and fixed it with 3D adhesive squares below the characters. To finish off my card, I added three enamel dots. I really love this green and teal color combination for winter or non-traditional Christmas cards. What is your favorite color combination for Christmas and winter cards?


I hope you’ve got inspired by this project! Happy holiday season to all of you and see you next week!


Francine

it’s WONDERFUL WEDNESDAYS with the WONDERFUL Francine Vuilleme :)

Hello everyone! Francine from Switzerland here! I’m so happy and excited to join Stamping Bella as a guest during the next few weeks! Thanks so much to Emily for having me!


I’ve created two clean and simple Christmas cards that I want to share with you today. Here is what I came up with:


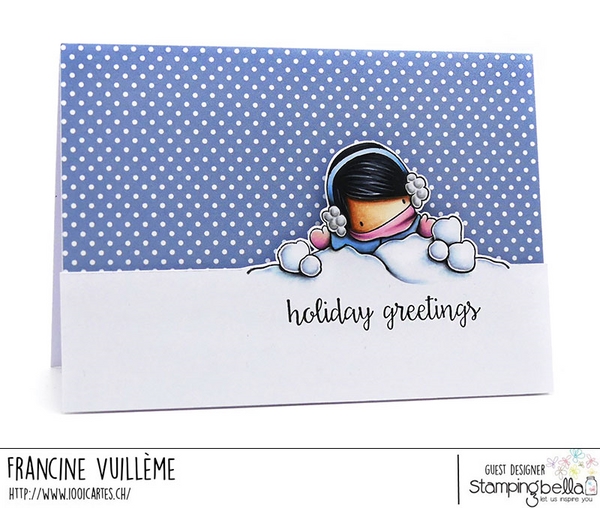
For the first card, I used the super cute Santa from the Little Bits Santa’s Gifts set. As I really like traditional Christmas colors, I decided to go for a red and white combination. I create a horizontal design made of three lines with the color highlight in the center to keep the card clean. The red dotted paper adds interest and makes the Santa stand out against the background. I also used some Christmas baubles to emphasize the feeling of holiday season. These baubles are from the Little Bits Set of Elves rubber stamp set. To finish off my card, I stamped the “Warmth×Joy×Happiness” sentiment from the Holiday Sentiment set in black ink. As you can see, you don’t have to use various colors or element on a card for maximum impact. Keeping white space helps to focus on the character itself.

———————————————————————————————————————————————————–

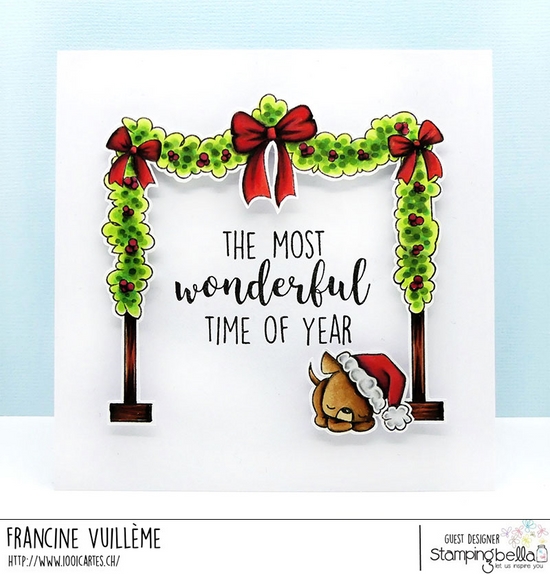
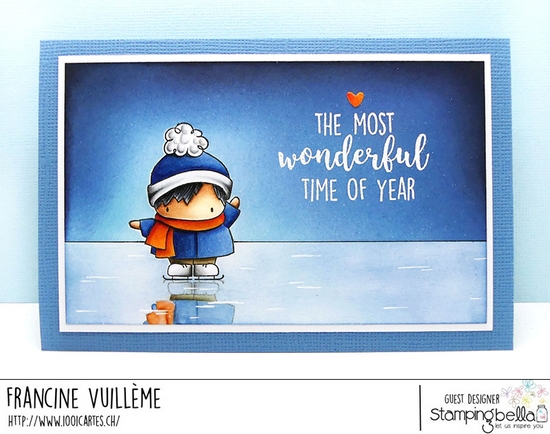
For the second card, I decided to put the sentiment as the focal point and to highlight it using “accessories”. The Christmas fireplace mantle from the Little Bits Santa’s Mantle set I used on this project is meant to be for the Fireplace Backdrop. I drew some wooden “legs” to use the garland as a stand-alone element. I first stamped the beautiful sentiment from the Holiday Sentiment set in black ink onto a white top-folded card base. I colored and cut the garland with scissors (but you can find the matching “CUT IT OUT” die here to make it easier) , as well as the dog from the Little Bits Santa Kids and Pets set. The sweet sleepy dog adds so much cuteness! (“Cut it out die” can be found here )  I adhered the garland and the dog with foam pads to the card base for more dimension. As for the first project, you don’t have to use a lot of elements to embellish a card. Try to think out of the box and play with all funny accessories you can find in the sets. Not only the main characters or critters are worth it.


I hope you’ve enjoyed this post! Happy holiday crafting and see you next week with a new project!


Francine


It’s WONDERDFUL WEDNESDAYS with MICHELLE SHORT aka THE CARD GROTTO!

Hello there, Michelle here and I am back with my final card for Stamping Bella this month. I have had so much fun creating my cards and this card that I am sharing today is no exception. I am using the Under The Sea Creatures along with the coordinating “Cut It Out” dies, Under the Sea Backdrop and the Under The Sea Sentiments Set.


Stamping Bella WONDERFUL WEDNESDAYS WITH MICHELLE SHORT- rubber stamps used: UNDER THE SEA CREATURES, UNDER THE SEA BACKDROP, UNDER THE SEA SENTIMENTS, UNDER THE SEA CREATURES "CUT IT OUT" DIES


I started off by stamping the Under The Sea Backdrop onto a panel of white cardstock. The panel was then coloured with Copic Markers to create the sea for my creatures to be in. I love that the backdrop is already made for you, no masking required! I took the sentiment from the Under The Sea Sentiments Set and stamped this onto the background using black ink. I did a little masking so that I could separate the words to fit the scene.


Stamping Bella WONDERFUL WEDNESDAYS WITH MICHELLE SHORT- rubber stamps used: UNDER THE SEA CREATURES, UNDER THE SEA BACKDROP, UNDER THE SEA SENTIMENTS, UNDER THE SEA CREATURES "CUT IT OUT" DIES


I stamped the Under The Sea Creatures onto white cardstock and coloured these with Copic Markers. They were then cut out using the Under The Sea Creatures “Cut It Out” Dies. I added the background flat onto a white A2 card base and then added the creatures on top with foam tape. To finish off, I added a little Crystal Glaze to the bubbles.


It has been an absolute pleasure guest designing with Stamping Bella this month. A huge thank you to Emily and her team for having me. Thanks so much for visiting today. I hope you have a fabulous day!